ESP32: one web page to replace five remotes (web IR blaster)
Build an ESP32 web-server IR blaster with a page of buttons for TV, soundbar, and AC. Capture codes with the IR receiver, replay them over Wi-Fi from any browser.
The IR transmitter tutorial built the sending half: an ESP32 with an
IR LED that replays captured codes when a URL gets hit. The
limitation showed up the second I handed it to my family: nobody is
going to bookmark http://192.168.1.42/tv/power or run curl from the
couch. This tutorial adds the missing piece, a web page of actual
buttons served from the ESP32 itself, and turns the blaster into the
one device the whole household can use (my coffee table went from
five remotes to one phone screen: TV, soundbar, fan, and two AC
units).
The trap: people serve a page, click a button, and get a blank screen, because the ESP32 sent the IR burst and the browser is still waiting for the page to redraw. The fix is knowing which half of the request cycle you are in. The ESP32 serves the page once; the buttons then fire small AJAX calls so the browser never navigates away. Get that split wrong and you will spend an evening rewriting a perfectly working server.
What you need
Needed
| Item | Qty | Purpose | Est. cost |
|---|---|---|---|
| ESP32 dev board (WROOM-32 devkit) | 1 | serves the page and fires the IR codes | $10 |
| 940 nm IR LED (5 mm) | 1 | the transmitter diode, same kind inside remotes | $1 |
| 2N2222 or BC337 NPN transistor | 1 | switches the LED from 5 V; the range fix | $0.50 |
| 220 ohm resistor | 1 | limits LED current | $0.10 |
| 1k ohm resistor | 1 | limits transistor base current | $0.10 |
| VS1838B IR receiver module | 1 | captures codes from your existing remotes first | $1 |
| Jumper wires (6) | 6 | LED drive circuit and receiver wiring | $2 |
| Breadboard | 1 | prototyping the drive circuit | $3 |
The IR receiver is on this list even though the finished build never uses it, because you need it once, up front, to capture each remote’s codes (that capture flow is Step 1 of the IR transmitter tutorial, and there is no shortcut around it: every remote’s hex values are its own).
Nice to have
- Soldering iron + solder: for a permanent install, solder the LED pigtail and transistor leads instead of breadboarding them.
- Helping hands: holds the LED and transistor while you solder.
- Iron stand + soldering mat: the standard safety pair.
- Anti-static wristband: the LED is cheap, the ESP32 behind it is not.
- Magnifying goggles: telling the LED’s long leg from the short one before soldering it backwards.
- Wire stripper: prepping the pigtail.
- Multimeter: verify the 5 V rail and LED polarity before blaming the code.
- Phone camera: shows the IR LED flash as a purple dot on screen, which is the fastest “is it firing at all” test there is.
Wiring
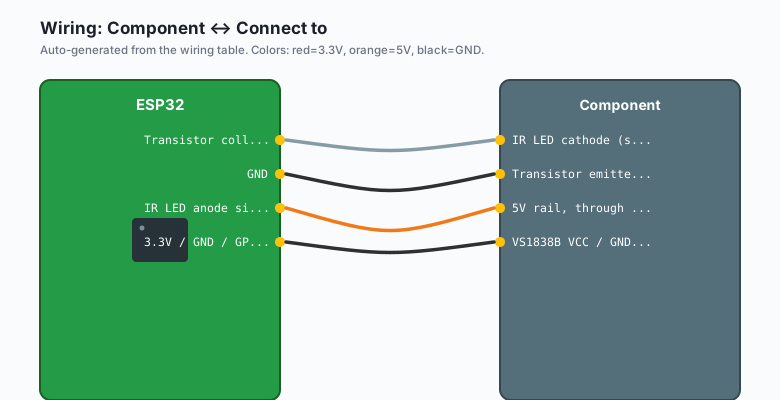
Same drive circuit as the transmitter tutorial, plus the receiver only during the capture step.
| Component | Connect to |
|---|---|
| IR LED cathode (short leg) | Transistor collector |
| Transistor emitter | GND |
| Transistor base | GPIO 12, through the 1k ohm resistor |
5V rail, through 220 ohm resistor | IR LED anode side |
VS1838B VCC / GND / OUT | 3.3V / GND / GPIO 4 (capture step only) |
A bare GPIO driving the LED reaches about one meter. The transistor stage is what buys the three-meter room-crossing range. Do not skip it, and do not swap the 220 ohm for a 1k ohm: weak LED current is the number one cause of “works on the desk, not in the living room.”
Aim the LED the same way the original remote points: at the device’s IR window, taped in place for a permanent install. Most field failures are aiming, not electronics.
Install
In the Arduino IDE: Sketch >> Include Library >> Manage Libraries >> search IRremoteESP8266 by David Conran et al. Install it. It both sends and receives, so capture and replay use the same library. Everything else (the web server, the Wi-Fi) is already in the ESP32 core.
The code
Step 1: capture the codes
Run the receiver sketch from the IR receiver tutorial, press every
button you want on the web page, and write down protocol and value
for each (e.g. NEC 0x20DF10EF for power on one LG TV). Label them
carefully; a code captured from a repeat frame will work in
mysterious ways later.
Step 2: the blaster page
#include <IRremoteESP8266.h>
#include <IRsend.h>
#include <WiFi.h>
#include <WebServer.h>

const uint16_t IR_PIN = 12;   // transistor base via 1k
IRsend irsend(IR_PIN);
WebServer server(80);

// Captured with the receiver sketch, one per button you need
const uint64_t TV_POWER  = 0x20DF10EF;   // NEC
const uint64_t TV_VOLUP  = 0x20DF906F;
const uint64_t TV_VOLDN  = 0x20DF708F;
const uint64_t BAR_POWER = 0x00FF02FD;
const uint64_t AC_OFF    = 0x8F710BE;    // example 28-bit AC code

const char PAGE[] PROGMEM = R"=====(
<!DOCTYPE html><html><head><meta name=viewport
  content="width=device-width,initial-scale=1">
<title>Remotes</title>
<style>
body{font-family:sans-serif;text-align:center;margin-top:30px}
button{font-size:1.3em;margin:8px;padding:14px 26px;width:44%}
h3{margin-top:24px}
</style></head><body>
<h1>Remotes</h1>
<h3>TV</h3>
<button onclick="hit('/tv/power')">Power</button>
<button onclick="hit('/tv/volup')">Vol +</button>
<button onclick="hit('/tv/voldn')">Vol -</button>
<h3>Soundbar</h3>
<button onclick="hit('/bar/power')">Power</button>
<h3>AC</h3>
<button onclick="hit('/ac/off')">Off</button>
<script>
function hit(url){
  fetch(url).then(r=>r.text()).then(t=>console.log(t));
}
</script></body></html>
)=====";

void sendAndAck(const char* msg) {
  server.send(200, "text/plain", msg);
}

void setup() {
  Serial.begin(115200);
  irsend.begin();
  WiFi.begin("your-wifi-ssid", "your-wifi-password");
  while (WiFi.status() != WL_CONNECTED) { delay(300); }
  Serial.println(WiFi.localIP());

  server.on("/", HTTP_GET, []() {
    server.send_P(200, "text/html", PAGE);
  });
  server.on("/tv/power", HTTP_GET, []() {
    irsend.sendNEC(TV_POWER);
    sendAndAck("ok tv power");
  });
  server.on("/tv/volup", HTTP_GET, []() {
    irsend.sendNEC(TV_VOLUP, 30);  // 30 repeats = held button
    sendAndAck("ok vol up x30");
  });
  server.on("/tv/voldn", HTTP_GET, []() {
    irsend.sendNEC(TV_VOLDN, 30);
    sendAndAck("ok vol down x30");
  });
  server.on("/bar/power", HTTP_GET, []() {
    irsend.sendNEC(BAR_POWER);
    sendAndAck("ok soundbar power");
  });
  server.on("/ac/off", HTTP_GET, []() {
    irsend.sendNEC(AC_OFF);
    sendAndAck("ok ac off");
  });
  server.begin();
}

void loop() {
  server.handleClient();
}
Open http://esp32-ip/ from any phone on the network and tap. The
fetch() calls hit the same endpoints the transmitter tutorial used
with curl, but from a page your family will actually use. Add a
bookmark to the home screen and it behaves like an app.
AC units send whole states
A TV remote sends one command per press. An AC remote sends the
entire state (temp, fan, mode, swing) as one blob every press, so
replaying a captured AC code reverts whatever was changed since. Use
the library’s brand-specific sender classes (e.g. IRPanasonicAc,
IRMitsubishiAC, IRDaikinESP) and set the state fields
explicitly. The full pattern with a worked example is in the IR
transmitter tutorial’s AC section.
What you learned
- An ESP32 can serve the entire UI for a hardware project from PROGMEM: one string constant, no filesystem, no SD card.
- The split that makes it feel like an app: one page load, then
fetch()calls for each button, so the browser never navigates away. - The same endpoints serve both humans (buttons) and machines (curl, MQTT flows, ntfy buttons), because HTTP is the interface either way.
When something breaks
- Page loads, buttons do nothing, no IR flash. The captured hex
came from a repeat frame or the wrong protocol. Recapture that
button with the receiver sketch and send with the matching
send*function. - Phone camera shows no purple flash from the LED. The drive circuit, not the code: check the transistor orientation, the 1k base resistor, and that the LED is not in backwards.
- Buttons work but the page hangs between presses. The IR burst blocks the CPU for about 100 ms per repeat burst and the browser’s default timeout can be shorter. Lower the repeat count or accept the pause; the send still lands.
- Volume changes only one step per tap. That is one repeat
frame.
sendNEC(code, 30)is the “hold the button down” pattern; the volume endpoints above already use it. - The AC reverts to old settings. You replayed a stale
full-state code. Switch to the brand-specific AC sender class and
set fields (e.g.
setTemp,setFan) explicitly.
What to build next
- The IR receiver tutorial is the capture half; run both sketches on one board for a learnable universal blaster.
- Wire the endpoints into the MQTT publish-subscribe tutorial
so any topic (e.g.
home/ir/send) triggers a code instead of an HTTP call, which is how it joins a whole-home automation stack. - The ntfy notifications tutorial can add a button to a phone notification that fires the same endpoint (the “kill the AC from anywhere” pattern).
- The ESP32 SD card datalogging tutorial pairs with this to record which commands fired and when.
The IoT with ESP32 book bundles receiver and transmitter into an IR hub project with this exact web UI pattern.