ESP32: log sensor data to a microSD card
Write timestamped CSV data from ESP32 sensors to a microSD card. FAT file basics, real timestamps, daily file rotation, and the flush pattern that survives power cuts.
Every sensor project hits the same moment: the Serial Monitor is scrolling numbers, and you realize those numbers evaporate when you pull the plug. A microSD card fixes that for about $8. The ESP32 speaks SPI to a standard microSD module, the FAT filesystem on the card shows up on any laptop, and your plant moisture readings or garage temperature history become a CSV you can open in a spreadsheet. This tutorial covers the wiring, the timestamps, and the file rotation pattern that keeps one logger running for months instead of filling one giant unopenable file.
The trap: the sketch logs fine for hours, then the power blinks, and you lose not just the last line but the whole file, because the last kilobytes were still sitting in the write buffer. SD writes go through an internal buffer and only reach the card on a flush. Learn the flush rhythm before you deploy, not after the first outage (e.g. I lost two weeks of weather data to a five-second power dip before I made this automatic).
What you need
Needed
| Item | Qty | Purpose | Est. cost |
|---|---|---|---|
| ESP32 dev board (WROOM-32 devkit) | 1 | reads sensors, writes files over SPI | $10 |
| MicroSD card module with SPI interface | 1 | the card socket with level shifting | $2 |
| MicroSD card, 8-16 GB, Class 10 | 1 | the storage; small is fine, FAT32 maxes at 32 GB | $8 |
| Jumper wires (6) | 6 | the SPI bus plus power | $2 |
Any microSD module with the standard six pins (CS, SCK, MOSI, MISO, VCC, GND) works. Prefer the ones rated for 3.3 V logic; the cheap five-pin boards without level shifting usually still work on the ESP32 because its 3.3 V logic matches the card, but the level-shifted modules are more forgiving of wiring slop.
For the demo sketch, a potentiometer stands in for your real sensor (e.g. a BME280 or the analog mic from the sound sensor tutorial). Any analog input proves the logging pattern.
Nice to have
- Soldering iron + solder: if your SD module came with unsoldered pin headers, which is common.
- Iron stand, helping hands, soldering mat: the safety trio for that job.
- Anti-static wristband: cards and modules survive carelessness, the ESP32 behind them does not.
- Magnifying goggles: the silkscreen pin labels on these modules are tiny.
- Wire stripper: for cut-to-length permanent wiring.
- Multimeter: checking the module’s VCC requirement (3.3 V vs 5 V input) before first power-up.
Wiring
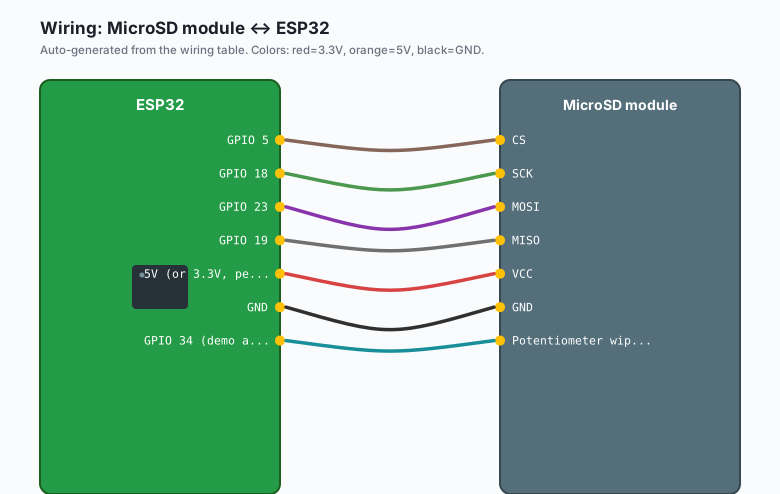
The SPI pins here are the ESP32’s default VSPI pins. Use them; every library example assumes them.
| MicroSD module | ESP32 |
|---|---|
CS | GPIO 5 |
SCK | GPIO 18 |
MOSI | GPIO 23 |
MISO | GPIO 19 |
VCC | 5V (or 3.3V, per your module’s regulator) |
GND | GND |
| Potentiometer wiper | GPIO 34 (demo analog input) |
Check your module before wiring power. Boards with an onboard regulator and level shifter take 5 V on VCC; bare-card sockets take 3.3 V and will not survive 5 V. The module’s silkscreen or the listing page settles it in ten seconds.
Format the card as FAT32 before the first run. The ESP32’s SD library
reads FAT16/FAT32 only, and a card formatted exFAT by a modern OS
will fail SD.begin() for reasons that look like dead hardware.
Install
Nothing to install. The SD.h and SPI.h libraries ship with the
ESP32 Arduino core, and time.h is part of the core too. This is one
of those rare builds where
Arduino IDE >> Sketch >> Include Library >> Manage Libraries stays
closed.
The code
The sketch logs an analog reading once per minute with a real timestamp from NTP, rotates to a new file every day, and flushes every line. The timestamp is the interesting half: the ESP32 has no battery-backed clock, so the sketch sets the system time from an NTP server over Wi-Fi at boot.
#include <SPI.h>
#include <SD.h>
#include <WiFi.h>
#include <time.h>

const int CS_PIN = 5;
const int POT_PIN = 34;          // demo analog input

const char* WIFI_SSID = "your-wifi-ssid";
const char* WIFI_PASS = "your-wifi-password";
const char* NTP_SERVER = "pool.ntp.org";
const long GMT_OFFSET_S = -7 * 3600;   // US Mountain Standard Time

File logFile;
String currentDate = "";

void connectTime() {
  configTime(GMT_OFFSET_S, 0, NTP_SERVER);
  struct tm timeinfo;
  while (!getLocalTime(&timeinfo, 10000)) {   // wait up to 10 s
    Serial.println("waiting for NTP...");
    delay(500);
  }
}

String nowStamp() {
  struct tm timeinfo;
  if (!getLocalTime(&timeinfo)) return "1970-01-01 00:00:00";
  char buf[20];
  strftime(buf, sizeof(buf), "%Y-%m-%d %H:%M:%S", &timeinfo);
  return String(buf);
}

void openTodayFile() {
  struct tm timeinfo;
  getLocalTime(&timeinfo);
  char fname[16];
  strftime(fname, sizeof(fname), "/log_%F.csv", &timeinfo);
  bool fresh = !SD.exists(fname);
  logFile = SD.open(fname, FILE_WRITE);
  if (fresh && logFile) {
    logFile.println("timestamp,adc");   // header only for new files
    logFile.flush();
  }
  Serial.print("logging to ");
  Serial.println(fname);
}

void setup() {
  Serial.begin(115200);

  WiFi.begin(WIFI_SSID, WIFI_PASS);
  while (WiFi.status() != WL_CONNECTED) { delay(300); }
  connectTime();

  if (!SD.begin(CS_PIN)) {
    Serial.println("SD init failed (format card as FAT32?)");
    while (true) delay(1000);
  }
  openTodayFile();
}

void loop() {
  struct tm timeinfo;
  getLocalTime(&timeinfo);

  // Daily rotation: new file when the date changes
  char today[11];
  strftime(today, sizeof(today), "%F", &timeinfo);
  if (currentDate != String(today)) {
    currentDate = String(today);
    logFile.close();
    openTodayFile();
  }

  int adc = analogRead(POT_PIN);
  logFile.print(nowStamp());
  logFile.print(",");
  logFile.println(adc);
  logFile.flush();          // the line survives a power cut

  Serial.printf("logged %d\n", adc);
  delay(60000);             // one line per minute
}
Pull the card, put it in a laptop, and log_2026-09-23.csv opens in
any spreadsheet with one row per minute. The file per day pattern
keeps every file small enough to open in one window (about 1,440 rows
at one reading per minute).
No Wi-Fi at the logging site
The NTP timestamp needs network at boot, or at least occasionally. If
the logger runs disconnected, either log millis() offsets and
reconcile later, or wire a DS3231 RTC module and read the time from
it instead (the RTC has its own battery and survives power cuts; the
ESP32 does not keep time across reboots without one).
FAT patterns worth knowing
- Filenames, 8.3 style: the ESP32’s SD library accepts long
names on FAT32, but older tooling on the card may truncate
log_2026-09-23.csvin odd ways. If a file refuses to open, shorten the name. - One file at a time: open, write, flush, and keep the handle only as long as you need it. Opening and closing a file every write is safe but slow (a few ms each way), fine at one line per minute, wasteful at 100 lines per second.
- Card wear: cards wear by write cycles. One line per minute is nothing; 100 writes per second for months will kill a cheap card. Batch multiple readings into one line or one flush per interval when running fast.
What you learned
- The ESP32 writes to standard FAT32 microSD cards over SPI with the built-in SD library: file open, print, flush, close.
- The ESP32 has no battery-backed clock; NTP over Wi-Fi (or a DS3231 RTC) is what makes timestamps real.
flush()is the difference between a durable log and a buffer that vanishes with the power. Flush per line at low rates.- Daily rotation (one file per day) keeps files small and makes the log browsable by date.
When something breaks
- “SD init failed” on every run. Format the card FAT32 (not exFAT), reseat it, and check the VCC level matches your module’s regulator. Nine times out of ten it is the format.
- Timestamps all show 1970. The sketch booted before NTP answered and your GMT offset is wrong on top of it. Watch for “waiting for NTP…” in the Serial Monitor and check the offset constant (the example is UTC-7 for US Mountain Standard Time).
- SPI bus conflicts. If you add a second SPI device (an SD card plus a display), each needs its own CS pin and the bus gets touchy. Keep the card on the default VSPI pins in this tutorial and wire the second device to the HSPI pins instead.
- File grows but shows garbage rows. The card is counterfeit or worn out. Counterfeit cards (a 16 GB that is really 2 GB with corrupted writes) are common on marketplaces; test with a write checker before trusting a logger to it.
- Last readings lost after power cuts. You dropped the
flush()or are writing so fast the flush cost dominates. Flush per line at one line per second or slower; batch and flush on an interval at high rates.
What to build next
- The RCWL-0516 microwave radar tutorial pairs with this: each motion trigger becomes a timestamped row, a full motion log with no cloud.
- The BME280 environment tutorial is the natural sensor for this logger: temperature, humidity, pressure, one row per minute.
- The DS3231 RTC tutorial replaces the NTP dependency for loggers that live where Wi-Fi does not reach.
- The ESP32 InfluxDB time series tutorial is the networked next step once a spreadsheet stops being enough (SD for the farm, Influx for the dashboard).
The IoT with ESP32 book bundles the SD logger with the sensor tutorials into a week-long data collection project chapter.