ESP32: read a soil moisture sensor (capacitive, not resistive)
Wire a capacitive soil moisture sensor to an ESP32 and read soil moisture as a percentage. Skip the resistive sensor; it corrodes and lies.
There are two kinds of soil moisture sensors: resistive and capacitive. The resistive ones use two exposed metal probes and measure the resistance between them. They corrode within a few weeks in soil and start reading wrong values. The capacitive ones measure the dielectric constant of the soil around a covered probe and last for years.
This tutorial covers the capacitive sensor (the one that looks like a small stick with a flat PCB at the top). Skip the resistive sensor. The $1 you save is not worth the false readings.
What you need
- ESP32 dev board
- Capacitive soil moisture sensor (the v1.2 from any of the usual vendors; $1-2 each)
- 3 jumper wires
- A potted plant or a glass of water for testing
Wiring
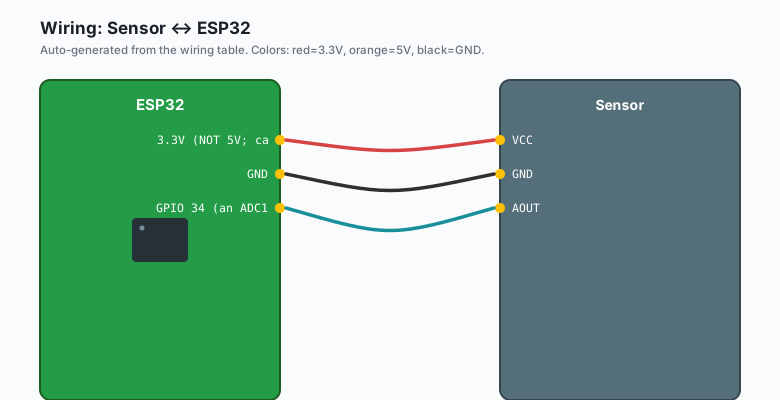
Sensor VCC -- ESP32 3.3V (NOT 5V; capacitive sensors do not need it)
Sensor GND -- ESP32 GND
Sensor AOUT -- ESP32 GPIO 34 (an ADC1 pin; see the ADC tutorial)
Use 3.3V, not 5V. The sensor’s analog output range is calibrated for 3.3V on most variants. Powering at 5V gives you a higher reading range but is out of spec for the sensor and reduces accuracy.
Why capacitive, not resistive
The resistive sensor:
- Two exposed metal probes in the soil
- DC current flows from one probe to the other through the wet soil
- The resistance drops as moisture increases
- The probes corrode because the DC current + moisture = electrolysis
- After 2-4 weeks, the probes are visibly corroded and the readings are unreliable
The capacitive sensor:
- One covered probe acts as one plate of a capacitor; the soil around it acts as the dielectric
- The capacitance changes with moisture content (water has a much higher dielectric constant than dry soil)
- The sensor measures capacitance and outputs a voltage proportional to it
- The covered probe does not corrode
- The sensor lasts for years in soil
There is a time-and-place for resistive sensors (instantaneous readings in dry, non-corrosive media). For soil moisture, capacitive is the right call.
The code
ESP32 (Arduino)
const int MOISTURE_PIN = 34;

const int DRY_VALUE = 2800;   // sensor in air
const int WET_VALUE = 400;    // sensor in water

float readMoisturePercent() {
  int raw = analogRead(MOISTURE_PIN);
  float pct = (float)(DRY_VALUE - raw) / (DRY_VALUE - WET_VALUE) * 100.0;
  return constrain(pct, 0.0, 100.0);
}

void setup() {
  Serial.begin(115200);
  delay(1000);
  analogReadResolution(12);
}

void loop() {
  Serial.print("Moisture: ");
  Serial.print(readMoisturePercent());
  Serial.println("%");
  delay(1000);
}
Arduino (Uno, Nano, Mega)
const int MOISTURE_PIN = A0;   // ADC1-equivalent pin on Uno

const int DRY_VALUE = 720;     // ADC is 10-bit (0-1023) on the Uno; halve the 12-bit values
const int WET_VALUE = 100;

float readMoisturePercent() {
  int raw = analogRead(MOISTURE_PIN);
  float pct = (float)(DRY_VALUE - raw) / (DRY_VALUE - WET_VALUE) * 100.0;
  return constrain(pct, 0.0, 100.0);
}

void setup() {
  Serial.begin(9600);
  delay(1000);
}

void loop() {
  Serial.print("Moisture: ");
  Serial.print(readMoisturePercent());
  Serial.println("%");
  delay(1000);
}
The Uno’s ADC is 10-bit (0-1023), not 12-bit. Calibrate
DRY_VALUEandWET_VALUEto your specific sensor in your specific soil.
MicroPython (ESP32 or Pico)
from machine import ADC, Pin
import time

# ESP32: GPIO 34-39 are ADC1
# Pico: GPIO 26-29 are ADC pins
moisture = ADC(Pin(34))
moisture.atten(ADC.ATTN_11DB)   # full 0-3.3V range on ESP32

DRY_VALUE = 2800
WET_VALUE = 400

def read_moisture_pct():
    raw = moisture.read_u16() >> 4   # ESP32 returns 0-65535; shift to 0-4095
    pct = (DRY_VALUE - raw) / (DRY_VALUE - WET_VALUE) * 100.0
    return max(0.0, min(100.0, pct))

print('Moisture sensor ready')
while True:
    print(f'Moisture: {read_moisture_pct():.1f}%')
    time.sleep(1)
For the Pico, use moisture = ADC(Pin(26)) and moisture.read_u16()
returns 0-65535 directly (no shift needed).
Raspberry Pi Python (with MCP3008 over SPI)
The Pi has no native ADC. The MCP3008 is the standard 8-channel 10-bit ADC chip, $2 from anywhere. Wire it to the Pi’s SPI pins.
import gpiozero
from gpiozero import MCP3008
import time

# MCP3008 channel 0, Vref 3.3V, 10-bit ADC (0-1023)
moisture = MCP3008(channel=0)

DRY_VALUE = 0.85    # voltage ratio at "air"
WET_VALUE = 0.20    # voltage ratio at "water"

def read_moisture_pct():
    # MCP3008.read_u16 returns 0-1 (ratio)
    ratio = moisture.value
    pct = (DRY_VALUE - ratio) / (DRY_VALUE - WET_VALUE) * 100.0
    return max(0.0, min(100.0, pct))

print('Moisture sensor ready')
while True:
    print(f'Moisture: {read_moisture_pct():.1f}%')
    time.sleep(1)
Enable SPI on the Pi first:
sudo raspi-config>> Interface OptionsSPI >> Enable. The MCP3008 also needs
pip install gpiozero(it ships with the standard Raspberry Pi OS image).
What you should see
Upload. Open Serial Monitor. You should see a value that changes as you move the sensor in and out of soil.
The raw value range depends on the sensor and your soil:
- Air (sensor in air): 2500-3000 (high = dry)
- Dry soil: 1800-2500
- Moist soil: 1000-1800
- Wet soil: 500-1000
- In water: 0-500
These are typical ranges for the v1.2 capacitive sensor. Yours will vary.
The percentage conversion
The raw value does not mean anything without calibration. To convert to a meaningful percentage, you need to measure the sensor in air (the “dry” reading) and in water (the “wet” reading) once:
const int DRY_VALUE = 2800;    // sensor in air
const int WET_VALUE = 400;     // sensor in water

float readMoisturePercent() {
  int raw = analogRead(MOISTURE_PIN);
  float pct = (float)(DRY_VALUE - raw) / (DRY_VALUE - WET_VALUE) * 100.0;
  return constrain(pct, 0.0, 100.0);
}

void loop() {
  Serial.print("Moisture: ");
  Serial.print(readMoisturePercent());
  Serial.println("%");
  delay(1000);
}
After running this for a day in a real plant, you’ll want to adjust the DRY_VALUE and WET_VALUE to match your specific soil.
Per-soil calibration
Different soils have different dielectric constants. Clay holds more water and reads higher than sandy soil at the same moisture level. For accurate readings:
- Saturate a soil sample with water (let it soak for an hour).
- Insert the sensor. Record the reading. This is your 100% wet value.
- Let the soil dry in the sun for a day or two. Insert the sensor. This is your 0% dry value.
- Use those two values in your formula.
For most projects (knowing “is the plant thirsty”), rough calibration is enough. For agricultural research, use a gravimetric measurement (weighing wet vs oven-dried soil) as the reference.
The “wait between readings” gotcha
The capacitive sensor’s output is a high-impedance analog signal. The ADC needs a small amount of time to settle. Reading immediately after powering the sensor can give a wrong value:
float readMoisturePercent() {
  // Discard the first reading after a power-up
  analogRead(MOISTURE_PIN);
  delay(10);
  int raw = analogRead(MOISTURE_PIN);
  // ... convert
}
For most projects, the loop delay is enough that this is not an issue.
The water pump project pattern
Most soil moisture projects end with “water the plant if dry.” The pattern is:
const int PUMP_PIN = 5;
const float THRESHOLD_PERCENT = 30.0;

void loop() {
  float moisture = readMoisturePercent();
  if (moisture < THRESHOLD_PERCENT) {
    Serial.println("Soil dry, watering for 5 seconds");
    digitalWrite(PUMP_PIN, HIGH);
    delay(5000);
    digitalWrite(PUMP_PIN, LOW);
    // wait for water to absorb before re-reading
    delay(60000);
  } else {
    Serial.print("Soil moist (");
    Serial.print(moisture);
    Serial.println("%), skipping");
  }
  delay(60000);   // check once per minute
}
Use a 12V peristaltic pump or a 5V submersible pump, with a MOSFET to switch it. The pump draws more current than the ESP32 can deliver directly.
What you learned
- Capacitive soil moisture sensors last for years; resistive ones corrode in weeks.
- Wiring is 3 pins: VCC (3.3V), GND, AOUT to an ADC1 pin.
- Convert raw ADC values to percent using air and water calibration.
- Per-soil calibration matters for accuracy.
When something breaks
- Readings are 0 all the time. Sensor is shorted (water inside the probe), or wired wrong. Pull it out and check.
- Readings are 4095 all the time. Sensor is not in soil, or wiring is wrong.
- Readings change very slowly. Normal for capacitive sensors in wet soil; they take a few minutes to settle.
- Sensor corrodes quickly. You bought a resistive sensor by mistake. Look for the “capacitive” label.
What to build next
- The BME280 tutorial combines with this for indoor plant monitoring: soil moisture, temperature, humidity, light.
- The ESP32 MQTT tutorial publishes soil moisture to a dashboard.
- The book ESP32 Smart Garden covers automated watering systems with multiple sensors and pumps.