ESP32: build a UI with LVGL on a touch display
Drive a 320x240 ILI9341 touch display with LVGL 9 on an ESP32. Real widgets, buttons that work, and the two-task structure that keeps drawing and touch alive.
An SSD1306 OLED gets you a 128x64 grid of dots and a display.print().
That is fine for a temperature. It is not fine for a thermostat. When
you want labels, buttons, a bar chart, and touch input (e.g. a
thermostat faceplate on the wall), you want LVGL: a full graphics
library with widgets, styles, and animations that runs on an ESP32.
The trap I hit: I followed a video, everything compiled, and the
screen stayed black. My buffer was fine, my pins were fine. The problem
was that LVGL is not a fire-and-forget render loop. It needs its
lv_timer_handler() called every few milliseconds forever, and the
tutorial’s delay(1000) in loop() was starving it. Structure the
sketch as two FreeRTOS tasks from the start (one draws, one reads
touch and runs your logic) and LVGL just works.
What you need
Needed
- ESP32 dev board, a plain WROOM-32 (about $8). No PSRAM needed for 320x240 at 16-bit color with one buffer.
- 2.4 inch ILI9341 resistive touch display module, 320x240 SPI, with the XPT2046 touch controller on the back (about $10). Get the module with the touch chip included, the display-only ones will waste an afternoon.
- Jumper wires (a lot of them, this module uses every pin)
- Breadboard, or better, female-to-female jumpers straight to the module header
Nice to have
- Helping hands or a third hand tool for holding the module while you probe pins
- Magnifying goggles for reading the silkscreen labels (they are tiny and inconsistent between sellers)
- Multimeter for verifying 3.3 V at the module before first power-up
- Soldering iron + solder if your module ships with an unsoldered header strip
- Soldering mat and iron stand
- Anti-static wristband
Wiring
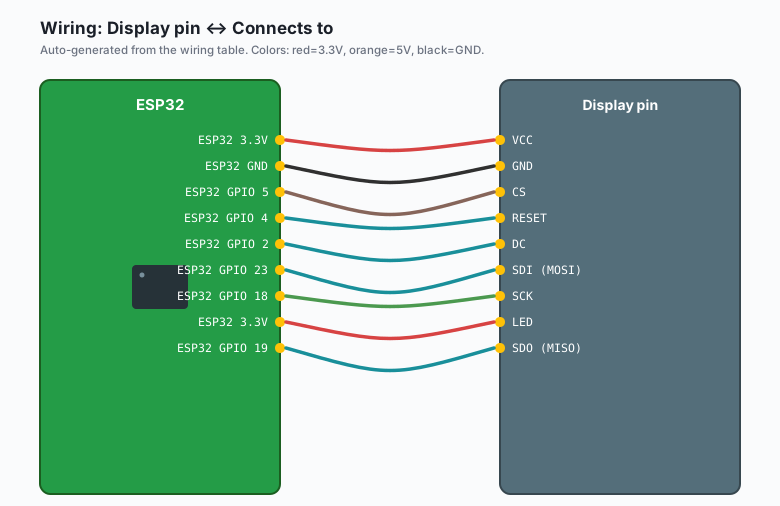
This is SPI for the display plus a second SPI for the touch controller (they share MISO/MOSI/SCK, separate chip selects).
| Display pin | Connects to |
|---|---|
VCC | ESP32 3.3V |
GND | ESP32 GND |
CS | ESP32 GPIO 5 |
RESET | ESP32 GPIO 4 |
| DC | ESP32 GPIO 2 |
SDI (MOSI) | ESP32 GPIO 23 |
SCK | ESP32 GPIO 18 |
| LED | ESP32 3.3V |
SDO (MISO) | ESP32 GPIO 19 |
| Touch pin | Connects to |
|---|---|
| T_CLK | ESP32 GPIO 18 (shared) |
| T_CS | ESP32 GPIO 15 |
T_DI (MOSI) | ESP32 GPIO 23 (shared) |
T_DO (MISO) | ESP32 GPIO 19 (shared) |
| T_IRQ | ESP32 GPIO 25 |
| T_CTRL | leave unconnected on most modules |
This module is 3.3 V only. There is no 5 V tolerance on the ILI9341 or the XPT2046. Do not wire it to 5 V “to make it brighter”, that is what the LED pin is for.
Install
Arduino IDE >> Sketch >> Include Library >> Manage Libraries:
- Search “lvgl”, install LVGL by kisvp (version 9.x). The code below is written for 9.
- Search “XPT2046”, install XPT2046_Touchscreen by Paul Stoffregen.
Then Arduino IDE >> Tools >> manage the board settings: Flash Size 4MB (or larger), Partition scheme “Huge APP”. LVGL 9 with one widget screen will not fit in the default 1.2 MB app partition. This is the other black-screen cause nobody warns you about (the upload fails or the board boot-loops).
The code
#include <lvgl.h>
#include <TFT_eSPI.h>       // install Bodmer's TFT_eSPI, configure User_Setup.h per its docs
#include <XPT2046_Touchscreen.h>
#include <SPI.h>

// --- Display buffer ---
#define SCREEN_W 320
#define SCREEN_H 240
static lv_color_t buf1[SCREEN_W * 100];   // 100 lines, ~64KB, fits in RAM

lv_display_t* disp;

// --- Pins (match the wiring table) ---
#define TFT_CS    5
#define TFT_RST   4
#define TFT_DC    2
#define TOUCH_CS  15
#define TOUCH_IRQ 25

XPT2046_Touchscreen touch(TOUCH_CS, TOUCH_IRQ);

// --- LVGL display flush: push pixels to the ILI9341 ---
void my_flush(lv_display_t* d, const lv_area_t* area, uint8_t* px_map) {
  uint32_t w = (area->x2 - area->x1 + 1);
  uint32_t h = (area->y2 - area->y1 + 1);
  TFT_eSPI& tft = *(TFT_eSPI*)lv_display_get_user_data(d);
  tft.startWrite();
  tft.setAddrWindow(area->x1, area->y1, w, h);
  tft.pushPixels(px_map, w * h);
  tft.endWrite();
  lv_display_flush_ready(d);
}

// --- LVGL touch read ---
void my_touch_read(lv_indev_drv_t* drv, lv_indev_data_t* data) {
  if (touch.tirqTouched() && touch.touched()) {
    TS_Point p = touch.getPoint();
    // XPT2046 raw range ~200..3900, map to screen
    data->point.x = map(p.x, 200, 3900, 0, SCREEN_W - 1);
    data->point.y = map(p.y, 200, 3900, 0, SCREEN_H - 1);
    data->state = LV_INDEV_STATE_PRESSED;
  } else {
    data->state = LV_INDEV_STATE_RELEASED;
  }
}

// --- UI objects (globals so the task can update them) ---
lv_obj_t* temp_label;
lv_obj_t* bar;

// --- App logic task: update widgets every second ---
void logic_task(void* arg) {
  for (;;) {
    float fake_temp = 20.0 + (random(0, 60) / 10.0);
    lv_label_set_text_fmt(temp_label, "%.1f C", fake_temp);
    lv_bar_set_value(bar, (int32_t)(fake_temp * 2), LV_ANIM_ON);
    vTaskDelay(pdMS_TO_TICKS(1000));
  }
}

void setup() {
  Serial.begin(115200);
  pinMode(TFT_RST, OUTPUT);
  digitalWrite(TFT_RST, HIGH);
  delay(50);
  digitalWrite(TFT_RST, LOW);
  delay(50);
  digitalWrite(TFT_RST, HIGH);

  static TFT_eSPI tft;
  tft.begin();
  tft.setRotation(1);           // landscape
  tft.fillScreen(TFT_BLACK);

  touch.begin();
  touch.setRotation(1);         // match the display rotation

  lv_init();
  disp = lv_display_create(SCREEN_W, SCREEN_H);
  lv_display_set_user_data(disp, &tft);
  lv_display_set_flush_cb(disp, my_flush);
  lv_display_set_buffers(disp, buf1, NULL, sizeof(buf1), LV_DISPLAY_RENDER_MODE_PARTIAL);

  lv_indev_t* indev = lv_indev_create();
  lv_indev_set_type(indev, LV_INDEV_TYPE_POINTER);
  lv_indev_set_read_cb(indev, my_touch_read);
  lv_indev_set_display(indev, disp);

  // A tiny UI: title, big temperature, bar
  lv_obj_t* scr = lv_screen_active();
  lv_obj_set_style_bg_color(scr, lv_color_hex(0x101418), 0);

  lv_obj_t* title = lv_label_create(scr);
  lv_label_set_text(title, "Workshop bench");
  lv_obj_align(title, LV_ALIGN_TOP_MID, 0, 8);

  temp_label = lv_label_create(scr);
  lv_obj_set_style_text_font(temp_label, &lv_font_montserrat_48, 0);
  lv_label_set_text(temp_label, "-- C");
  lv_obj_align(temp_label, LV_ALIGN_CENTER, 0, -10);

  bar = lv_bar_create(scr);
  lv_obj_set_size(bar, 260, 14);
  lv_obj_align(bar, LV_ALIGN_CENTER, 0, 40);
  lv_bar_set_range(bar, 0, 100);

  // Two-task structure. This is the part that makes LVGL stable:
  xTaskCreatePinnedToCore(lvgl_task, "lvgl", 8192, NULL, 2, NULL, 1);  // core 1
  xTaskCreatePinnedToCore(logic_task, "logic", 4096, NULL, 1, NULL, 0); // core 0
}

// --- LVGL task: never touch UI objects from anywhere else ---
void lvgl_task(void* arg) {
  for (;;) {
    lv_timer_handler();       // runs render + input
    vTaskDelay(pdMS_TO_TICKS(5));
  }
}

void loop() {
  // empty on purpose: everything lives in the two tasks
}

// UI updates must go through the LVGL task. If logic_task ever needs
// to change a widget from another core, use lv_async_call() instead
// of touching the object directly (it schedules the change inside the
// LVGL task, which is the only safe place).
The code above uses TFT_eSPI for the ILI9341 transport. TFT_eSPI is configured by editing
User_Setup.hin the library (its comment block lists every ILI9341 board preset), not from your sketch. That is the one library in this stack you configure by editing a file, and it is why the pins above are repeated there.
What you learned
- LVGL is a retained-mode widget library, not a pixel-pushing one. You build the UI once, LVGL redraws only what changed.
- LVGL needs
lv_timer_handler()every few ms. Adelay()inloop()freezes the UI, so the working structure is two FreeRTOS tasks on two cores. - Touch input is an input device you register, not a loop you poll yourself. LVGL calls your read function.
- Only the LVGL task may touch UI objects. From another task, use
lv_async_call().
When something breaks
- Black screen, code compiles fine. Two usual causes: the app
partition is too small (Arduino IDE >> Tools >> Partition scheme
Huge APP), or
lv_timer_handler()is starved by adelay()inloop(). Fix the partition first, then check the task setup. - White screen with noise. SPI pins in
User_Setup.hdo not match the wiring table. The module silkscreen labels vary between sellers (e.g. some print SDA for MOSI), so trust your wiring, not the label. - Display works, touch is dead. TOUCH_CS is floating. The touch controller shares the SPI bus, and without its chip select it never answers. GPIO 15 in the table above is required, not optional.
- Touch works but is mirrored or offset. The XPT2046 raw values
need calibration. Change the
map()endpoints inmy_touch_readuntil the stylus lands where it points, and swap x/y if the rotation is wrong (set both display and touch rotations to the same value first). - Random crashes after minutes. You called a UI function from
logic_task. Move it behindlv_async_call().
What to build next
Put a real sensor behind the fake temperature: the BME280 tutorial’s
reading feeds lv_label_set_text_fmt() exactly as written above, and
the MQTT tutorial turns the same UI into a remote control (subscribe,
then update the label from the callback through lv_async_call()).
For a wall-mounted build, this display plus the SSD1306 tutorial’s lessons about brightness is how you get to a thermostat faceplate. And when the UI needs live data from a browser at the same time, the WebSocket server tutorial feeds both from one chip.