ESP32: read RFID tags with the RC522
Wire the $3 MFRC522 RFID reader to an ESP32 over SPI and build the tap-to-unlock pattern: card UID list, relay output, event logging.
The MFRC522 is the $3 RFID reader behind most DIY door projects. Tap a card or keyfob, it reports the card’s UID over SPI, and your code decides what that UID means. This tutorial gets clean reads on an ESP32 and builds the tap-to-unlock pattern around it.
What you need
- ESP32 dev board
- MFRC522 RFID module with card + key fob (the blue PCB with the spiral antenna, about $3)
- Jumper wires
- (For the unlock build) a relay module
The RC522 reads MIFARE Classic 13.56 MHz tags: the white card and keyfob that ship with it, plus most transit cards, office badges, and modern hotel cards. It does NOT read the 125 kHz tags (e.g. older entry fobs) or phone-hosted NFC in most cases.
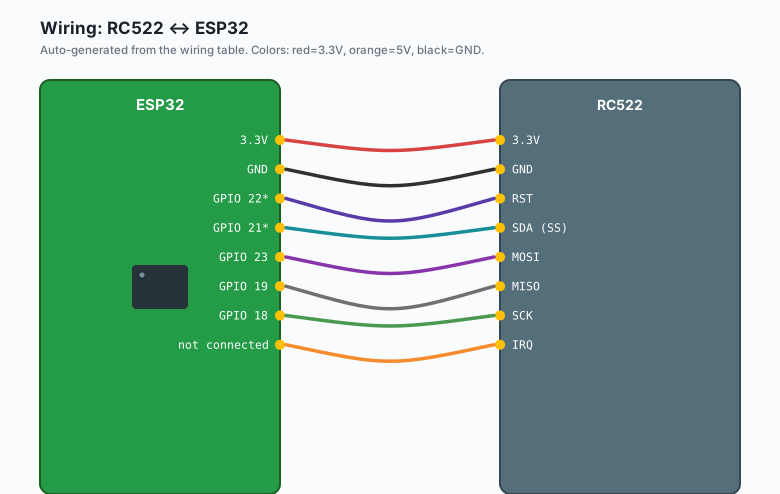
Wiring (SPI)
| RC522 | ESP32 |
|---|---|
3.3V | 3.3V |
GND | GND |
RST | GPIO 22* |
SDA (SS) | GPIO 21* |
MOSI | GPIO 23 |
MISO | GPIO 19 |
SCK | GPIO 18 |
IRQ | not connected |
*The library default pins vary; these two are what the popular ESP32 examples use, and both are declared in the sketch so any pair of spare GPIOs works. 3.3V only: the module is not 5V tolerant on its logic pins.
Install
Arduino IDE >> Sketch >> Include Library >> Manage Libraries, search “MFRC522”, install the one by GithubDeveloper/miguelbalboa (the one with thousands of examples in it).
The code
#include <SPI.h>
#include <MFRC522.h>

#define SS_PIN 21
#define RST_PIN 22

MFRC522 rfid(SS_PIN, RST_PIN);

// Your card UIDs go here (dumped by the reader sketch on first run)
const String VALID_UIDS[] = {"A1 B2 C3 D4", "12 34 56 78"};
const int NUM_UIDS = 2;

void setup() {
  Serial.begin(115200);
  SPI.begin();
  rfid.PCD_Init();
  Serial.println("RFID ready, tap a card");
}

void loop() {
  if (!rfid.PICC_IsNewCardPresent()) return;
  if (!rfid.PICC_ReadCardSerial()) return;

  String uid = "";
  for (byte i = 0; i < rfid.uid.size; i++) {
    uid += (rfid.uid.uidByte[i] < 0x10 ? "0" : "") + String(rfid.uid.uidByte[i], HEX) + " ";
  }
  uid.trim();
  uid.toUpperCase();

  Serial.print("Card: ");
  Serial.println(uid);

  if (is_valid(uid)) {
    Serial.println("GRANTED");
    // relay / strike / ntfy notification here
  } else {
    Serial.println("DENIED");
  }
  rfid.PICC_HaltA();
  rfid.PCD_StopCrypto1();
}

bool is_valid(String uid) {
  for (int i = 0; i < NUM_UIDS; i++) {
    if (VALID_UIDS[i] == uid) return true;
  }
  return false;
}
First run: tap each card, copy the printed UID into VALID_UIDS, re- upload. That is the enrollment.
UID auth vs sector auth
Reading the UID is the tutorial above. The RC522 can also authenticate against a MIFARE sector and read/write data (e.g. storing a secret on the card). The distinction matters for anything beyond a garage door:
| Scheme | What proves access | Cheap attack |
|---|---|---|
| UID match | The card’s serial number | Cloneable with a $15 writer |
| Sector secret | Data encrypted on the card | Much harder |
UID checking is fine for the workshop fridge. For a house door, write a random secret to a card sector and check THAT, not the UID.
The tap-to-unlock build
GPIO 13 to a relay module (the relay tutorial has the wiring), relay to the strike. The unlock pattern with timing:
const int STRIKE_PIN = 13;
unsigned long strikeUntil = 0;

void loop() {
  // ... card read as above ...
  if (is_valid(uid)) {
    strikeUntil = millis() + 3000;   // 3 s unlock window
    digitalWrite(STRIKE_PIN, HIGH);
  }
  if (strikeUntil && millis() > strikeUntil) {
    digitalWrite(STRIKE_PIN, LOW);
    strikeUntil = 0;
  }
}
Millis-based unlock windows keep the reader responsive while the door is open (e.g. a second card can still be read and logged during the window).
What you learned
- RC522 over SPI: init, IsNewCardPresent/ReadCardSerial, UID as hex.
- UID enrollment is copy-the-printed-value; sector auth is the upgrade for real security.
- Millis-based unlock windows, not delay().
When something breaks
- Always fails to read: 3.3V only. The module is 5V-kill on its logic and half-dead on 5V supply with 3.3V logic. Check voltage first, wiring second.
- Reads once then never again: missing PICC_HaltA()/StopCrypto1() after a read. The code above has them; when they are gone the reader thinks the same card is still present forever.
- Intermittent reads at distance: RC522 is a 2-4 cm reader. People tap from 10 cm and blame the code. Mount the reader behind a plastic surface (not metal) and tap on it.
- UID prints but auth denies: hex formatting. UIDs with leading zeros (“0A”) print differently between sketches. Normalize to the padded uppercase format above on both the enrollment and check paths.
What to build next
- The QR scanner tutorial is the phone-based sibling.
- The relay tutorial is the output side of the unlock build.
- The ntfy tutorial pushes a “workshop opened” event with the UID.