ESP32: detect motion through walls with the RCWL-0516 radar
Wire the RCWL-0516 microwave radar to an ESP32 and detect motion through walls and plastic. Doppler sensing with Wi-Fi reporting, deep sleep, and ntfy alerts.
The Arduino RCWL-0516 tutorial covered the sensor itself: a $2 Doppler radar that fires a 3.18 GHz wave through plastic and drywall and triggers on anything that moves. This tutorial is the same sensor on the ESP32, and the ESP32 is what makes the pair interesting: the radar’s trigger is now a network event. Motion in the garage becomes an ntfy alert on your phone, a wake-up interrupt from deep sleep, or a line in a log with a timestamp. The sensor part takes three wires and five minutes; the rest of this tutorial is the ESP32-side patterns around it.
The trap is the same trap as the Arduino version, and I will name it anyway because it costs people a weekend: microwave radar does not care what is moving. It sees through the wall you mounted it behind, and through the cabinet, and into the room where your ceiling fan lives (e.g. my first hallway install triggered every time the bathroom exhaust fan kicked on two rooms away). Placement is the tuning process. The code will be correct long before the install is.
What you need
Needed
| Item | Qty | Purpose | Est. cost |
|---|---|---|---|
| ESP32 dev board (WROOM-32 devkit) | 1 | reads the OUT pin, adds Wi-Fi reporting and deep sleep | $10 |
| RCWL-0516 microwave radar module | 1 | the motion sensor: 3.18 GHz Doppler radar | $2 |
| Jumper wires (3) | 3 | VIN, GND, OUT | $1 |
| Breadboard (optional but handy) | 1 | bench testing before the permanent mount | $3 |
Why the ESP32 over the Uno for this sensor: the RCWL-0516 draws up to about 100 mA while transmitting, which is fine on USB power, and the deep-sleep current of the ESP32 (about 10 microamps) is what makes a battery-powered radar practical. The Arduino path can sleep, but it cannot wake, report over Wi-Fi, and go back to sleep in one piece of hardware.
Nice to have
- Plastic project enclosure: the radar fires straight through most plastics, so the finished build hides inside a box. Metal is the one material that kills it.
- Multimeter: confirm 5 V at VIN before blaming anything else.
- Magnifying goggles: the sensitivity pot and the C-T solder pad are tiny silkscreen markings.
- Soldering iron + solder: if you move the module to a permanent mount with cut-to-length leads.
- Wire stripper: for those leads.
- Anti-static wristband: cheap insurance while handling a bare module.
Wiring
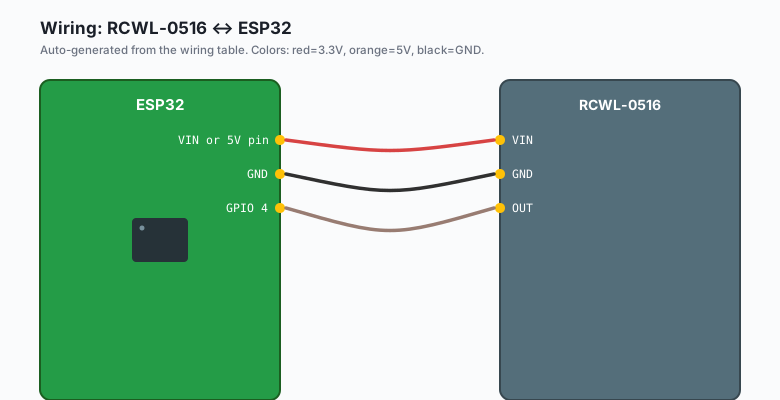
Three wires. The OUT pin drives about 3.3 V when it detects motion, which the ESP32 reads as HIGH with no level shifting.
| RCWL-0516 | ESP32 |
|---|---|
VIN | VIN or 5V pin |
GND | GND |
| OUT | GPIO 4 |
The module runs on 5 V but its output swings to 3.3 V, so it is directly ESP32-safe. Do not power it from the 3.3 V pin: it will sort of work at reduced range and you will spend an afternoon chasing a phantom sensitivity problem.
Keep the radar module at least 30 cm away from the ESP32 board itself if you can. The dev board’s own switching regulator generates just enough electrical noise to show up as occasional false triggers at close range.
Install
Nothing to install. Like the Arduino version, this is a plain digital
input, and there is no library worth fetching from
Arduino IDE >> Sketch >> Include Library >> Manage Libraries. The
whole hardware interface is digitalRead(4). The Wi-Fi and ntfy code
uses libraries already in the ESP32 core.
The code
Rising-edge detection with re-arm, then a Wi-Fi report. The radar holds OUT HIGH for about 2 seconds after motion stops (its fixed retrigger window), so the sketch waits for the falling edge before it will report a second event. Same pattern as the Arduino tutorial, plus the network half.
#include <WiFi.h>
#include <HTTPClient.h>

const int RADAR_OUT = 4;

void setup() {
  Serial.begin(115200);
  pinMode(RADAR_OUT, INPUT);

  WiFi.begin("your-wifi-ssid", "your-wifi-password");
  while (WiFi.status() != WL_CONNECTED) { delay(300); }
  Serial.println(WiFi.localIP());
}

void reportMotion() {
  HTTPClient http;
  http.begin("http://ntfy.sh/your-secret-topic");
  http.addHeader("Content-Type", "text/plain");
  http.POST("Radar: motion detected");
  http.end();
}

void loop() {
  static int state = 0;
  static unsigned long lastTrigger = 0;

  if (digitalRead(RADAR_OUT) == HIGH) {
    if (state == 0) {                      // rising edge: new event
      Serial.print("MOTION, ");
      Serial.print((millis() - lastTrigger) / 1000);
      Serial.println(" s since previous");
      lastTrigger = millis();
      state = 1;
      reportMotion();
    }
  } else {
    state = 0;                             // falling edge: re-armed
  }
  delay(50);
}
Upload it, open the Serial Monitor at 115200, and walk through the room. Each crossing prints a MOTION line and pushes to your ntfy topic (set up in the ntfy notifications tutorial, or use any topic name and subscribe from your phone). Swap the ntfy POST for an MQTT publish if you already run a broker; the edge-detect loop above stays identical either way.
Mounting and tuning
Two physical adjustments, same as the Arduino build:
- Sensitivity pot (the one near the antenna side of the board): quarter-turn steps. Walk away until it stops triggering, then one quarter-turn back up. Full clockwise will reach through an interior wall, which you want exactly when you want it and never otherwise.
- Placement: the beam is wide and blind to material. Point it at what you want watched and let walls block the rest. Keep it away from fans, HVAC vents moving curtains, and anything on a motor (a fridge compressor triggers it every cycle).
The ESP32-specific placement note: this module is a natural fit for “inside the enclosure” builds, because Wi-Fi works through plastic too. Radar in a box by the garage door, antenna pointed through it, one cable for power.
What you learned
- Doppler radar detects motion, not heat, and it does it through drywall and plastic: the reflection’s frequency shift is the signal.
- The module holds OUT HIGH about 2 seconds after motion stops, so software needs falling-edge re-arm to count events correctly.
- On the ESP32 the same three-wire sensor becomes a network citizen:
one
digitalReadplus an HTTP POST is a whole alerting system.
When something breaks
- Triggers constantly with nobody moving: fans, curtain-moving vents, compressors, or the sensitivity pot is too high. Drop it a quarter-turn and re-test, then hunt moving objects in the beam path. (The Arduino tutorial’s tuning section goes deeper here.)
- Never triggers: measure 5 V at VIN first, then check that the component side faces the room, then accept that Doppler needs real velocity (a person standing perfectly still is invisible to this sensor, by physics, not by bug).
- ntfy never arrives but the Serial Monitor reports motion: the
POST is failing, not the radar. Print
http.HTTPCode()and check Wi-Fi signal strength; a radar in a metal basement is also a Wi-Fi-less ESP32 in a metal basement. - Random triggers from the board itself: the dev board’s 3.3 V regulator noise at close range. Add 30 cm of separation or a 100 uF capacitor across the module’s power pins.
- Works on the bench, dies in the enclosure: the enclosure is metal. Radar cannot leave a Faraday cage. Plastic only.
What to build next
- The ESP32 deep sleep tutorial plus this sensor is the battery-powered motion beacon: the radar is wired to the wake pin, the ESP32 wakes, reports, and drops back to microamps.
- The ESP32 SD card datalogging tutorial turns the trigger lines into a timestamped motion log with no network needed.
- The ESP32 ntfy notifications tutorial goes deeper on self-hosted alerting, including running the ntfy server on your own Pi.
- The Arduino RCWL-0516 radar tutorial is the Uno version if your build site has no Wi-Fi worth joining.
The IoT with ESP32 book bundles the sleep, log, and notify tutorials with this sensor into one motion-detection chapter arc.