ESP32: publish a temperature reading via Matter so Apple Home shows 22.5C
Read a BME280 or DHT22 and expose the value as a Matter Temperature Sensor that Apple Home and Google Home display natively. Cluster limits, the subscription pattern, and the history gap.
I wanted the temperature from my workshop to show up in Apple Home next to the existing Aqara sensors. The Aqara sensors are cheap and they work, but I had a BME280 wired to an ESP32 on the bench and I wanted to see if I could make the ESP32 look identical to the Aqara from the app’s perspective. The answer is yes, and that is exactly the point of Matter.
This is the same project as the On/Off Light from a software standpoint, except the device type is different. A Temperature Sensor is a different endpoint with a different cluster (the Temperature Measurement cluster, not the On/Off cluster). The Matter data model is what makes this work: you do not write a “tell Apple Home to show a number” routine. You implement a Temperature Measurement cluster, and Apple Home knows what to do with it.
The trap I want to call out before we get into the code is cluster limits. The Matter Temperature Measurement cluster has a defined min and max value, defined precision, and a defined resolution. If you publish a value outside the cluster’s range (e.g. -273°C, which is physically impossible but is the cluster’s hard lower bound) the commissioner will reject the update. Check the cluster’s spec before you publish.
The Temperature Sensor device type
The Temperature Sensor device type in Matter exposes a single standard cluster: the Temperature Measurement cluster (cluster ID 0x0402). The cluster has one attribute the user can see: MeasuredValue, which is a signed 16-bit integer in hundredths of a degree Celsius. To publish 22.5°C, you write 2250 to the attribute. To publish -10°C, you write -1000. The precision is fixed at 0.01°C and the valid range is -27315 to 32767 (which covers everything you will ever see in a building).
The cluster also has MinMeasuredValue and MaxMeasuredValue attributes, which are a hint to the app about the range you expect. Apple Home does not use these. Google Home does not use these. Home Assistant does not use these. They exist for completeness, and you should set them to a sane range for your sensor so a future tool that does care has a sensible answer.
The matter cluster data model in practice
Every Matter cluster is a struct with attributes, commands, and events. The Temperature Measurement cluster has three attributes: MeasuredValue (the current reading), MinMeasuredValue (the lowest reading you have ever seen, optional), and MaxMeasuredValue (the highest reading you have ever seen, optional). When the commissioner reads your device, it reads all three. When the value changes, your device publishes a new MeasuredValue and the app updates.
The pattern looks like this in esp-matter:
temperature_sensor::config_t sensor_config;
sensor_config.temperature.min_value = static_cast<int16_t>(-4000);  // -40°C
sensor_config.temperature.max_value = static_cast<int16_t>(8000);   //  80°C

endpoint_t *sensor_endpoint = temperature_sensor::create(
    node, &sensor_config, ENDPOINT_FLAG_NONE, NULL);
That block creates a Temperature Sensor endpoint with a declared range of -40°C to 80°C. The create call wires up the Temperature Measurement cluster for you. The actual reading is something you write to the cluster from your loop() (or from a FreeRTOS task, which is the more typical pattern).
Reading the sensor
I am using a BME280 here because I had one on the bench, but a DHT22 works the same way. The BME280 is more accurate (it reports temperature to 0.01°C, which is what the Matter cluster expects) and also reports humidity and pressure. The DHT22 reports temperature to 0.1°C, which means your Matter reading will be quantized to 0.1°C, not 0.01°C. The cluster does not care. It accepts 0.1°C precision.
#include <Wire.h>
#include <Adafruit_BME280.h>

Adafruit_BME280 bme;

void setup() {
    Wire.begin(21, 22);   // SDA, SCL
    if (!bme.begin(0x76)) {
        Serial.println("BME280 not found");
        while (1) delay(1000);
    }
}
If you are using a DHT22, the wiring is different (a single data pin with a 10K pull-up to 3V3) and you use the DHT sensor library instead. The Matter side does not care which sensor you use. It only sees the float you hand it.
The subscription pattern
This is the part that confused me for a while. A Matter commissioner (Apple Home, Google Home) does not poll your device for the temperature. It subscribes. When you subscribe, the commissioner tells the device “send me updates whenever the value changes, and if it does not change, send me a heartbeat every N seconds.” The device then publishes updates on its own schedule.
The pattern looks like this in firmware:
- Read the sensor
- Compare the new value to the last value you published
- If the value changed by more than a threshold (e.g. 0.5°C), publish a new
MeasuredValue - If 60 seconds have passed since the last publish, publish a heartbeat with the current value anyway
The threshold is on you. A sensor that publishes on every 0.01°C change will spam the network and drain the battery. A sensor that only publishes on 5°C changes will look broken in the app. A 0.5°C threshold with a 60-second heartbeat is a good default for room-temperature monitoring.
In esp-matter, the publish is a single function call:
esp_matter::attribute::update(
    sensor_endpoint,
    chip::app::Clusters::TemperatureMeasurement::Id,
    chip::app::Clusters::TemperatureMeasurement::Attributes::MeasuredValue::Id,
    &new_value);
new_value is a chip::app::DataModel::Nullable<int16_t>. You pass the value in hundredths of a degree Celsius (e.g. 2250 for 22.5°C).
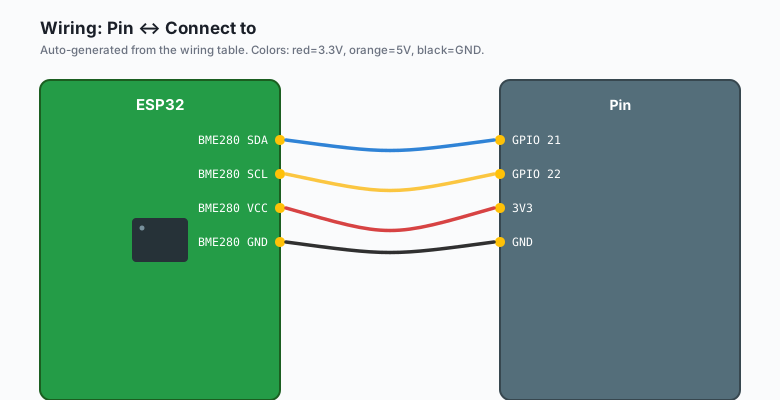
Wiring
| Pin | Connect to |
|---|---|
GPIO 21 | BME280 SDA |
GPIO 22 | BME280 SCL |
3V3 | BME280 VCC |
GND | BME280 GND |
If you are using a DHT22 instead:
| Pin | Connect to |
|---|---|
GPIO 4 | DHT22 DATA |
3V3 | DHT22 VCC |
GND | DHT22 GND |
| 10K pull-up | DHT22 DATA to 3V3 |
The pull-up on the DHT22 data line is not optional. Without it, the sensor returns NaN intermittently and your Matter updates will be wrong.
The code
Here is the full pattern. The Matter setup is identical to the Light tutorial, with temperature_sensor::create instead of on_off_light::create.
#include <esp_log.h>
#include <esp_matter.h>
#include <Wire.h>
#include <Adafruit_BME280.h>

using namespace chip::app::Clusters;
using namespace esp_matter;

static const char *TAG = "app_main";
static Adafruit_BME280 bme;

static int16_t lastPublished = 0;
static unsigned long lastPublishTime = 0;

static void publish_temperature(int16_t centi_celsius)
{
    chip::app::DataModel::Nullable<int16_t> value(centi_celsius);
    esp_matter::attribute::update(
        0x0001,  // endpoint ID, set to whatever create() returned
        TemperatureMeasurement::Id,
        TemperatureMeasurement::Attributes::MeasuredValue::Id,
        &value);
    lastPublished = centi_celsius;
    lastPublishTime = millis();
    ESP_LOGI(TAG, "Published %d.%02d C", centi_celsius / 100, abs(centi_celsius) % 100);
}

static void temperature_task(void *arg)
{
    while (1) {
        float c = bme.readTemperature();
        int16_t centi = (int16_t)(c * 100.0f);

        if (abs(centi - lastPublished) >= 50 ||  // 0.5°C delta
            (millis() - lastPublishTime) > 60000) {  // 60s heartbeat
            publish_temperature(centi);
        }
        vTaskDelay(pdMS_TO_TICKS(5000));   // read every 5s
    }
}

extern "C" void app_main()
{
    // 1. Init I2C and sensor
    Wire.begin(21, 22);
    bme.begin(0x76);

    // 2. Create the Matter node and Temperature Sensor endpoint
    node::config_t node_config;
    node_t *node = node::create(&node_config, NULL, NULL);

    temperature_sensor::config_t sensor_config;
    sensor_config.temperature.min_value = -4000;
    sensor_config.temperature.max_value = 8000;
    endpoint_t *sensor = temperature_sensor::create(
        node, &sensor_config, ENDPOINT_FLAG_NONE, NULL);

    // 3. Start Matter
    esp_matter::start(NULL);

    // 4. Start the publishing task
    xTaskCreate(temperature_task, "temp", 4096, NULL, 5, NULL);
}
The temperature_task is where the work happens. It reads the sensor, applies the 0.5°C delta threshold, applies the 60-second heartbeat, and publishes. Everything else is Matter boilerplate.
Verifying in Apple Home
Pair the device the same way as the Light tutorial: + >> Add Accessory >> More Options… >> scan QR. The new tile will appear in the room. Unlike the Light tile, the Sensor tile does not toggle. It shows the current value and a small chart of recent values (the chart only has resolution at the heartbeat interval, which is 60s in this build).
If the value shows 22.5C and updates within 60 seconds, you are good. If the value shows 0.0C and never updates, your cluster update call is failing. Check the serial monitor for the esp_matter::attribute::update return value and the chip::app::DataModel::Nullable<int16_t> constructor signature.
Verifying in Google Home
Same flow, different app. Settings >> Works with Google >> Matter >> scan QR. The tile appears in the room and updates the same way.
The “I want a graph over time” limitation
This is the limit that trips people up the most. Matter does not have a standard history cluster. There is no “give me the last 24 hours of temperature readings” command in the spec. The cluster only publishes the current value.
If you want a history graph, you have two options. The first is to use a platform that records history (e.g. HomeKit history, Home Assistant, Google Home Routines that trigger on value change). HomeKit history is built into Apple Home and will show a chart of the last 24 hours. The resolution of that chart is the heartbeat interval (60s in this build). If you want 1-second resolution, you have to lower the heartbeat, which means more network traffic and more battery drain.
The second option is to log to a local server (e.g. MQTT to a Raspberry Pi running InfluxDB + Grafana) and graph it there. This is the right answer for anything beyond a quick “is the workshop warmer than the house” check.
Cluster limits you will hit
The Matter Temperature Measurement cluster has a few hard limits worth knowing:
- Range: -27315 to 32767 hundredths-of-a-degree-Celsius (-273.15°C to 327.67°C). You will never hit this.
- Resolution: 0.01°C. The cluster truncates. If you publish 22.555, it stores 22.55.
- NULL semantics:
MeasuredValueis nullable. If your sensor is broken and you want the app to show “unknown,” publishchip::app::DataModel::NullOptional. The app will hide the value. - Update rate: No spec limit, but the practical limit is “as fast as the commissioner can re-render.” Faster than 1Hz is wasted.
When something breaks
- Apple Home shows the device but the value never updates: your
attribute::updatecall is failing. Add a return-code check and look at the serial log. - The value is stuck at
0.0C: theNullable<int16_t>constructor got the wrong type. The cluster expects a nullable int16, not a plain int. - The value updates but Apple Home says
22.5Cwhile Google Home says22.50C: the apps round differently. This is normal. - Commissioning fails with “out of range”: the
min_valueormax_valueyou declared in the config is wrong for the cluster. Re-check the Matter spec for the Temperature Measurement cluster. - The device joins but the app shows “no compatible devices”: you implemented the wrong device type. Confirm
temperature_sensor::createis what you called, noton_off_light::createorthermostat::create.
What to build next
A combination sensor (temperature + humidity + pressure) is the next step. Matter supports a Humidity Sensor device type and a Pressure Sensor device type. You can add both endpoints to the same node. Apple Home will render two tiles. The BME280 reports all three, so the firmware work is just adding two more attribute::update calls. A multi-endpoint node is also the pattern you use to build a “real” weather station, which is the next tutorial in this series.