ESP32: receive IR remote signals with the VS1838B
Wire a 3-pin IR receiver module to an ESP32 and decode remote control signals. Use any TV remote, AC remote, or cheap IR remote as a wireless input.
The VS1838B is the IR receiver module I default to for any project that needs a wireless button. It is a 3-pin module (signal, VCC, GND) that demodulates 38 kHz IR signals and outputs a clean digital pulse train matching the original remote’s protocol. Wire it to any GPIO, point a remote at it, and you can read button presses as simple values.
This tutorial covers the wiring, the library, decoding the most common protocols (NEC, Sony, RC5), and the pattern for mapping button presses to actions in your project.
What you need
- ESP32 dev board
- VS1838B IR receiver module (3-pin variant with the metal can; about $1 from anywhere). The TSOP38238 is the equivalent from Vishay and is what Adafruit sells.
- Any IR remote. TV remote, AC remote, the cheap 21-button remotes from AliExpress. All work.
- 3 jumper wires
Wiring
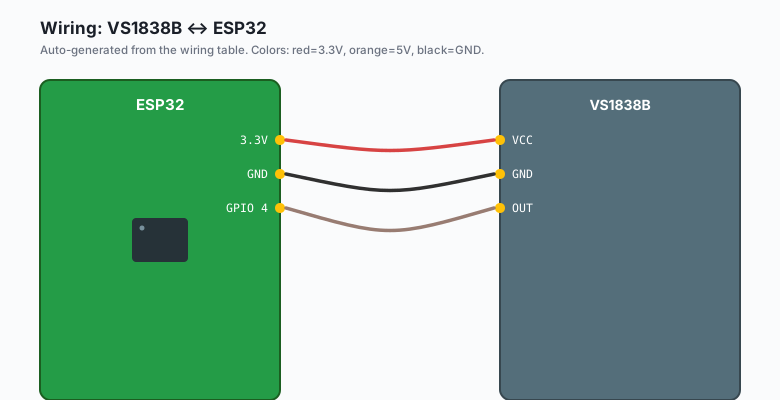
The VS1838B has 3 pins: OUT, GND, VCC.
VS1838B VCC -- ESP32 3.3V
VS1838B GND -- ESP32 GND
VS1838B OUT -- ESP32 GPIO 4
That is the entire wiring. The module’s OUT pin goes HIGH when no IR signal is detected and pulses LOW when a 38 kHz modulated signal is present. The library decodes the pulse train.
The VS1838B works on 3.3V or 5V. Use 3.3V to keep the ESP32 safe. Some modules have a metal can that is also the GND pin. Check the silkscreen.
Install library
Sketch >> Include Library >> Manage Libraries >> search for
IRremoteESP8266. Install it. The library supports the ESP32 even
though the name says ESP8266.
The code
Pick the language tab for your board.
ESP32 (Arduino)
#include <IRrecv.h>
#include <IRutils.h>

const int IR_PIN = 4;

IRrecv irrecv(IR_PIN);
decode_results results;

void setup() {
  Serial.begin(115200);
  delay(1000);
  irrecv.enableIRIn();
  Serial.println("IR receiver ready. Point a remote and press a button.");
}

void loop() {
  if (irrecv.decode(&results)) {
    Serial.print("Protocol: ");
    Serial.print(typeToString(results.decode_type).c_str());
    Serial.print("  Value: 0x");
    Serial.print(results.value, HEX);
    Serial.print("  Bits: ");
    Serial.println(results.bits);
    irrecv.resume();
  }
}
Arduino (Uno, Nano, Mega)
#include <IRrecv.h>
#include <IRutils.h>

const int IR_PIN = 2;   // pin 2 is the Timer2 interrupt pin on Uno/Nano, which the library needs

IRrecv irrecv(IR_PIN);
decode_results results;

void setup() {
  Serial.begin(115200);
  delay(1000);
  irrecv.enableIRIn();
  Serial.println("IR receiver ready.");
}

void loop() {
  if (irrecv.decode(&results)) {
    Serial.print("Protocol: ");
    Serial.print(typeToString(results.decode_type).c_str());
    Serial.print("  Value: 0x");
    Serial.print(results.value, HEX);
    Serial.print("  Bits: ");
    Serial.println(results.bits);
    irrecv.resume();
  }
}
The IR library needs a pin that supports Pin Change Interrupts (Uno/Nano: pin 2 or 3; Mega: pin 2, 3, 18, 19, 20, 21). Avoid pin 13 because the onboard LED interferes.
MicroPython (ESP32 or Pico)
from machine import Pin, Timer
from ir_rx import IR_RX

# pip-install ir_rx first, or copy ir_rx.py from
# https://github.com/peterhinch/micropython_ir
# On the Pico, use GPIO 4. On the ESP32, also works on GPIO 4.

ir_pin = Pin(4, Pin.IN, Pin.PULL_UP)

def callback(data, addr, ctrl):
    if data < 0:   # repeat code
        print('repeat')
    else:
        print(f'addr=0x{addr:02x} data=0x{data:02x} ctrl=0x{ctrl:02x}')

ir = IR_RX(ir_pin, callback)
print('IR receiver ready. Point a remote and press a button.')
Raspberry Pi Python
# Uses gpiozero. The LIRC daemon can also decode IR but gpiozero + a
# edge-detected GPIO is the simplest pattern for just "did something
# just transmit."
import gpiozero
import time

# On the Pi, use BCM pin 4 (physical pin 7). The VS1838B is a digital
# output; this just counts falling edges so you can see the bursts of
# 38 kHz modulation that the receiver has already demodulated.

ir_pin = gpiozero.DigitalInputDevice(4, pull_up=True)
last_event = 0
events = 0

def on_change():
    global last_event, events
    now = time.time()
    if now - last_event > 0.05:   # new burst
        events = 0
    events += 1
    last_event = now

ir_pin.when_activated = on_change
print('IR receiver ready. Watch Serial (or just count edges).')

while True:
    time.sleep(0.1)
For real IR decoding on a Pi (protocol-aware, button-identifying), install LIRC and configure /etc/lirc/lircd.conf for your remote. That is a separate, larger setup.
What you should see
Upload the ESP32 or Arduino version. Open Serial Monitor. Point a remote at the receiver and press a button. You should see lines like:
Protocol: NEC  Value: 0x20DF10EF  Bits: 32
Protocol: NEC  Value: 0x20DF906F  Bits: 32
Each button press gives a unique hex value. The protocol is whatever the remote uses (NEC is most common for cheap remotes; Sony uses SIRC; RC5 is on older Philips devices).
The protocols
The library decodes dozens of protocols. The most common:
- NEC: 32 bits, used by most cheap remotes and many TVs. The 8-bit address is followed by the 8-bit command and the 8-bit inverted command.
- Sony SIRC: 12, 15, or 20 bits. Used by Sony devices.
- RC5 / RC6: Philips protocol. Toggle bit complicates the decoding.
- Samsung: 32 bits. Similar to NEC but with different timing.
For most projects, you do not need to know the protocol details. You just need the hex value of each button. Write down which value corresponds to which button on your remote, and use those values in your project.
Mapping buttons to actions
The pattern is a switch statement on the hex value:
void loop() {
  if (irrecv.decode(&results)) {
    switch (results.value) {
      case 0x20DF10EF:   // power button on a typical NEC remote
        Serial.println("POWER");
        break;
      case 0x20DF906F:   // volume up
        Serial.println("VOL+");
        break;
      case 0x20DF8877:   // menu
        Serial.println("MENU");
        break;
      default:
        Serial.print("Unknown: 0x");
        Serial.println(results.value, HEX);
        break;
    }
    irrecv.resume();
  }
}
To get the hex values for your specific remote, run the sketch above and write down which button produces which value. Different remotes produce different values even for the same button. The library decodes the protocol but the address and command are remote-specific.
Repeat codes
When you hold a button down, the remote sends the code once, then sends repeat codes. The library has a separate path for repeat codes:
void loop() {
  if (irrecv.decode(&results)) {
    if (results.value == 0xFFFFFFFF) {
      // repeat code
      Serial.println("REPEAT");
    } else {
      // new code
      handleCode(results.value);
    }
    irrecv.resume();
  }
}
Use repeat codes for “hold to scroll” or “hold to dim” behaviors. They fire every ~100 ms while the button is held.
Sending IR (the other half)
The library also sends IR signals. With an IR LED and a transistor, you can control any device that has an IR remote:
#include <IRsend.h>

IRsend irsend(IR_PIN);   // use the same pin or a different one for the LED

void sendPower() {
  irsend.sendNEC(0x20DF10EF);
}
Wire an IR LED through a 100 ohm resistor to GPIO 4 (or any GPIO), with a 2N2222 transistor if you want maximum range. The library handles the 38 kHz modulation in software.
Common uses
- Home automation: cheap remotes as scene controllers.
- Camera shutter: any IR remote can trigger an ESP32 camera.
- Robot control: cheap toy-car-style remotes work great.
- Universal remote hub: combine IR receive and send to make the ESP32 a universal remote controller.
What you learned
- The VS1838B is the standard 3-pin IR receiver. 3.3V, GND, signal.
- Use the IRremoteESP8266 library on the ESP32.
- Each button press is a unique hex value per protocol per remote.
- Map hex values to actions in a switch statement.
When something breaks
- No output on Serial Monitor. Library not installed correctly, or
you forgot
irrecv.enableIRIn()insetup(). - Every press shows the same value. The remote is using a different
protocol than you expect. Try
decode_typeto see what the library thinks it is. - Random values when no remote is pressed. Electrical noise. Add a 100nF capacitor across the VS1838B’s VCC and GND pins.
- Short range (under 1 meter). The receiver is pointed wrong, or sunlight is washing out the IR signal. Test indoors away from windows.
What to build next
- The HC-SR04 tutorial combines with this for IR-controlled obstacle-avoiding robots.
- The book ESP32 IoT Projects covers IR-controlled home automation with a custom dashboard.
- The book Production IoT with ESP32 covers IR repeaters for controlling existing appliances.