ESP32: push readings into InfluxDB over HTTP
Write ESP32 sensor readings straight into a self-hosted InfluxDB over HTTP with line protocol. Time-series storage on your Pi, graphed by Grafana, no cloud in the middle.
You have InfluxDB and Grafana running on the Pi (the
raspberry-pi-influxdb-grafana tutorial covers the server side, the
token, and the bucket named home). This tutorial is the device
side: an ESP32 that pushes BME280 readings into that InfluxDB with a
plain HTTP POST. No MQTT, no broker process to babysit, no client
library. Line protocol over HTTP is one of the simplest
thing-to-database writes in all of IoT.
The trap: the write fails with HTTP 401 or 404 and people assume the
ESP32 code is wrong. It is almost always the URL. InfluxDB 2.x wants
/api/v2/write?org=...&bucket=..., with a Token header, and the org
and bucket must match what you typed during server setup exactly
(e.g. org=home when you created the org as home). One typo and
you spend an hour recompiling for nothing.
What you need
Needed
- ESP32 dev board
- A BME280 module for the example (any sensor works; swap the read
- A Pi (or any Linux box) with InfluxDB 2.x running, reachable on
- The API token from the InfluxDB setup (the
- 4 jumper wires and a breadboard
Nice to have
- A soldering iron and solder (only if you solder the header pins yourself)
- Helping hands or a vise to hold the board while you work
- An anti-static wristband (cheap insurance for the ESP32’s pins)
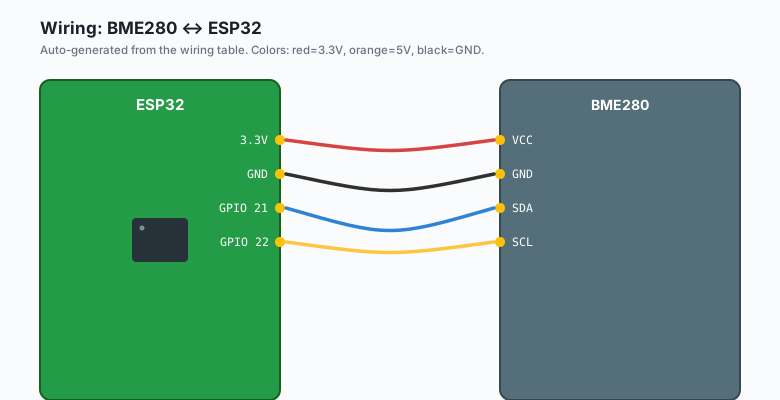
Wiring
| BME280 | ESP32 |
|---|---|
VCC | 3.3V |
GND | GND |
SDA | GPIO 21 |
SCL | GPIO 22 |
The stock ESP32 I2C pins. Nothing exotic here; the interesting part of this tutorial is all in the HTTP write.
Install
In the Arduino IDE: Sketch >> Include Library >> Manage Libraries >> search Adafruit BME280 Library (pulls in the
Adafruit Unified Sensor dependency; install that too when the IDE
asks). The HTTP client is built into the ESP32 core, so there is no
MQTT broker, no extra protocol library, nothing else.
The code
Line protocol is one text line per measurement:
measurement,tag=value field=value timestamp. Without a timestamp
the server stamps arrival time, which is what you want 95% of the
time.
#include <WiFi.h>
#include <HTTPClient.h>
#include <Wire.h>
#include <Adafruit_BME280.h>

const char* WIFI_SSID   = "your-wifi-ssid";
const char* WIFI_PASS   = "your-wifi-password";
const char* INFLUX_HOST = "192.168.1.50";        // the Pi
const char* INFLUX_ORG  = "home";
const char* INFLUX_BUCKET = "home";
const char* INFLUX_TOKEN  = "your-long-influxdb-token";

Adafruit_BME280 bme;

String writeUrl() {
  return String("http://") + INFLUX_HOST +
         ":8086/api/v2/write?org=" + INFLUX_ORG +
         "&bucket=" + INFLUX_BUCKET + "&precision=s";
}

bool influxWrite(const String& line) {
  HTTPClient http;
  http.begin(writeUrl());
  http.addHeader("Content-Type", "text/plain; charset=utf-8");
  http.addHeader("Authorization", String("Token ") + INFLUX_TOKEN);
  int code = http.POST(line);
  http.end();
  if (code != 204) {          // 204 No Content is Influx's success code
    Serial.printf("Write failed, HTTP %d\n", code);
    return false;
  }
  return true;
}

void setup() {
  Serial.begin(115200);
  Wire.begin(21, 22);
  if (!bme.begin(0x76)) {
    Serial.println("BME280 not found. Check wiring/address.");
    while (true) delay(100);
  }
  WiFi.begin(WIFI_SSID, WIFI_PASS);
  while (WiFi.status() != WL_CONNECTED) { delay(300); }
  Serial.print("IP: ");
  Serial.println(WiFi.localIP());
}

void loop() {
  static uint32_t last = 0;
  if (millis() - last < 60000) return;   // one reading per minute
  last = millis();

  float t = bme.readTemperature();
  float h = bme.readHumidity();
  float p = bme.readPressure() / 100.0F;

  // line protocol: measurement, tags, then fields, space-separated
  String line = String("home_sensor,room=desk,device=esp32-1 ") +
    "temperature=" + String(t, 2) + "," +
    "humidity="    + String(h, 2) + "," +
    "pressure="    + String(p, 2);

  if (influxWrite(line)) {
    Serial.println("Wrote: " + line);
  }
}
Upload, then check it landed. In the Influx UI
(http://pi-ip:8086): Explore >> pick the bucket home >> you
should see the home_sensor measurement with three fields. Or just
query the API:
curl -G "http://pi-ip:8086/api/v2/query?org=home" \
  -H "Authorization: Token your-long-influxdb-token" \
  -H "Accept: application/csv" \
  --data-urlencode 'from(bucket:"home") |> range(start: -10m)'
HTTP, not HTTPS, on a trusted LAN is a normal choice here. If your Pi is reachable from the wider network, do two things: give the token read-write scope only, and consider putting the Pi behind WireGuard instead of port-forwarding (the wireguard tutorial covers that).
Batch writes (the version I actually run)
One HTTP request per reading is fine at once-a-minute rates. When a
device reports every few seconds, buffer lines in RAM and flush a
batch. The endpoint accepts multiple lines separated by \n in one
POST, which cuts the request count by the batch size.
String batch = "";
int pending = 0;

void queueReading(float t, float h, float p) {
  batch += String("home_sensor,room=desk ") +
           "temperature=" + String(t, 2) + "," +
           "humidity=" + String(h, 2) + "\n";
  if (++pending >= 10) {          // flush every 10 readings
    HTTPClient http;
    http.begin(writeUrl());
    http.addHeader("Authorization", String("Token ") + INFLUX_TOKEN);
    http.POST(batch);
    http.end();
    batch = "";
    pending = 0;
  }
}
Keep batches under about 5 KB and flush before deep sleep (unwritten lines die with the RAM).
What you learned
- Line protocol is
measurement,tags fields: one text line per point, POSTed to/api/v2/write. - The Token header carries the API token; 204 means success.
- Tags go in the line and make Grafana filtering free (e.g.
room=desklets one dashboard show every room). - Batch multiple lines in one POST to cut request overhead.
When something breaks
- HTTP 401. The token is wrong, missing the
Tokenprefix, or scoped to a different org. The header must be exactlyAuthorization: Token <value>. - HTTP 404 or 422. The org or bucket name in the URL does not
match the server. Re-check against
Explorein the Influx UI (e.g.org=homefails if the org is actuallymyhome). - HTTP 429 or writes slow down over time. You are writing too fast for the Pi’s SD card. Raise the interval to 30 s or more, batch, and set a retention policy so the card is not writing forever.
- Data appears but Grafana shows nothing. The Grafana data source token usually has read scope while you created it before the bucket. Check the data source’s token, not the ESP32’s.
- Readings jump around wildly. You put the reading value in a tag instead of a field. Tags are strings and indexes; fields are the numbers. Swap them and the graphs behave.
What to build next
- Read the raspberry-pi-influxdb-grafana tutorial end to end if you have not yet: this device write is half of that stack.
- The MQTT publish-subscribe tutorial is the alternative feed: MQTT broker in the middle when many devices write to many consumers at once.
- The web server sensor dashboard tutorial pairs with this as the device’s own local dashboard while Influx handles history.
- The book IoT with ESP32 walks the full device-to-dashboard arc with retention and alerting included.