ESP32-CAM: photo delivery patterns over ntfy (attach, caption, thumbnail)
Three ways to push an ESP32-CAM photo through ntfy: raw JPEG attachment, captioned image, and thumbnail with a link. With the header semantics that make each one work.
The photo-on-motion tutorial sends one kind of ntfy message: the raw JPEG body that shows up as an attachment. That is the workhorse, but ntfy actually has three useful delivery shapes for a camera photo, and they behave differently on the phone (e.g. the attachment fills the notification, the thumbnail sits inline while the full image lives behind a tap, and the captioned version lets one POST carry two messages at once).
The trap I hit: I set X-Attach-URL pointing at the ESP32-CAM’s own
web server and the notification arrived with no image. The phone had
to fetch the JPEG from the camera, the camera was on the LAN, the
phone was on cellular, and nothing could reach anything. ntfy has two
attachment paths (bytes in the POST body vs a URL the server or client
fetches) and picking the wrong one fails silently.
What you need
Needed
- ESP32-CAM board (AI-Thinker, about $10)
- FTDI USB-serial adapter for programming
- 5V supply rated 500 mA or better
- The ntfy app on your phone, subscribed to a topic (e.g.
- Optionally, a self-hosted ntfy server on your LAN (the self-hosted
Nice to have
- A soldering iron and solder (only if you solder the header pins yourself)
- Helping hands or a vise to hold the board while you work
- An anti-static wristband (cheap insurance for the ESP32’s pins)
Wiring
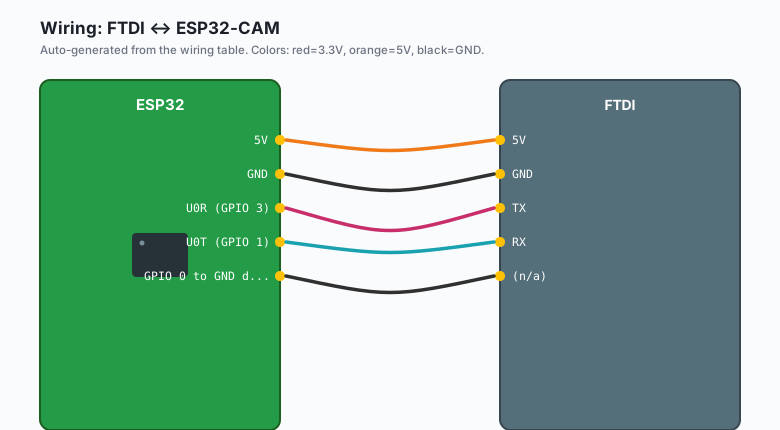
Same FTDI dance as every ESP32-CAM post:
| FTDI | ESP32-CAM |
|---|---|
5V | 5V |
GND | GND |
TX | U0R (GPIO 3) |
RX | U0T (GPIO 1) |
| (n/a) | GPIO 0 to GND during power-up (download mode) |
Ground GPIO 0, power the board, upload, remove the jumper, press
reset. No other wiring: this post is about the delivery layer, so the
trigger side is a plain loop() timer. Wire a PIR on GPIO 13 per the
photo-on-motion tutorial when you want the real trigger.
Install
No new libraries. The ESP32 Arduino core’s HTTPClient.h does
everything here. Board selection: Tools >> Board >> ESP32 Arduino >>
AI Thinker ESP32-CAM.
The code
One sketch, three send functions, one per pattern:
#include "esp_camera.h"
#include <WiFi.h>
#include <HTTPClient.h>

// AI-Thinker pin map
#define PWDN_GPIO_NUM  32
#define RESET_GPIO_NUM -1
#define XCLK_GPIO_NUM   0
#define SIOD_GPIO_NUM  26
#define SIOC_GPIO_NUM  27
#define Y2_GPIO_NUM     5
#define Y3_GPIO_NUM    18
#define Y4_GPIO_NUM    19
#define Y5_GPIO_NUM    21
#define Y6_GPIO_NUM    36
#define Y7_GPIO_NUM    39
#define Y8_GPIO_NUM    34
#define Y9_GPIO_NUM    35
#define VSYNC_GPIO_NUM 25
#define HREF_GPIO_NUM  23
#define PCLK_GPIO_NUM  22

const char* NTFY_URL = "https://ntfy.sh/porch-cam-m3z8";
// Self-hosted: http://192.168.1.50:25800/porch-cam-m3z8

bool cameraReady = false;

void setup() {
  Serial.begin(115200);

  camera_config_t config = {};
  config.ledc_channel = LEDC_CHANNEL_0;
  config.ledc_timer = LEDC_TIMER_0;
  config.pin_d0 = Y2_GPIO_NUM;  config.pin_d1 = Y3_GPIO_NUM;
  config.pin_d2 = Y4_GPIO_NUM;  config.pin_d3 = Y5_GPIO_NUM;
  config.pin_d4 = Y6_GPIO_NUM;  config.pin_d5 = Y7_GPIO_NUM;
  config.pin_d6 = Y8_GPIO_NUM;  config.pin_d7 = Y9_GPIO_NUM;
  config.pin_xclk = XCLK_GPIO_NUM;
  config.pin_pclk = PCLK_GPIO_NUM;
  config.pin_vsync = VSYNC_GPIO_NUM;
  config.pin_href = HREF_GPIO_NUM;
  config.pin_sccb_sda = SIOD_GPIO_NUM;
  config.pin_sccb_scl = SIOC_GPIO_NUM;
  config.pin_pwdn = PWDN_GPIO_NUM;
  config.pin_reset = RESET_GPIO_NUM;
  config.xclk_freq_hz = 20000000;
  config.pixel_format = PIXFORMAT_JPEG;
  config.frame_size = FRAMESIZE_VGA;
  config.jpeg_quality = 12;
  config.fb_count = 1;

  cameraReady = (esp_camera_init(&config) == ESP_OK);
  Serial.println(cameraReady ? "camera ok" : "camera FAILED (check power)");

  WiFi.mode(WIFI_STA);
  WiFi.begin("your-wifi", "your-password");
  while (WiFi.status() != WL_CONNECTED) { delay(500); Serial.print("."); }
  Serial.println("\nready");
}

camera_fb_t* capture() {
  if (!cameraReady) return nullptr;
  camera_fb_t *fb = esp_camera_fb_get();
  if (!fb) Serial.println("capture failed");
  return fb;
}

// Pattern 1: the raw JPEG body (the photo-on-motion workhorse)
void sendAttach() {
  camera_fb_t *fb = capture();
  if (!fb) return;
  HTTPClient http;
  http.begin(wc, NTFY_URL);
  http.addHeader("Content-Type", "image/jpeg");
  http.addHeader("X-Title", "Porch: photo attached");
  int code = http.POST(String((const char*)fb->buf), fb->len);
  Serial.printf("attach: %d\n", code);
  http.end();
  esp_camera_fb_return(fb);
}

// Pattern 2: captioned image (text body + X-Filename makes it an
// attachment while the message text rides along)
void sendCaptioned(String caption) {
  camera_fb_t *fb = capture();
  if (!fb) return;
  HTTPClient http;
  http.begin(wc, NTFY_URL);
  http.addHeader("Content-Type", "image/jpeg");
  http.addHeader("X-Title", "Porch cam");
  http.addHeader("X-Message", caption);      // the text under the image
  http.addHeader("X-Filename", "porch.jpg"); // turns the body into an attachment
  int code = http.POST(String((const char*)fb->buf), fb->len);
  Serial.printf("captioned: %d\n", code);
  http.end();
  esp_camera_fb_return(fb);
}

// Pattern 3: thumbnail + link. Send a small downscaled JPEG in the
// body, and let the notification carry a URL to the full frame.
void sendThumbAndLink() {
  camera_fb_t *fb = capture();
  if (!fb) return;

  // Serve the full frame yourself (snapshot server, SD card + web
  // server, or any endpoint you own); here we just reference one:
  String fullUrl = "http://192.168.1.77/porch-latest.jpg";

  HTTPClient http;
  http.begin(wc, NTFY_URL);
  http.addHeader("Content-Type", "text/plain");
  http.addHeader("X-Title", "Porch cam");
  http.addHeader("X-Click", fullUrl);        // tapping opens the full photo
  http.addHeader("X-Icon", "https://your-server.local/cam-icon.png");
  int code = http.POST("Tap for the full photo");
  Serial.printf("thumb+link: %d\n", code);
  http.end();

  // Then push the full JPEG wherever fullUrl points (e.g. POST it to
  // a tiny receiver on your LAN, or write to SD if that receiver is
  // the camera's own SD web server).
  esp_camera_fb_return(fb);
}

WiFiClient wc;   // shared client for HTTPClient::begin(wc, url)

void loop() {
  sendAttach();
  delay(20000);
  sendCaptioned("Motion test at " + String(millis() / 1000) + "s");
  delay(20000);
  sendThumbAndLink();
  delay(60000);
}
Note the HTTPClient http; http.begin(wc, NTFY_URL) signature: the
shared WiFiClient overload. On the ESP32 Arduino core 2.x, the
no-argument begin(url) form leaks sockets when called repeatedly
(each call opens a new one); passing the shared client closes each
connection properly.
Which pattern when
| Pattern | What arrives | Use it for |
|---|---|---|
| Raw attach | full image in the notification | events you judge by looking |
| Captioned | image plus text | events where the why matters (e.g. “back door, 3 people”) |
| Thumb + link | small card, tap for full | bandwidth-limited or archived photos |
The raw attach is the default. Captioned when the event carries metadata worth reading (a sensor value, a count). Thumb + link when the photos are big, the network is slow, or you are sending many and want the phone to stay snappy.
Attachment payloads over the public ntfy.sh count against its per-message and per-visitor caches. VGA at quality 12 is 20-40 KB and fine. UXGA at quality 10 can be 300 KB and gets you rate-limited faster; self-host before you raise frame sizes.
The two attachment paths, and when the URL one works
ntfy attachments have two distinct mechanics:
- Body bytes: the JPEG travels inside your POST. Works everywhere, both ntfy.sh and self-hosted, and the image is delivered even if the camera goes offline a second later.
- X-Attach-URL: the server (or your phone) fetches the JPEG from a URL you name. Only works if that URL is reachable from wherever the fetch happens (e.g. your LAN-only camera URL is invisible from cellular, so the notification arrives with no image and no error).
The URL path earns its keep when you already run a server that holds the full image (e.g. the camera’s own SD-card web server, or a receiver box on a VPS). Body bytes win everywhere else.
What you learned
- One POST, three shapes: raw attachment, captioned attachment, and link card, all chosen by headers, not by different endpoints.
X-Filenameplus an image Content-Type is what makes the body an attachment with a caption;X-Clickis what makes a message tappable.- The URL-attachment path needs a URL reachable from the phone, not just from the camera.
When something breaks
- Notification arrives with no image: you sent body bytes with a wrong Content-Type (e.g. text/plain instead of image/jpeg), or you used X-Attach-URL with a LAN-only URL while on cellular. Check both.
- “Camera init failed”: the power supply, as with every ESP32-CAM post. 5V, 500 mA+, short thick cable.
- POST returns 429: the public server rate limit. VGA photos at reasonable intervals are fine; a burst of UXGA attachments is not. Self-host.
- Image arrives as garbage pixels: power brownout mid-capture or
jpeg_qualitybelow 10. Same fixes as the streaming tutorial. - Caption shows but image does not:
X-Filenamewas missing, so the body stayed a plain text message that happens to be bytes. The filename header is what flips the body to attachment mode.
What to build next
- The photo-on-motion tutorial is the PIR-triggered baseline this post varies the delivery for.
- The streaming tutorial serves the live view that the thumb + link pattern can deep-link into.
- The ntfy tutorial covers self-hosting, priorities, and the MQTT bridge for two-way topics.
- The book IoT with ESP32 bundles the camera tutorials.