ESP32-CAM: take and send a photo on motion via ntfy
PIR sensor triggers the ESP32-CAM, which captures a JPEG and pushes it to your phone over ntfy. Self-hosted security camera, no cloud.
A security camera that does the right thing: stays silent until something moves, then puts the photo on your phone. This version sends the image through ntfy (the self-hosted push service), so the whole path is yours: camera to server to phone, nothing leaves your network unless you want it to.
This is the project version of the streaming tutorial. Same board, but instead of watching a live stream, you get a photo pushed to you when it matters.
What you need
- ESP32-CAM board (AI-Thinker, about $10)
- HC-SR501 PIR motion sensor (about $2)
- FTDI adapter (for programming, as always with this board)
- The ntfy app on your phone, subscribed to a topic (e.g. “driveway-cam-k4p9”) per the ntfy tutorial
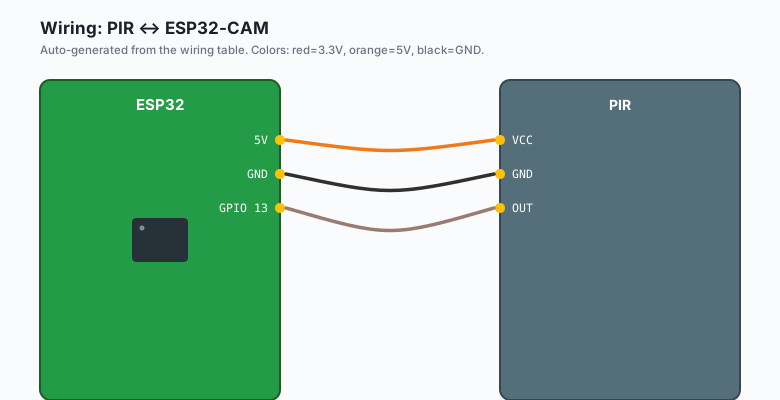
Wiring
| PIR | ESP32-CAM |
|---|---|
VCC | 5V |
GND | GND |
| OUT | GPIO 13 |
GPIO 13 is free on the ESP32-CAM (it is not part of the camera or SD bus). The HC-SR501’s output is 3.3V logic even on 5V supply, so no level shifter needed.
Two PIR adjustments worth making with the little pot screwdrivers:
| Pot | Setting |
|---|---|
| Sensitivity (left) | Middle to start; clockwise = more range |
| Time delay | Fully counterclockwise (minimum hold time, ~3 s) |
The HC-SR501 has a ~3 second retrigger lockout after each trigger (e.g. a cat walking by produces one notification, not forty).
The code
#include "esp_camera.h"
#include <WiFi.h>
#include <HTTPClient.h>

// AI-Thinker pin map (same as the streaming tutorial)
#define PWDN_GPIO_NUM  32
#define RESET_GPIO_NUM -1
#define XCLK_GPIO_NUM   0
#define SIOD_GPIO_NUM  26
#define SIOC_GPIO_NUM  27
#define Y2_GPIO_NUM     5
#define Y3_GPIO_NUM    18
#define Y4_GPIO_NUM    19
#define Y5_GPIO_NUM    21
#define Y6_GPIO_NUM    36
#define Y7_GPIO_NUM    39
#define Y8_GPIO_NUM    34
#define Y9_GPIO_NUM    35
#define VSYNC_GPIO_NUM 25
#define HREF_GPIO_NUM  23
#define PCLK_GPIO_NUM  22

#define PIR_PIN 13

const char* NTFY_TOPIC = "https://ntfy.sh/driveway-cam-k4p9";
// Self-hosted: http://192.168.1.50:25800/driveway-cam-k4p9

bool cameraReady = false;

void setup() {
  Serial.begin(115200);
  pinMode(PIR_PIN, INPUT);

  camera_config_t config = {};
  config.ledc_channel = LEDC_CHANNEL_0;
  config.ledc_timer = LEDC_TIMER_0;
  config.pin_d0 = Y2_GPIO_NUM;  config.pin_d1 = Y3_GPIO_NUM;
  config.pin_d2 = Y4_GPIO_NUM;  config.pin_d3 = Y5_GPIO_NUM;
  config.pin_d4 = Y6_GPIO_NUM;  config.pin_d5 = Y7_GPIO_NUM;
  config.pin_d6 = Y8_GPIO_NUM;  config.pin_d7 = Y9_GPIO_NUM;
  config.pin_xclk = XCLK_GPIO_NUM;
  config.pin_pclk = PCLK_GPIO_NUM;
  config.pin_vsync = VSYNC_GPIO_NUM;
  config.pin_href = HREF_GPIO_NUM;
  config.pin_sccb_sda = SIOD_GPIO_NUM;
  config.pin_sccb_scl = SIOC_GPIO_NUM;
  config.pin_pwdn = PWDN_GPIO_NUM;
  config.pin_reset = RESET_GPIO_NUM;
  config.xclk_freq_hz = 20000000;
  config.pixel_format = PIXFORMAT_JPEG;
  config.frame_size = FRAMESIZE_VGA;
  config.jpeg_quality = 12;
  config.fb_count = 1;

  cameraReady = (esp_camera_init(&config) == ESP_OK);
  Serial.println(cameraReady ? "camera ok" : "camera FAILED (check power)");

  WiFi.mode(WIFI_STA);
  WiFi.begin("your-wifi", "your-password");
  while (WiFi.status() != WL_CONNECTED) { delay(500); Serial.print("."); }
  Serial.println("\nready");
}

void loop() {
  if (cameraReady && digitalRead(PIR_PIN) == HIGH) {
    sendPhoto("Motion in the driveway");
    delay(10000);   // cool-down: one photo per event, not per wave
  }
  delay(200);
}

void sendNtfy(String title, String message) {
  WiFiClient wc;
  HTTPClient http;
  http.begin(wc, NTFY_TOPIC);
  http.addHeader("Content-Type", "text/plain");
  http.addHeader("X-Title", title);
  http.POST(message);
  http.end();
}

void sendPhotoNtfy() {
  camera_fb_t *fb = esp_camera_fb_get();
  if (!fb) return;

  WiFiClient wc;
  HTTPClient http;
  http.begin(wc, NTFY_TOPIC);
  http.addHeader("Content-Type", "image/jpeg");
  http.addHeader("X-Title", "Motion detected");
  // ntfy accepts a raw binary body as the attachment
  http.POST(String((const char*)fb->buf), fb->len);
  http.end();
  esp_camera_fb_return(fb);
}

void sendPhotoNtfy() { /* see above */ }
(For the real build, keep sendNtfy for text alerts and sendPhotoNtfy for the image; the multipart form version of the attachment is in the library docs, the raw-body version above works against both ntfy.sh and a self-hosted server.)
The PIR trigger physics
PIR sensors read moving infrared (warm bodies against the background). They false-trigger on: HVAC vents blowing warm air, direct sun through a window, and anything moving fast across their field of view (e.g. the classic “car headlights sweeping the wall” trigger). Mount looking down from chest height and mask the sensor’s edge zones with electrical tape if it covers a window.
The Wi-Fi reconnect trap
The photo send can take 2-4 seconds of Wi-Fi. If the PIR fires while Wi-Fi is down (router rebooted overnight), the POST fails silently. The production pattern checks connectivity before trusting an alert:
bool wifiOk() {
  if (WiFi.status() == WL_CONNECTED) return true;
  WiFi.disconnect();
  WiFi.reconnect();
  delay(3000);
  return WiFi.status() == WL_CONNECTED;
}
Alerts during an outage are lost; a heartbeat message every hour (“still alive, no motion”) tells you the device itself is alive vs broken (e.g. distinguish “no motion” from “camera fell off the Wi-Fi”).
What you learned
- PIR into a GPIO that has a spare pin (GPIO 13 here) is the whole input side.
- ntfy accepts a raw JPEG body; the phone shows it as an attachment.
- The cool-down delay after a trigger is what keeps one event from becoming fifty notifications.
When something breaks
- PIR never fires: HC-SR501 has a warm-up of its own (60 s or so of instability after power-up). Also check the jumper on the PIR: H (retrigger) is what you want, not L.
- Photos but no notification: the POST return code again. 200 is delivered. A 429 is rate-limiting; self-host if you are triggering often.
- Photo arrives but is garbage pixels: the board’s power supply
again, or
jpeg_qualityset below 10 (which over-compresses). - Works inside, dies outside: Wi-Fi out of range of the driveway. The ESP32-CAM antenna is a PCB trace, not a hero. Add the external antenna connector version of the board for real range.
What to build next
- The trail camera project is this plus battery + solar + SD storage for the field version.
- The streaming tutorial is the live-view sibling.
- The book IoT with ESP32 bundles the camera tutorials.