ESP32: environmental sensing with the BME680
The BME680 reads temperature, humidity, pressure, AND volatile organic compounds (VOC) from air quality, over one I2C bus.
The BME680 is what you get when Bosch takes the BME280 and adds a gas sensor. It reads temperature, humidity, barometric pressure, and volatile organic compounds (VOCs, e.g. the stuff from cooking, paint, and breathing). One chip, one I2C bus, four readings. It is the sensor in most of the commercial indoor air quality gadgets, and the breakout costs about $8.
This tutorial gets you all four readings on screen in about 25 minutes.
What you need
- ESP32 dev board
- BME680 breakout (the Adafruit one is the reference design; the purple GY-BME680 clones work the same, about $10)
- 4 jumper wires
Why the BME680 over the BME280 you may already have: the gas resistance channel. It is not a CO2 meter (be suspicious of any sub-$30 “CO2 sensor”), but it reacts to cooking, solvents, and a full room of people. The BME280 is still the right pick if you only want weather data. The 680 is the pick when “is the air in this room actually stale” is the question.
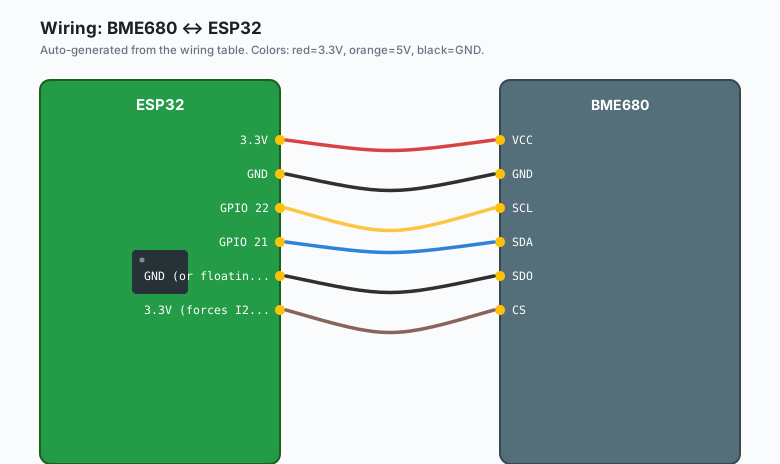
Wiring (I2C)
| BME680 | ESP32 |
|---|---|
VCC | 3.3V |
GND | GND |
SCL | GPIO 22 |
SDA | GPIO 21 |
| SDO | GND (or floating) |
CS | 3.3V (forces I2C mode) |
The CS pin on some breakouts needs to be high to select I2C instead of SPI. The Adafruit board ties it for you. The purple clones usually want it tied to VCC.
Install
Arduino IDE >> Sketch >> Include Library >> Manage Libraries, search “BME68x”, install the Bosch one (by BOSCHSensortec). The BSEC library gives you a computed IAQ (indoor air quality) index, but it is closed-source and license-encumbered (e.g. fine for personal use, check before shipping a product). This tutorial uses the plain open-source driver and raw gas resistance.
The code
#include <Wire.h>
#include "bme68x.h"
#include "bme68x_defs.h"
// Simpler: use the Adafruit BME680 library
#include <Adafruit_BME680.h>

#define SEALEVELPRESSURE_HPA (1013.25)

Adafruit_BME680 bme;

void setup() {
  Serial.begin(115200);
  Wire.begin(21, 22);

  if (!bme.begin(0x76)) {
    Serial.println("BME680 not found, check wiring and CS/SDO pins");
    while (1) delay(1000);
  }

  bme.setTemperatureOversampling(BME68X_OS_16X);
  bme.setHumidityOversampling(BME68X_OS_2X);
  bme.setPressureOversampling(BME68X_OS_16X);
  bme.setIIRFilterSize(BME68X_IIR_FILTER_SIZE_3);
  bme.setGasHeater(320, 150);   // 320C for 150 ms
}

void loop() {
  unsigned long endTime = bme.beginReading();
  if (endTime == 0) {
    Serial.println("reading failed");
    return;
  }
  delay(endTime - millis());   // sensor needs this long to measure

  if (!bme.endReading()) {
    Serial.println("failed to complete reading");
    return;
  }

  Serial.print("Temp: ");   Serial.print(bme.temperature / 100.0);  Serial.println(" C");
  Serial.print("Hum:  ");   Serial.print(bme.humidity / 1000.0);   Serial.println(" %");
  Serial.print("Pres: ");   Serial.print(bme.pressure / 100.0);     Serial.println(" hPa");
  Serial.print("Gas:  ");   Serial.print(bme.gas_resistance / 1000.0); Serial.println(" KOhms");
  Serial.println();
  delay(5000);
}
Upload, open Serial Monitor at 115200. Wave a marker with the cap off near the sensor and watch the gas resistance drop.
Reading the gas number
Gas resistance runs the counterintuitive way: LOWER ohms means MORE gas. A clean room settles somewhere around 30-50 KOhms after the sensor has been running for a while. Wave a marker at it and it can drop below 5 KOhms. The number is relative: what matters is the baseline your own room settles at (e.g. compare today’s reading to last hour’s reading, not to an absolute number).
The heater runs hot and draws real current (about 5 mA average, more in bursts). Fine on USB power. On battery, this is the sensor that eats your budget; duty-cycle it (one reading a minute) or use deep sleep between readings.
The burn-in
Bosch says the gas sensor needs 48 hours of powered operation before the baseline is stable. In practice it drifts downward over the first day and then stabilizes. Do not calibrate anything on day one. This is the same 24-hour warm-up dance the MQ sensors do, just tamer.
What you learned
- The BME680 is a BME280 plus a VOC-reactive gas resistance channel.
- Gas resistance reads inversely: low ohms, more gas. Baseline is per room, so track relative changes.
- The two-stage read pattern: beginReading() schedules, delay to endTime, then endReading() collects.
When something breaks
- “BME680 not found”: the CS/SDO pin matters on clones. Tie CS high (3.3V) to select I2C. Run an I2C scanner; the address is 0x76 or 0x77 depending on the SDO pin.
- Gas resistance stuck near 0: the heater is not firing. Check setGasHeater() was called with sane values (320 degrees, 150 ms).
- Humidity reads high all the time: you just showered or the sensor is near a plant. It is probably right. Bosch’s humidity element is fast, faster than your nose.
What to build next
- The air quality monitor project combines this with an OLED to build a standalone room monitor.
- Push the gas reading to MQTT and graph it over a week to find your room’s baseline.
- The book IoT with ESP32 bundles the sensor tutorials.