ESP32: add precision analog inputs with the ADS1115
The ESP32 ADC is noisy and 12-bit. The ADS1115 gives you 16-bit, 4-channel, differential readings over I2C for $4.
The ESP32’s built-in ADC is the weakest part of the chip. It is 12-bit, nonlinear at both ends of the range, and noisy enough that consecutive readings of the same voltage can differ by 50 counts. For “is the soil dry” that is fine. For a load cell, a thermocouple, or any sensor where you care about small voltage changes, it is not.
The ADS1115 is the fix. It is a 16-bit, 4-channel ADC that talks I2C for about $4. It has a programmable gain amplifier, true differential inputs, and it is stable enough to read a thermocouple through an amplifier without the reading wandering.
What you need
- ESP32 dev board
- ADS1115 breakout (the Adafruit one has a nice terminal block; the GY-ADS1115 clone works identically, about $4)
- A sensor to test with (a potentiometer is fine for proving it works)
- Jumper wires
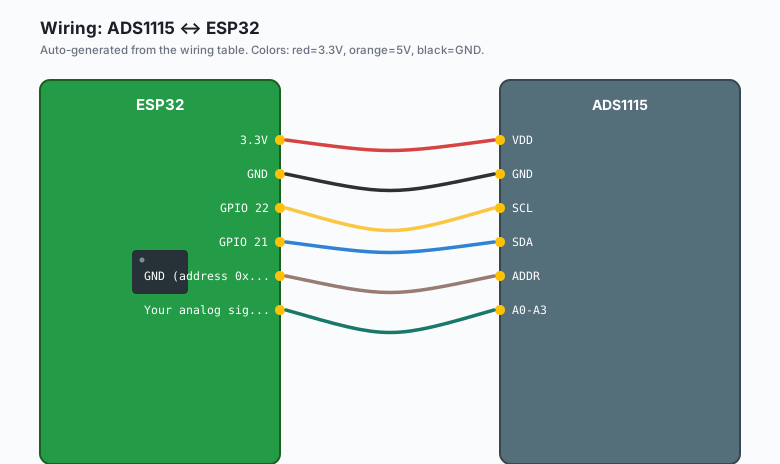
Wiring (I2C)
| ADS1115 | ESP32 |
|---|---|
| VDD | 3.3V |
GND | GND |
SCL | GPIO 22 |
SDA | GPIO 21 |
| ADDR | GND (address 0x48) |
A0-A3 | Your analog signals |
The ADDR pin picks one of four I2C addresses (0x48, 0x49, 0x4A, 0x4B for GND, VDD, SDA, SCL respectively). That means up to four ADS1115s on one bus, 16 analog inputs total.
The ADS1115 runs on 3.3V here, so its full-scale input tracks the supply voltage. Do not feed it 5V signals unless you power it from 5V and use a level shifter on I2C. Staying at 3.3V keeps everything safe for the ESP32.
Install
Arduino IDE >> Sketch >> Include Library >> Manage Libraries, search “Adafruit ADS1X15”, install the Adafruit one.
The code
#include <Wire.h>
#include <Adafruit_ADS1X15.h>

Adafruit_ADS1115 ads;

void setup() {
  Serial.begin(115200);
  Wire.begin(21, 22);

  if (!ads.begin(0x48)) {
    Serial.println("ADS1115 not found, check wiring");
    while (1) delay(1000);
  }

  // Gain sets the full-scale range:
  //   GAIN_TWOTHIRDS -> +/-6.144V (default)
  //   GAIN_ONE       -> +/-4.096V
  //   GAIN_FOUR      -> +/-1.024V
  //   GAIN_SIXTEEN   -> +/-0.256V
  ads.setGain(GAIN_ONE);
}

void loop() {
  int16_t raw = ads.readADC_SingleEnded(0);
  float volts = ads.computeVolts(raw);

  Serial.print("Raw: ");
  Serial.print(raw);
  Serial.print("  Volts: ");
  Serial.println(volts, 4);
  delay(500);
}
Upload, open Serial Monitor. Turn the potentiometer and watch four decimal places move. Compare that to the ESP32’s own ADC and you will see the difference immediately: the ADS1115 holds steady, the internal ADC wanders.
Differential mode, the real reason to buy this
The single-ended read above is the basic use. The feature that earns the $4 is differential mode, where the chip reads the voltage BETWEEN two pins instead of between a pin and ground:
int16_t diff = ads.readADC_Differential_0_1();
float volts = ads.computeVolts(diff);
This is how load cells and thermocouples work: the sensor outputs a tiny voltage difference between two wires (e.g. a load cell might output 10 mV at full weight), and common-mode noise (anything pushing both wires the same direction) cancels out. The ESP32 ADC cannot do this at all. If your project involves a Wheatstone bridge or a shunt resistor, differential mode is the whole reason.
The gain setting
The gain sets the input range. Pick the smallest range that fits your signal:
| Gain | Full-scale | Use when |
|---|---|---|
| GAIN_TWOTHIRDS | +/-6.144V | 5V signals |
| GAIN_ONE | +/-4.096V | Most 3.3V sensors |
| GAIN_FOUR | +/-1.024V | Thermocouple amps, shunt resistors |
| GAIN_SIXTEEN | +/-0.256V | Load cells, microvolt signals |
Wrong gain does two different bad things. Too small a range clips (readings pin at the max), too large a range wastes resolution. With a load cell amp that outputs 0-20 mV, GAIN_SIXTEEN is the difference between 200 usable counts and 3200.
The data rate tradeoff
The ADS1115 samples at 8 or 128 samples per second. The default in the
library is 128. For slow sensors (temperature, weight, light) that is
plenty. If you set ads.setDataRate(RATE_ADS1115_8SPS) you get more
internal averaging and cleaner readings at the cost of speed (e.g.
right choice for a scale).
What you learned
- The ADS1115 adds 16-bit, low-noise analog inputs over I2C.
- Differential mode reads the voltage between two pins, which cancels noise and is required for bridge sensors.
- Gain and data rate trade range against resolution and noise.
When something breaks
- Readings pegged at 32767 or -32768: your input exceeds the gain range. Drop the gain (bigger +/- range) or scale the signal down.
- “ADS1115 not found”: run an I2C scanner. Four possible addresses depending on the ADDR pin. The Adafruit library begin() takes the address as its argument.
- Readings noisy even on the ADS: your sensor wire is long and picking up mains hum. Average 8 readings, or check that the sensor and ESP32 share a ground.
- Slow loop: at 8 SPS each read blocks for 125 ms. That is the chip doing its job, not your code. Raise the data rate or accept it.
What to build next
- The load cell + HX711 tutorial covers a dedicated weight amp, but the ADS1115 in differential mode handles bridge sensors too.
- Pair with a thermocouple amp for high-temp logging with real resolution.
- The book IoT with ESP32 bundles the sensor tutorials.