ESP32: build a digital scale with a load cell and HX711
Turn a $8 load cell into a working digital scale with the HX711 amp and an ESP32. Calibration, tare, and the wiring that gets 1g resolution.
A load cell is a strain gauge in a metal frame: put weight on it, the frame flexes a few microns, and the resistance of a tiny bridge circuit changes by a few millivolts. Those millivolts are way below what any microcontroller ADC can read directly. The HX711 exists to amplify and digitize exactly that signal, 24 bits at a time.
This tutorial builds a working scale with 1-gram resolution on an ESP32, including the calibration step everyone skips and then regrets.
What you need
- ESP32 dev board
- Load cell: the 5 kg “bar” type (four wire, white/red/black/green) is the standard starter one, about $8. Pick the capacity for your use (e.g. 1 kg for a kitchen scale, 20 kg for a pet feeder, 100 kg for a beehive)
- HX711 breakout board (the little green one with two big screw terminals, about $2)
- A flat rigid plate and 4 spacers (the load cell mounts in the middle and takes force on its ends; mounting hardware matters more than the sensor)
Wiring
| HX711 | Connects to |
|---|---|
| E+ | Load cell RED wire |
| E- | Load cell BLACK wire |
| A- | Load cell WHITE wire |
| A+ | Load cell GREEN or BLUE wire |
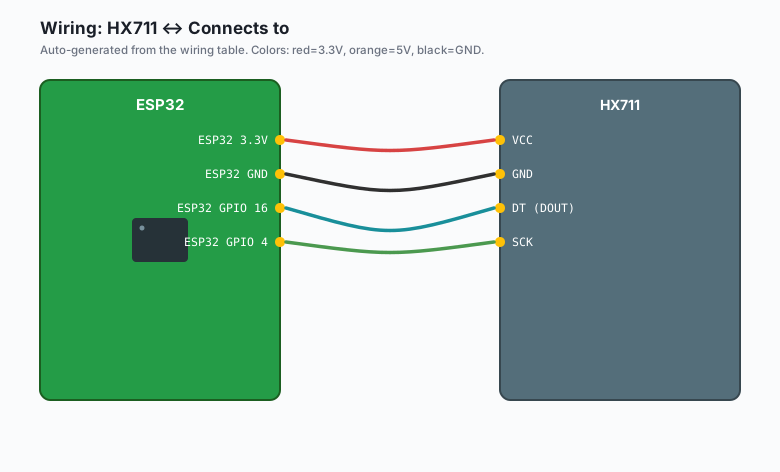
VCC | ESP32 3.3V |
GND | ESP32 GND |
DT (DOUT) | ESP32 GPIO 16 |
SCK | ESP32 GPIO 4 |
The load cell wires are the four screws on the left side of the HX711. Colors vary by manufacturer, which is the number one source of “my scale reads negative” confusion. The wiring above is the standard 5 kg bar from SparkFun and most AliExpress sellers.
Load cells are direction-sensitive. The arrow stamped on the metal points the way force should flow (top to bottom). Mount it upside down and your readings will be negative or nonlinear. If it reads backwards after correct wiring, just negate in software, the cell does not care.
Install
Arduino IDE >> Sketch >> Include Library >> Manage Libraries, search “HX711”, install the one by bogde (bogdan).
The code
#include "HX711.h"

#define LOADCELL_DOUT_PIN 16
#define LOADCELL_SCK_PIN  4

HX711 scale;

void setup() {
  Serial.begin(115200);
  scale.begin(LOADCELL_DOUT_PIN, LOADCELL_SCK_PIN);

  Serial.println("Wait for scale to stabilize, remove any weight.");
  delay(2000);
  scale.tare();   // zero the scale, current reading = 0
  Serial.println("Tared. Place a known weight.");

  // Calibration factor: 228.0f is a common starting point for the
  // 5kg bar cell. You MUST calibrate for your own cell (see below).
  scale.set_scale(228.0f);
}

void loop() {
  if (scale.is_ready()) {
    float grams = scale.get_units(10);   // average 10 readings
    Serial.print("Weight: ");
    Serial.print(grams, 1);
    Serial.println(" g");
  } else {
    Serial.println("HX711 not ready");
  }
  delay(500);
}
Calibration, the part everyone skips
The 228.0f in the code is a starting point, not a value. Every load cell + HX711 pair has a different gain. Calibrate in two steps:
- Tare with nothing on the scale (already done by tare() above).
- Place a known weight (e.g. a bag of sugar marked 1000 g, or a roll of nickels, which is 200 g in the US and 250 g in Canada, or literally any kitchen item you trust). Note the raw reading:
// Add this to loop() temporarily:
Serial.println(scale.read_average(20));   // raw counts
Divide: calibration_factor = raw_reading / known_grams. Put that
number in set_scale(). Done. My scale needed 426.7, yours will need
something different, and that is not a bug.
The mechanical setup
The load cell only works if it is mounted right. The bar type has mounting holes on both ends; one end attaches to your base, the other to the platform where the weight goes, and the force has to flow through the cell’s arrow direction. Direct screw-to-tabletop reads nothing useful (e.g. the cell needs room to flex).
The standard pattern: two plates, the cell sandwiched between them on spacers, force applied to the top plate. 3D-printed brackets exist for every cell size; search “load cell mount 5kg” on any print site.
The 80-bit trap
The HX711 outputs a 24-bit reading per sample, but the actual useful resolution is set by the load cell’s rated output (typically 1 mV/V). At 5 kg with a 3.3V excitation you get about 3.3 mV full scale, which the HX711’s 128x gain turns into about 420 mV. Spread across 2^24 counts, that is theoretical noise-floor resolution of milligrams. Real world: 0.1 g is achievable with the 10-sample average, 1 g is solid without averaging. Do not expect more from a single cell.
What you learned
- Load cells output millivolts; the HX711 amplifies and digitizes them over a two-wire serial link.
- Tare() zeroes the scale, set_scale() converts raw counts to units, and the factor is unique to your hardware.
- Resolution is a function of the cell’s mV/V rating, not the ADC bits.
When something breaks
- Readings negative when weight applied: your white/green wires are swapped, or the cell is mounted upside down relative to the arrow. Negate the calibration factor and move on.
- “HX711 not ready” forever: the DT and SCK wires are swapped, or you are powering the HX711 from 5V and reading with 3.3V logic. The HX711 wants VCC of 2.7-5.5V but its DOUT swings to VCC, so power it from 3.3V.
- Readings drift upward over minutes: temperature. Load cells have real thermal drift. Tare() at startup, and if the project runs long, re-tare on a schedule or on a button.
- Jumping by grams every read: the scale is on a wobbly surface, or your wiring has a bad contact. Average more samples (get_units(20)) or fix the contact first.
What to build next
- The ADS1115 tutorial covers the general precision-ADC path (the HX711 is the specialized cheap version of the same idea).
- A pet feeder project: this scale + the servo tutorial + a timer.
- The book IoT with ESP32 bundles the sensor tutorials.