ESP32: read a BME280 temperature, humidity, and pressure sensor
Wire a BME280 to an ESP32 over I2C and stream temperature, humidity, and barometric pressure. Better than the DHT22 for anything weather-related.
The BME280 is the sensor I reach for when a DHT22 is not enough. It reads temperature, humidity, and barometric pressure. It uses I2C (two wires). It is accurate to about 1 hPa on pressure, which is enough to detect weather changes and altitude shifts of a few meters. The DHT22 only does temperature and humidity, and it is slow and finicky.
This tutorial gets you from a fresh ESP32 to a clean weather reading in about 25 minutes.
What you need
- ESP32 dev board
- BME280 breakout board (the Adafruit or SparkFun ones are plug-and-play; the cheap AliExpress ones usually work too but check the chip markings)
- 4 jumper wires
Wiring (I2C)
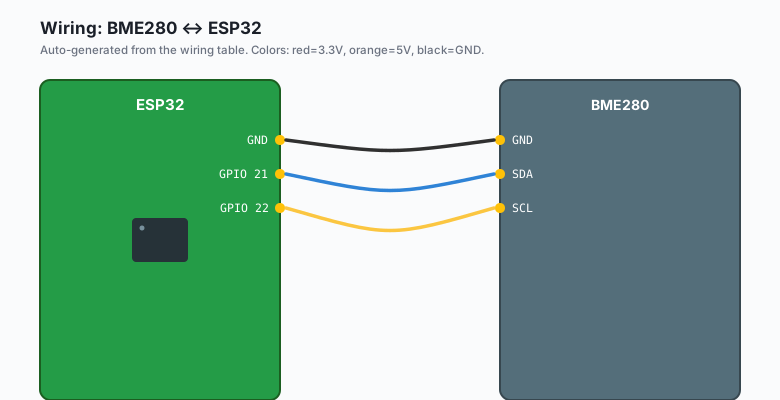
The BME280 uses I2C. On most ESP32 dev boards, the default I2C pins are GPIO 21 (SDA) and GPIO 22 (SCL). That is what we use here.
BME280 VCC -- ESP32 3.3V (do NOT use 5V, the BME280 is 3.3V)
BME280 GND -- ESP32 GND
BME280 SDA -- ESP32 GPIO 21
BME280 SCL -- ESP32 GPIO 22
That is the entire wiring.
Some BME280 breakouts have an SDO pin. If yours does, it usually controls the I2C address. SDO to GND = address 0x76. SDO to VCC = address 0x77. Most boards default to 0x76. If the scanner does not find the chip, try the other address.
Install libraries
Sketch >> Include Library >> Manage Libraries >> search for
Adafruit BME280. Install it. Also install Adafruit Unified Sensor
when prompted (it is a dependency).
The code
ESP32 (Arduino)
#include <Wire.h>
#include <Adafruit_Sensor.h>
#include <Adafruit_BME280.h>

Adafruit_BME280 bme;

void setup() {
  Serial.begin(115200);
  delay(1000);
  Wire.begin();

  if (!bme.begin(0x76)) {
    Serial.println("Could not find BME280");
    while (1);
  }
  Serial.println("BME280 found.");
}

void loop() {
  Serial.print(bme.readTemperature());
  Serial.print(", ");
  Serial.print(bme.readHumidity());
  Serial.print(", ");
  Serial.println(bme.readPressure() / 100.0);
  delay(2000);
}
Arduino (Uno, Nano, Mega)
#include <Wire.h>
#include <Adafruit_Sensor.h>
#include <Adafruit_BME280.h>

Adafruit_BME280 bme;

void setup() {
  Serial.begin(9600);
  delay(1000);
  Wire.begin();

  if (!bme.begin(0x76)) {
    Serial.println("Could not find BME280");
    while (1);
  }
  Serial.println("BME280 found.");
}

void loop() {
  Serial.print(bme.readTemperature());
  Serial.print(", ");
  Serial.print(bme.readHumidity());
  Serial.print(", ");
  Serial.println(bme.readPressure() / 100.0);
  delay(2000);
}
I2C on the Uno uses A4 (SDA) and A5 (SCL). The ESP32 uses GPIO 21/22.
Wire.begin()picks the right pins per board.
MicroPython (ESP32 or Pico)
from machine import I2C, Pin
import time

# ESP32 default I2C: GPIO 21 (SDA), 22 (SCL)
# Pico default I2C: GPIO 0 (SDA), 1 (SCL)
i2c = I2C(0, scl=Pin(22), sda=Pin(21), freq=100_000)
devices = i2c.scan()
print(f'I2C devices: {[hex(d) for d in devices]}')

BME280_ADDR = 0x76

def read_bme280():
    # Burst-read 8 bytes: press(3) + temp(3) + hum(2)
    data = i2c.readfrom_mem(BME280_ADDR, 0xF7, 8)
    press_raw = (data[0] << 12) | (data[1] << 4) | (data[2] >> 4)
    temp_raw = (data[3] << 12) | (data[4] << 4) | (data[5] >> 4)
    hum_raw = (data[6] << 8) | data[7]
    # Rough conversion (no calibration compensation):
    temp_c = temp_raw / 5120.0
    hum_pct = hum_raw / 1024.0
    press_hpa = press_raw / 256.0 / 100.0
    return temp_c, hum_pct, press_hpa

print('BME280 reading (raw, not calibrated)')
while True:
    t, h, p = read_bme280()
    print(f'{t:.2f} C, {h:.2f} %, {p:.2f} hPa')
    time.sleep(2)
For calibrated readings on MicroPython, install the official BME280
driver: mip install bme280 (on the Pico W with mip) or copy
bme280.py to the ESP32’s filesystem.
Raspberry Pi Python
import smbus2
import time

bus = smbus2.SMBus(1)
BME280_ADDR = 0x76

# Calibration registers (truncated; full driver is at
# https://github.com/pimoroni/bme280-python)
cal = bus.read_i2c_block_data(BME280_ADDR, 0x88, 26)
dig_T = (cal[0] | cal[1] << 8) / 16384.0, (cal[2] | cal[3] << 8) / 1024.0

def read_raw():
    bus.write_i2c_block_data(BME280_ADDR, 0xF4, [0x25])   # press + temp
    time.sleep(0.1)
    bus.write_i2c_block_data(BME280_ADDR, 0xF2, [0x01])   # humidity
    time.sleep(0.1)
    data = bus.read_i2c_block_data(BME280_ADDR, 0xF7, 8)
    return (data[0] << 12) | (data[1] << 4) | (data[2] >> 4), \
           (data[3] << 12) | (data[4] << 4) | (data[5] >> 4), \
           (data[6] << 8) | data[7]

print('BME280 ready')
while True:
    t_raw, p_raw, h_raw = read_raw()
    print(f'{t_raw} T, {p_raw} P, {h_raw} H (raw)')
    time.sleep(2)
For real Pi projects, install the proper driver:
pip3 install bme280It handles all the calibration math.
What you should see
Why use BME280 instead of DHT22
The BME280 is better than the DHT22 for almost everything:
| Sensor | Temperature | Humidity | Pressure | Accuracy | Speed | Cost |
|---|---|---|---|---|---|---|
| DHT22 | yes | yes | no | ±0.5 C, ±2-5% RH | 1 read / 2 sec | ~$2 |
| BME280 | yes | yes | yes | ±1 C, ±3% RH, ±1 hPa | 100+ reads / sec | ~$5 |
The BME280 is faster, more accurate, and gives you pressure. The only reason to pick a DHT22 is if you have one lying around or you need a sensor that runs on long wires (the DHT22’s protocol tolerates longer runs than I2C).
Reading pressure as altitude
Barometric pressure changes with both weather and altitude. To use pressure as an altimeter, you need to know the sea-level reference pressure for your location on the day you calibrate. Then:
float readAltitude(float seaLevelhPa) {
  float pressure = bme.readPressure() / 100.0;
  return 44330.0 * (1.0 - pow(pressure / seaLevelhPa, 0.1903));
}

void loop() {
  Serial.print(readAltitude(1013.25));   // adjust to your location
  Serial.println(" m");
  delay(1000);
}
This gives you altitude in meters above sea level. With a sea-level reference of 1013.25 hPa, accuracy is about ±10 m. With a known reference (e.g. you are at sea level), it is ±1 m.
Weather changes the sea-level reference by about ±25 hPa. That is about ±200 m of apparent altitude change. For an indoor altimeter, it is fine. For outdoor use, you need a weather-corrected reference.
Using multiple BME280s on one I2C bus
The BME280’s I2C address is 0x76 or 0x77, selectable with the SDO pin. That means you can put two BME280s on one I2C bus, but not more.
If you need more sensors, use a different I2C bus (the ESP32 has two) or a multiplexer like the TCA9548A. For most projects (one indoor sensor, one outdoor sensor), two on one bus is enough.
Adafruit_BME280 bmeIndoor;
Adafruit_BME280 bmeOutdoor;

void setup() {
  Wire.begin();
  bmeIndoor.begin(0x76);
  bmeOutdoor.begin(0x77);   // SDO tied to VCC on this one
}

void loop() {
  Serial.print(bmeIndoor.readTemperature());
  Serial.print(", ");
  Serial.print(bmeOutdoor.readTemperature());
  Serial.println();
  delay(2000);
}
Sampling rate and power
The BME280 defaults to “normal” mode: one sample, sleep, repeat on request. For higher sample rates (e.g. logging weather changes), set the mode:
bme.setSampling(Adafruit_BME280::MODE_NORMAL,
                Adafruit_BME280::SAMPLING_X2,    // temperature oversampling
                Adafruit_BME280::SAMPLING_X16,   // humidity oversampling
                Adafruit_BME280::SAMPLING_X8,    // pressure oversampling
                Adafruit_BME280::FILTER_OFF,
                Adafruit_BME280::STANDBY_MS_1000);
Higher oversampling = more accurate but slower. The defaults are fine for most projects. For weather logging, the X16 humidity oversampling makes a noticeable difference in noisy conditions.
Logging to MQTT
The natural next step is publishing readings over MQTT. Combine this tutorial with the ESP32 MQTT publish/subscribe tutorial:
#include <PubSubClient.h>
#include <WiFi.h>

WiFiClient wifiClient;
PubSubClient mqtt(wifiClient);

void setup() {
  Serial.begin(115200);
  Wire.begin();
  bme.begin(0x76);

  WiFi.begin("your-ssid", "your-password");
  while (WiFi.status() != WL_CONNECTED) delay(500);

  mqtt.setServer("192.168.1.50", 1883);
  mqtt.connect("esp32-bme280");
}

unsigned long lastPublish = 0;

void loop() {
  if (millis() - lastPublish > 30000) {
    lastPublish = millis();
    char msg[80];
    snprintf(msg, sizeof(msg),
      "{\"temp\":%.2f,\"hum\":%.2f,\"press\":%.2f}",
      bme.readTemperature(),
      bme.readHumidity(),
      bme.readPressure() / 100.0);
    mqtt.publish("ctrlaltbrian/sensor/weather", msg);
  }
  delay(100);
}
This publishes JSON-formatted weather data every 30 seconds to your MQTT broker. The book IoT with ESP32 has a complete home sensor network using this pattern.
What you learned
- BME280 reads temperature, humidity, and pressure over I2C.
- Wiring is 4 wires (VCC, GND, SDA, SCL). Most breakouts use I2C address 0x76.
- The library is Adafruit BME280 + Adafruit Unified Sensor.
- BME280 is the right pick over DHT22 for any project where accuracy or speed matter.
When something breaks
- “Could not find BME280”. Wrong address (try 0x77), wrong wiring, wrong voltage (BME280 is 3.3V only, not 5V).
- Pressure reading seems wrong. Probably fine; 1013 hPa is “average” sea-level pressure, but local weather changes it ±25 hPa.
- Humidity reading saturates at 100%. The sensor is condensing. Move it away from the source of moisture, or reduce sampling rate.
- Temperature reads higher than expected. Self-heating from the ESP32.
Move the sensor away from the chip, or add
delay()between reads.
What to build next
- The ESP32 MQTT publish/subscribe tutorial publishes these readings to a broker.
- The ESP32 deep sleep tutorial uses BME280 as the wake trigger (only wake up every 5 minutes to publish).
- The Raspberry Pi Node-RED tutorial builds a dashboard that consumes these MQTT readings and graphs them.