ESP32: measure ambient light in lux with the BH1750
Wire a BH1750 light sensor to an ESP32 and measure ambient light in real lux units. The right sensor for daylight sensing, plant monitoring, and screen brightness.
The BH1750 is the light sensor I default to when I need real lux values, not just “is it dark.” It uses I2C, costs $2, and gives readings in lux from 1 to 65535. It is the right sensor for screen brightness control, daylight harvesting, plant growth monitoring, and any project that needs to know how bright the room actually is.
This tutorial covers wiring, the I2C library, the conversion, and the patterns for using lux values in projects.
What you need
- ESP32 dev board
- BH1750 breakout board (the GY-302 is the most common; $1-2 each)
- 4 jumper wires
Wiring
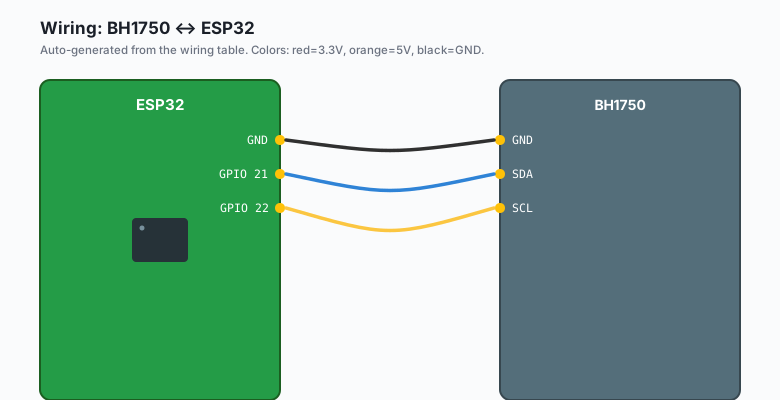
The BH1750 uses I2C. Same pins as the BME280 and MPU6050:
BH1750 VCC -- ESP32 3.3V (NOT 5V; the BH1750 is 3.3V)
BH1750 GND -- ESP32 GND
BH1750 SDA -- ESP32 GPIO 21
BH1750 SCL -- ESP32 GPIO 22
The default I2C address is 0x23. Some boards have an ADDR pin; if yours does, connecting it to VCC changes the address to 0x5C.
Install library
Sketch >> Include Library >> Manage Libraries >> search for
BH1750 by Christopher Laws. Install it.
The code
ESP32 (Arduino)
#include <Wire.h>
#include <BH1750.h>

BH1750 lightMeter(0x23);

void setup() {
  Serial.begin(115200);
  delay(1000);
  Wire.begin();
  if (lightMeter.begin(BH1750::CONTINUOUS_HIGH_RES_MODE)) {
    Serial.println("BH1750 found");
  } else {
    Serial.println("Could not find BH1750");
    while (1);
  }
}

void loop() {
  if (lightMeter.measurementReady()) {
    float lux = lightMeter.readLightLevel();
    Serial.print("Light: ");
    Serial.print(lux);
    Serial.println(" lux");
  }
  delay(200);
}
Arduino (Uno, Nano, Mega)
#include <Wire.h>
#include <BH1750.h>

BH1750 lightMeter(0x23);

void setup() {
  Serial.begin(9600);
  delay(1000);
  Wire.begin();
  if (lightMeter.begin(BH1750::CONTINUOUS_HIGH_RES_MODE)) {
    Serial.println("BH1750 found");
  } else {
    Serial.println("Could not find BH1750");
    while (1);
  }
}

void loop() {
  if (lightMeter.measurementReady()) {
    float lux = lightMeter.readLightLevel();
    Serial.print("Light: ");
    Serial.print(lux);
    Serial.println(" lux");
  }
  delay(200);
}
The Uno’s I2C pins are A4 (SDA) and A5 (SCL). The ESP32 default is GPIO 21/22;
Wire.begin()uses the board defaults on both.
MicroPython (ESP32 or Pico)
from machine import I2C, Pin
import time

# ESP32 default I2C pins: 21 (SDA), 22 (SCL)
# Pico default I2C pins: 0 (SDA), 1 (SCL)
i2c = I2C(0, scl=Pin(22), sda=Pin(21), freq=100_000)
devices = i2c.scan()
print(f'I2C devices: {[hex(d) for d in devices]}')

BH1750_ADDR = 0x23
CONT_HIRES = 0x10   # continuous high-res mode

i2c.writeto(BH1750_ADDR, bytes([CONT_HIRES]))
time.sleep_ms(180)   # first measurement takes 180ms

while True:
    data = i2c.readfrom(BH1750_ADDR, 2)
    raw = (data[0] << 8) | data[1]
    lux = raw / 1.2   # per BH1750 datasheet
    print(f'Light: {lux:.1f} lux')
    time.sleep_ms(200)
Raspberry Pi Python
import smbus2
import time

bus = smbus2.SMBus(1)   # /dev/i2c-1 on modern Pi OS
BH1750_ADDR = 0x23
CONT_HIRES = 0x10

bus.write_byte(BH1750_ADDR, CONT_HIRES)
time.sleep(0.18)   # first measurement

while True:
    data = bus.read_i2c_block_data(BH1750_ADDR, 0x00, 2)
    raw = (data[0] << 8) | data[1]
    lux = raw / 1.2
    print(f'Light: {lux:.1f} lux')
    time.sleep(0.2)
Enable I2C on the Pi first: sudo raspi-config >> Interface Options >>
I2C >> Enable. Then pip install smbus2 (preinstalled on Raspberry Pi OS).
What you should see
Upload. Open Serial Monitor. You should see lux values that change as you cover the sensor with your hand or shine a flashlight at it.
Typical values:
- Dark room at night: 0-10 lux
- Living room with lamps: 50-200 lux
- Office with fluorescent lights: 300-500 lux
- Overcast outdoor: 1000-2000 lux
- Direct sunlight: 10000-100000 lux
The measurement modes
The BH1750 supports 4 modes with different resolution and speed:
| Mode | Resolution | Measurement time | Use case |
|---|---|---|---|
| CONTINUOUS_HIGH_RES_MODE | 1 lux | 120 ms | Default; room light sensing |
| CONTINUOUS_HIGH_RES_MODE_2 | 0.5 lux | 120 ms | High accuracy at low light |
| CONTINUOUS_LOW_RES_MODE | 4 lux | 16 ms | Fast response, low resolution |
| ONE_TIME_HIGH_RES_MODE | 1 lux | 120 ms | Battery projects (sleep between readings) |
For most projects, the default high-resolution mode is fine. For battery projects, the one-time modes let you take a single reading and then put the sensor back to sleep.
Why use lux, not just ADC
A photocell (the cheap light-dependent resistor) gives you a raw ADC value that depends on the sensor, the resistor value, and the supply voltage. It is not meaningful in absolute terms. The BH1750 gives you lux, which is a standardized unit of illuminance. Two BH1750s in the same room will give the same reading to within a few percent.
For projects where the absolute value matters (calibrating a screen brightness curve, comparing outdoor light to plant growth needs), lux is the only unit that works.
Screen brightness project
Use lux to set a display’s brightness:
const int DISPLAY_PWM_PIN = 4;

void setup() {
  ledcSetup(0, 5000, 8);
  ledcAttachPin(DISPLAY_PWM_PIN, 0);
}

void loop() {
  if (lightMeter.measurementReady()) {
    float lux = lightMeter.readLightLevel();
    // Map 0-1000 lux to 20-255 brightness
    int brightness = constrain(map(lux, 0, 1000, 20, 255), 20, 255);
    ledcWrite(0, brightness);
  }
  delay(500);
}
The map is non-linear (human perception of brightness is logarithmic), but the linear mapping works as a first pass.
Plant growth project
Different plants need different lux levels. A few reference points:
- Low light (snake plant, pothos): 50-200 lux
- Medium light (most houseplants): 200-1000 lux
- High light (succulents, herbs): 1000+ lux
void loop() {
  if (lightMeter.measurementReady()) {
    float lux = lightMeter.readLightLevel();
    if (lux < 200) {
      Serial.println("Too dim, consider a grow light");
    } else if (lux > 10000) {
      Serial.println("Direct sun, monitor for heat stress");
    } else {
      Serial.print("Good light: ");
      Serial.print(lux);
      Serial.println(" lux");
    }
  }
  delay(5000);
}
Multiple BH1750s on one I2C bus
The BH1750 supports two addresses (0x23 and 0x5C), so you can put two on one bus. For more, use a multiplexer.
BH1750 lightMeter1(0x23);
BH1750 lightMeter2(0x5C);   // ADDR pin tied to VCC on this one

void setup() {
  Wire.begin();
  lightMeter1.begin(BH1750::CONTINUOUS_HIGH_RES_MODE);
  lightMeter2.begin(BH1750::CONTINUOUS_HIGH_RES_MODE);
}

void loop() {
  float lux1 = lightMeter1.readLightLevel();
  float lux2 = lightMeter2.readLightLevel();
  // ...
}
What you learned
- The BH1750 is a digital lux meter over I2C. No analog conversion, no calibration needed.
- 1 to 65535 lux range, 1 lux resolution.
- Same I2C wiring as the BME280 and MPU6050.
- Use one-time mode for battery projects to take a single reading and sleep.
When something breaks
- Readings are 0 or near 0. Sensor is in a dark space, or the I2C wiring is wrong.
- Readings are 65535 (max). Sensor is in direct sunlight or pointed at a bright light. Normal.
- “Could not find BH1750”. Wrong address (try 0x5C), wrong wiring, or wrong supply voltage.
- Readings fluctuate wildly. The sensor is near a fluorescent light with a 50/60 Hz flicker. Average multiple readings, or move the sensor away from the flickering source.
What to build next
- The BME280 tutorial combines with this for a complete indoor environment monitor (temperature, humidity, pressure, light).
- The deep sleep tutorial uses BH1750 as a wake trigger for daylight-responsive projects.
- The book ESP32 Smart Home covers daylight harvesting (automatic blinds) using the BH1750.