Arduino: drive a 16x2 LCD display (with I2C backpack)
Add a 16x2 character LCD to your Arduino using the I2C backpack. Show text, custom characters, and read sensor values on a screen.
The 16x2 character LCD is the display you find on every project box from the last 20 years. With the I2C backpack, you only need 4 wires (VCC, GND, SDA, SCL) instead of the 16 wires the parallel interface uses.
This tutorial covers the wiring, the I2C address scan (almost always needed), and the most common operations: print text, move the cursor, make custom characters.
What you need
- Arduino (Uno, Nano, etc.)
- 16x2 LCD with I2C backpack (e.g. the common HD44780-based one with PCF8574 backpack, about $3)
- 4 jumper wires
Wiring
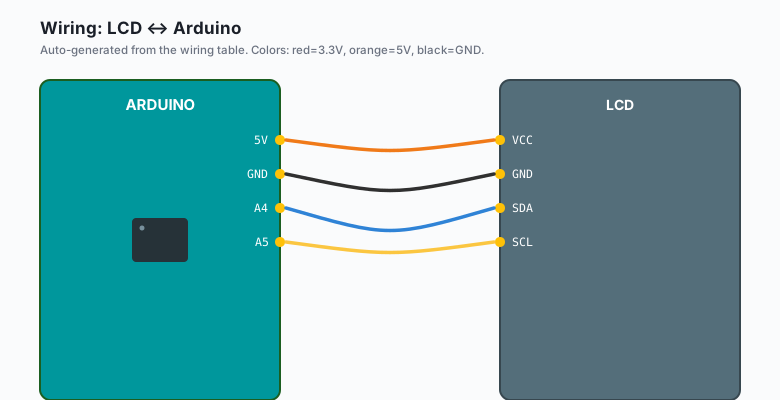
LCD VCC -- Arduino 5V
LCD GND -- Arduino GND
LCD SDA -- Arduino A4
LCD SCL -- Arduino A5
That is the entire wiring.
Install library
Sketch >> Include Library >> Manage Libraries >> search LiquidCrystal I2C by Frank de Brabander. Install.
The I2C address
Most I2C LCD backpacks use address 0x27. Some use 0x3F. If your code
says 0x27 and the LCD does nothing, run the I2C scanner from the earlier
tutorial and use whatever address it reports.
The code
Arduino (Uno, Nano, Mega)
#include <Wire.h>
#include <LiquidCrystal_I2C.h>

LiquidCrystal_I2C lcd(0x27, 16, 2);   // address, columns, rows

void setup() {
  lcd.init();
  lcd.backlight();
  lcd.print("Hello, Arduino!");
}

void loop() {
  // (nothing)
}
Upload it. You should see Hello, Arduino! on the LCD with the backlight
on.
If you see white blocks on the first row but no text, the contrast is wrong. Most backpacks have a small potentiometer on the back. Turn it with a screwdriver until the text appears.
ESP32 (Arduino)
#include <Wire.h>
#include <LiquidCrystal_I2C.h>

LiquidCrystal_I2C lcd(0x27, 16, 2);

void setup() {
  Wire.begin(21, 22);   // SDA, SCL on the ESP32
  lcd.init();
  lcd.backlight();
  lcd.print("Hello, ESP32!");
}

void loop() {
  // (nothing)
}
Same library, same code. The only difference is that you pass the I2C
pins to Wire.begin() on the ESP32 (defaults to GPIO 21/22).
MicroPython (ESP32 or Pico)
from machine import I2C, Pin
from esp8266_i2c_lcd1602 import I2cLcd1602

i2c = I2C(0, scl=Pin(22), sda=Pin(21), freq=100_000)

lcd = I2cLcd1602(i2c, 0x27, 2, 16)
lcd.backlight_on()
lcd.puts('Hello, MicroPython!')
The esp8266_i2c_lcd1602 library works on both ESP32 and Pico. On
the Pico, copy the file from
https://github.com/T-622/RPI-PICO-I2C-LCD and rename if needed.
Raspberry Pi Python
pip3 install RPLCDEnable I2C on the Pi first: sudo raspi-config >> Interface Options >>
I2C >> Enable.
from RPLCD.i2c import CharLCD

lcd = CharLCD('PCF8574', 0x27, cols=16, rows=2)
lcd.backlight_enabled = True

lcd.write_string('Hello, Pi!')
CharLCD handles the I2C backpack protocol. The first argument is the
chip on the backpack (PCF8574 is the most common).
Moving the cursor
The LCD has a 16-column, 2-row character grid. Position (0, 0) is the top left:
lcd.setCursor(0, 0);   // column 0, row 0
lcd.print("Top left");

lcd.setCursor(0, 1);   // column 0, row 1
lcd.print("Bottom row");

lcd.setCursor(5, 1);   // column 5, row 1
lcd.print("Centered?");
Showing sensor values
The most common use is to display a sensor reading. Combine with the DHT22 or DS18B20 tutorial:
#include <Wire.h>
#include <LiquidCrystal_I2C.h>
#include <DHT.h>

LiquidCrystal_I2C lcd(0x27, 16, 2);
DHT dht(2, DHT22);

void setup() {
  lcd.init();
  lcd.backlight();
  dht.begin();
  lcd.setCursor(0, 0);
  lcd.print("Sensor ready...");
  delay(2000);
  lcd.clear();
}

void loop() {
  float temp = dht.readTemperature();
  float hum  = dht.readHumidity();

  lcd.setCursor(0, 0);
  lcd.print("T:");
  lcd.print(temp, 1);
  lcd.print(" C    ");

  lcd.setCursor(0, 1);
  lcd.print("H:");
  lcd.print(hum, 1);
  lcd.print(" %    ");

  delay(2000);
}
Note the trailing spaces in the print statements. The LCD does not clear old characters when you print fewer new ones. If the new text is shorter, the old digits stay visible. Adding spaces after the new text overwrites them.
A more reliable pattern:
lcd.setCursor(0, 0);
lcd.print("T:");
lcd.print(temp, 1);
lcd.print(" C");

// clear the rest of the row
for (int i = lcd.print("") + 3; i < 16; i++) lcd.print(" ");
Or just lcd.clear() at the start of each update, but that creates a
flicker.
Custom characters
The LCD has 8 slots for custom 5x8 pixel characters. Define a “thermometer” icon, a “bell,” a “wifi signal,” whatever:
byte thermometer[8] = {
  0b00100,
  0b01010,
  0b01010,
  0b01010,
  0b01010,
  0b10001,
  0b10001,
  0b01110
};

void setup() {
  lcd.init();
  lcd.backlight();
  lcd.createChar(0, thermometer);
  lcd.setCursor(0, 0);
  lcd.print("Temp: ");
  lcd.write(0);   // print custom char 0
  lcd.print(" 23.5 C");
}
You can define up to 8 custom characters (slots 0-7). The icon is 8 bytes, each byte is one row of 5 pixels.
The contrast pot
I keep mentioning this because it is the single most common “why does my LCD just show white blocks” issue. Get a small Phillips screwdriver, find the pot on the back of the backpack (usually blue), and turn it slowly while the LCD is powered. The text will appear at some point in the rotation.
Backlight control
Most backpacks have a jumper for the backlight. If you want to control it from code (e.g. to dim the display at night), the backpack pin labeled “LED” can be connected to an Arduino PWM pin:
analogWrite(10, 128); // pin 10, half brightnessSome backpacks have a transistor for the backlight, and you can drive the transistor directly. Check your backpack’s schematic.
When to use a 16x2 LCD vs. an OLED
- 16x2 LCD: cheap, sunlight-readable, simple. Best for “show one number or two lines of text” projects.
- OLED display (e.g. SSD1306): more expensive, looks fancier, supports graphics and any font size. Best for “show graphs, custom UI, or anything graphical.”
For a basic temperature display, a 16x2 LCD is the right call. For a multi-line UI with progress bars or graphs, use an OLED. The OLED version is in the book Arduino Displays.
What to build next
- A digital thermometer with min/max tracking.
- A menu system (Up, Down, Select buttons + LCD).
- A serial monitor on the LCD (echo anything from Serial to the LCD).
The menu system version is one of the next tutorials on this site.