ESP32: read an HC-SR04 ultrasonic distance sensor
Wire an HC-SR04 to an ESP32 and measure distance in centimeters. The sensor that goes into most of my robotics projects.
The HC-SR04 is the sensor I reach for when I need to know how far away something is. It is cheap (about $1.50), it works on 5V, and it has been around forever.
This tutorial covers the wiring, the math, and the part most tutorials skip: why the ESP32’s 3.3V logic needs a small workaround for the trigger pin.
What you need
- ESP32 dev board
- HC-SR04 ultrasonic sensor
- Jumper wires
- 1k and 2k resistors (for the voltage divider on the echo pin)
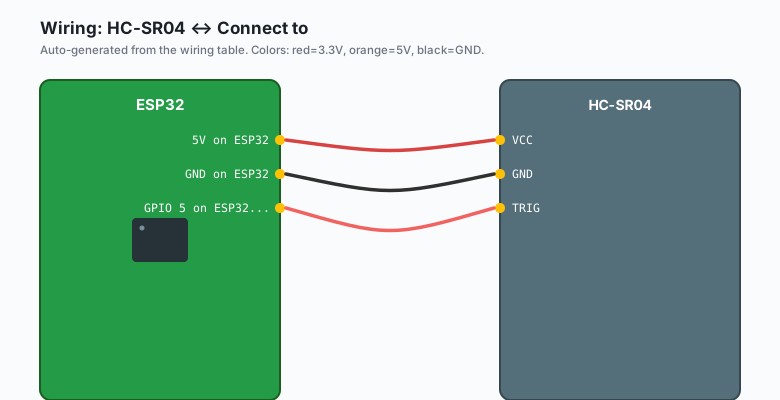
Wiring
| HC-SR04 | Connect to |
|---|---|
VCC | 5V on ESP32 |
GND | GND on ESP32 |
TRIG | GPIO 5 on ESP32 (direct, 3.3V logic is fine) |
ECHO | Voltage divider to GPIO 18 on ESP32 |
The voltage divider is the part you do not want to skip. The HC-SR04’s echo line outputs 5V, but the ESP32’s GPIO is 3.3V-only. Apply 5V to a GPIO and you will let the magic smoke out, eventually.
The voltage divider is two resistors on the echo line:
ECHO --[ 1k ]--+-- GPIO 18
               |
             [ 2k ]
               |
              GND
That divides the 5V echo signal down to about 3.3V, which is safe for the ESP32. Use the same divider on every HC-SR04 project.
Install
No library needed. The Arduino IDE has pulseIn() built in.
The code
ESP32 (Arduino)
#define TRIG_PIN 5
#define ECHO_PIN 18

long duration;
float distanceCm;

void setup() {
  Serial.begin(115200);
  pinMode(TRIG_PIN, OUTPUT);
  pinMode(ECHO_PIN, INPUT);
}

void loop() {
  digitalWrite(TRIG_PIN, LOW);
  delayMicroseconds(2);
  digitalWrite(TRIG_PIN, HIGH);
  delayMicroseconds(10);
  digitalWrite(TRIG_PIN, LOW);

  duration = pulseIn(ECHO_PIN, HIGH, 30000);
  if (duration == 0) {
    Serial.println("Out of range");
  } else {
    distanceCm = duration * 0.0343 / 2.0;
    Serial.print("Distance: ");
    Serial.print(distanceCm);
    Serial.println(" cm");
  }

  delay(100);
}
The HC-SR04 runs on 5V. The ECHO pin outputs 5V. On the ESP32 (3.3V GPIO), add a voltage divider on ECHO: 1k ohm + 2k ohm, with the midpoint going to GPIO 18. The Uno’s 5V GPIO can take 5V directly.
Arduino (Uno, Nano, Mega)
#define TRIG_PIN 3   // any digital pin
#define ECHO_PIN 2   // any digital pin

long duration;
float distanceCm;

void setup() {
  Serial.begin(9600);
  pinMode(TRIG_PIN, OUTPUT);
  pinMode(ECHO_PIN, INPUT);
}

void loop() {
  digitalWrite(TRIG_PIN, LOW);
  delayMicroseconds(2);
  digitalWrite(TRIG_PIN, HIGH);
  delayMicroseconds(10);
  digitalWrite(TRIG_PIN, LOW);

  duration = pulseIn(ECHO_PIN, HIGH, 30000);
  if (duration == 0) {
    Serial.println("Out of range");
  } else {
    distanceCm = duration * 0.0343 / 2.0;
    Serial.print("Distance: ");
    Serial.print(distanceCm);
    Serial.println(" cm");
  }
  delay(100);
}
MicroPython (ESP32 or Pico)
from machine import Pin, time_pulse_us
import time

trig = Pin(5, Pin.OUT)
echo = Pin(18, Pin.IN)

while True:
    trig.low()
    time.sleep_us(2)
    trig.high()
    time.sleep_us(10)
    trig.low()

    us = time_pulse_us(echo, 1, 30_000)
    if us < 0:
        print('Out of range')
    else:
        print(f'Distance: {us * 0.0343 / 2.0:.1f} cm')
    time.sleep(0.1)
Raspberry Pi Python
The Pi’s GPIO does not have a hardware pulseIn equivalent; timing is
done in software. Less accurate than the C versions.
import gpiozero
import time

trig = gpiozero.OutputDevice(5)   # BCM pin 5
echo = gpiozero.DigitalInputDevice(18, pull_up=False)   # BCM pin 18

def read_distance_cm():
    trig.off()
    time.sleep(0.000002)
    trig.on()
    time.sleep(0.00001)
    trig.off()

    start = time.time()
    while not echo.is_active:
        if time.time() - start > 0.03:
            return None
    pulse_start = time.time()

    while echo.is_active:
        if time.time() - pulse_start > 0.03:
            return None
    pulse_end = time.time()

    duration = (pulse_end - pulse_start) * 1_000_000
    return duration * 0.0343 / 2.0

while True:
    dist = read_distance_cm()
    if dist is None:
        print('Out of range')
    else:
        print(f'Distance: {dist:.1f} cm')
    time.sleep(0.1)
What you should see
Upload it. Wave your hand in front of the sensor. You should see the distance change.
The math
Sound travels at about 343 m/s in air at room temperature. That is 0.0343 cm per microsecond. The round trip (out and back) takes twice as long, so:
distance_cm = duration_us * 0.0343 / 2If you want temperature compensation:
float speedOfSound = 0.0331 + 0.00006 * temperatureC;
distanceCm = duration * speedOfSound / 2.0;
For indoor projects at room temperature, the basic version is fine. For outdoor projects where the temperature changes a lot, compensate.
The 30ms timeout
pulseIn(ECHO_PIN, HIGH, 30000) waits up to 30 ms for the echo. The sensor
is rated for 4 m max range, which is about 23 ms round trip. 30 ms gives a
bit of margin. If pulseIn() returns 0, the object is out of range (or the
wiring is wrong).
Common issues
- Always reads zero. Wiring is wrong. Check the voltage divider.
- Always reads 0 or max. The echo pin is on the wrong GPIO, or the voltage divider is missing.
- Reads once, then stuck. Power issue. The HC-SR04 draws 15 mA when pulsing. If you are powering it from the ESP32’s 5V pin, you should be fine. If you are powering from a USB hub, try a different port.
- Reads are noisy. Average several readings and discard outliers:
float readDistance() {
  float samples[5];
  for (int i = 0; i < 5; i++) {
    digitalWrite(TRIG_PIN, LOW); delayMicroseconds(2);
    digitalWrite(TRIG_PIN, HIGH); delayMicroseconds(10);
    digitalWrite(TRIG_PIN, LOW);
    samples[i] = pulseIn(ECHO_PIN, HIGH, 30000) * 0.0343 / 2.0;
    delay(20);
  }
  // discard outliers
  float sum = 0;
  for (int i = 0; i < 5; i++) sum += samples[i];
  return sum / 5.0;
}
When to use the HC-SR04 vs. alternatives
- HC-SR04: cheap, 4m range, 5V power, sensitive to soft surfaces (e.g. fabric absorbs the ping)
- VL53L0X: laser time-of-flight, 2m range, 3.3V, much smaller, less sensitive to surface
- VL53L1X: same family, 4m range
- HC-SR05: smaller cousin, 3.3V-compatible, but rarer
For “is there something in front of me” robot projects, HC-SR04 is fine. For “what is the exact distance to this surface,” VL53L0X is better.
What to build next
- A parking sensor with a buzzer that beeps faster as you get closer.
- A water level sensor in a tank (downward-facing HC-SR04 on the lid).
- A trash can that opens when your hand is within 10 cm.
The parking sensor version is in the book ESP32 Robotics Projects. The water level sensor is one of the next tutorials on this site.