Arduino: decode any IR remote with the IRremote library
Wire a 3-pin IR receiver to an Arduino and decode any TV or AC remote with the IRremote library. NEC, Sony, RC5, and the switch statement that turns buttons into actions.
Every IR remote in your house is a free wireless keypad. TV, AC, the cheap 21-button thing that came with an LED strip: all of them speak a protocol an Arduino can read with one $1 part. I use IR whenever a project needs buttons but should not need Wi-Fi (e.g. a shop light controller where a lost network connection should not mean a dark room).
The trap is the pin choice, and it bites everyone once: IRremote needs a pin that can generate interrupts, and on an Uno that is pin 2 or 3. Wire the receiver to pin 7 because it is physically nearer, upload the example, and you get silence. No error, no crash, just no output. Move it to pin 2 and the same sketch works. (I lost twenty minutes to this so you do not have to.)
What you need
Needed
| Item | Qty | Purpose | Est. cost |
|---|---|---|---|
| Arduino Uno or Nano | 1 | the brain | $10-$25 |
| VS1838B IR receiver module (3-pin, metal can) | 1 | receives 38 kHz IR | $1 |
| Any IR remote | 1 | the input device you already own | $0 |
| 3 jumper wires | 3 | connection | $1 |
The VS1838B is the standard receiver. The TSOP38238 from Vishay is the equivalent that Adafruit sells; either works, and this tutorial’s code is the same for both.
Nice to have
- Breadboard, because the module’s 3 pins are on a 2.54 mm pitch and straddle the center channel nicely
- Magnifying goggles or a loupe: the pin labels on the metal can are small, and the flat side faces you
- Multimeter (e.g. to check VCC and GND before you blame the library for silence)
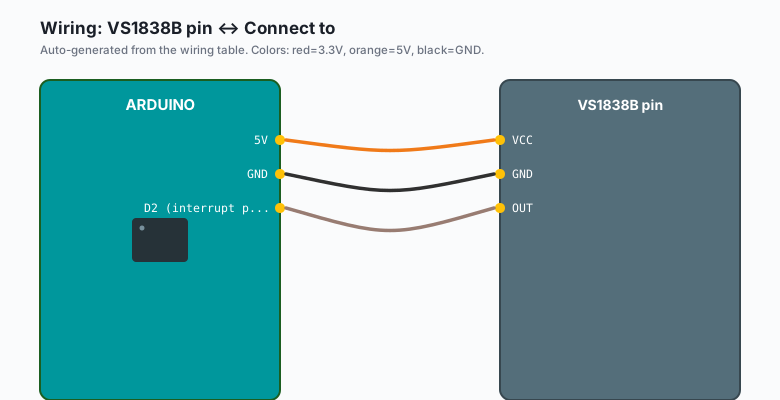
Wiring
Three wires, the entire electrical work:
| VS1838B pin | Connect to |
|---|---|
VCC | 5V |
GND | GND |
| OUT | D2 (interrupt pin, this matters) |
The can’s flat side faces the remote. Pins are usually labeled OUT, GND, VCC on the underside silkscreen (e.g. the ordering differs between clones, read the silkscreen instead of assuming).
Some modules have the metal can as the GND pin. Check the silkscreen before you trust a photo from a listing. VCC on the middle pin exists too, and wiring that one backwards kills the module in one press of a remote.
Install
Arduino IDE >> Sketch >> Include Library >> Manage Libraries >> search “IRremote” >> install the one by shirriff, z3t0 (Armin Joachimsmann maintains it now). Version 4.x is current; the API below is the stable one.
The code
This sketch prints every button as protocol + hex value, which is the discovery step. Then it shows the mapping pattern.
#include <IRremote.hpp>   // v4.x: use the .hpp include

const int IR_PIN = 2;     // must be an interrupt-capable pin on Uno/Nano

void setup() {
  Serial.begin(115200);
  IrReceiver.begin(IR_PIN, ENABLE_LED_FEEDBACK);
  Serial.println("IR ready. Point a remote, press a button.");
}

void loop() {
  if (IrReceiver.decode()) {
    Serial.print("Protocol: ");
    Serial.print(getProtocolString(IrReceiver.decodedData.protocol));
    Serial.print("  Value: 0x");
    Serial.print(IrReceiver.decodedData.command, HEX);
    Serial.print("  Address: 0x");
    Serial.println(IrReceiver.decodedData.address, HEX);

    // hold-to-repeat: NEC remotes send 0 repeats while held
    if (IrReceiver.decodedData.command == 0x45) {
      // example: "OK" button on the cheap 21-button remote
      Serial.println(">> OK pressed");
    }

    IrReceiver.resume();   // ready for the next packet
  }
}
Open the Serial Monitor at 115200, press buttons, and write down what each one prints. Every button press gives a unique command code (the address identifies the device type, the command identifies the button).
Mapping buttons to actions
Once you have the values, the pattern is a switch on the command:
void loop() {
  if (IrReceiver.decode()) {
    switch (IrReceiver.decodedData.command) {
      case 0x45: Serial.println("POWER");   break;
      case 0x46: Serial.println("VOL+");    break;
      case 0x47: Serial.println("VOL-");    break;
      case 0x44: Serial.println("PREV");    break;
      case 0x40: Serial.println("NEXT");    break;
      case 0x43: Serial.println("PLAY");    break;
      default:   Serial.println("Unknown"); break;
    }
    IrReceiver.resume();
  }
}
Your remote’s values will differ. That is not a bug; remotes do not share command codes across brands. Run the discovery sketch, fill in your values, done.
Why pin 2 or 3, exactly
IRremote times pulses with an interrupt. On an Uno and Nano the
library’s timer choice lines up with pin 2 or pin 3; on a Mega use 2,
3, 18, 19, 20, or 21. Other pins compile fine and simply never fire
decode(), which is the nastiest failure mode in this tutorial
(compiles, uploads, silent).
What you learned
- The VS1838B demodulates 38 kHz IR into a digital pulse train.
- IRremote decodes it to protocol + address + command.
- Buttons map to actions with a switch statement on the command value.
- Pin 2 or 3 on an Uno is not optional, it is how the library reads the pin at all.
When something breaks
- No output at all: receiver on the wrong pin (use 2 or 3), or VCC
and GND swapped, or you included
IRremote.hinstead ofIRremote.hppon a 4.x install and the build failed silently. - Same value for every button: the remote speaks a protocol the
library half-knows. Print the full
decodedDatadump (thePrintReceiveDemoexample shows it) and read the raw timing, or try a different remote to compare. - Random values with no remote nearby: electrical noise, often from a cheap supply. A 100 nF capacitor across VCC and GND on the receiver module fixes it.
- Range under 1 meter: sunlight or a halogen lamp is flooding the receiver with IR. Test away from windows; some LED bulbs leak IR too.
- Works, then stops after a few presses: you forgot
IrReceiver.resume()in one branch of your switch. The library stops listening until it is called. Oneresume()at the end of the decode block covers every branch.
What to build next
- The relay module tutorial plus this one: a wall-mounted IR-controlled lamp. No app, no cloud, just the remote on the couch.
- The ESP32 IR receiver tutorial is the same build with Wi-Fi, which pairs with ntfy notifications: a button that sends a phone alert.
- Pair with the servo tutorial for a remote-controlled blind or gate opener.
The book Arduino Fun Projects bundles this with the relay and servo tutorials into a remote-controlled-everything chapter.