Arduino: Ethernet web server when Wi-Fi is not an option
Put an Arduino on your LAN with a W5500 Ethernet module and serve sensor pages from any browser. The wired path when Wi-Fi drops, roams, or is not allowed.
Last month I put a temperature logger in the garage and the Wi-Fi signal out there is a rumor at best. Rebooting the router helped for a day. The fix that actually stuck was a $9 Ethernet module and a cable I already had in a drawer. The Arduino has been reporting every minute since, through the router, with no Wi-Fi involved at all.
That is the case for this tutorial: wired networking for the places Wi-Fi does not want to live (garages, basements, sheds, equipment racks where a dropped connection means a missed alert). An Uno plus an Ethernet module is also the honest answer when someone says “no wireless devices allowed” (e.g. a workshop or a lab that bans radios).
The trap I hit first: I bought the cheap shield with the big black W5100 chip because the listing said “Ethernet shield” and nothing else. It works, but it fights the SD card slot for pin 10 and it draws more current than an Uno’s 3.3V rail is comfortable with. The W5500 module costs about the same, speaks SPI cleanly, and stays out of your way. Get the W5500. (e.g. the 6-pin W5500 module by Waveshare, or the “Ethernet module Lite” version with the magjack built in.)
What you need
Needed
| Item | Qty | Purpose | Est. cost |
|---|---|---|---|
| Arduino Uno or Nano | 1 | the brain | $10-$25 |
| W5500 Ethernet module | 1 | wired LAN, SPI | $7-$10 |
| Ethernet patch cable | 1 | module to router | $3 |
| Breadboard + jumper wires | 1 | hooking it up | $5 |
Total: about $25 if you have none of it, less if the Uno drawer is already full.
Nice to have
- Multimeter (e.g. to check that your module is actually getting 3.3V before you blame the code)
- Helping hands or a small vise for holding the module while you jumper it
- A real router port, not a switch hanging off Wi-Fi: keep the path short while you are debugging
Wiring
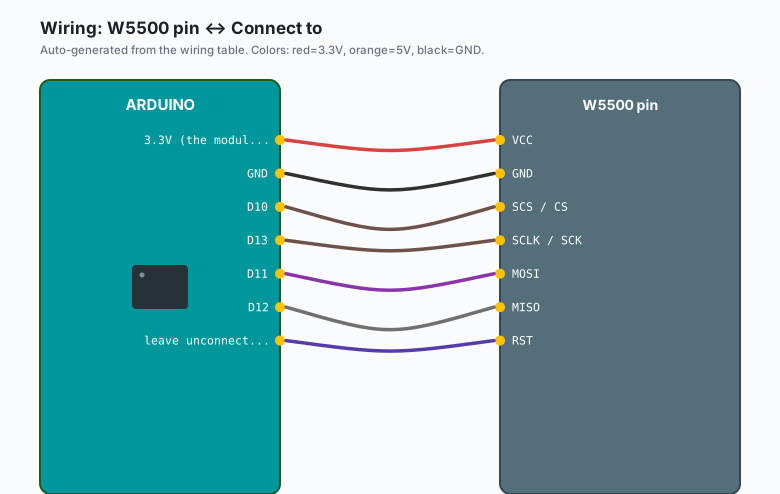
The W5500 module is an SPI device. On an Uno the SPI pins are fixed:
| W5500 pin | Connect to |
|---|---|
VCC | 3.3V (the module has an onboard regulator; 5V works on most, check the silkscreen) |
GND | GND |
SCS / CS | D10 |
SCLK / SCK | D13 |
MOSI | D11 |
MISO | D12 |
RST | leave unconnected (the library resets it in software) |
Do not power the W5500 from a 3.3V pin on a board that cannot supply the current. The module draws up to 130 mA during link startup. On an Uno the 3.3V rail handles it; on homemade setups it does not. If the board browns out and reboots when the cable connects, this is why.
The module and the router negotiate 100 Mbps full duplex. You do not configure any of that. The Ethernet library does it.
Install
The library ships with the IDE. Sketch >> Include Library >> Ethernet. That is it, nothing to download. If the Library menu shows Ethernet2 too, ignore it: Ethernet2 is for the old Arduino Ethernet Shield 2 and the plain Ethernet library drives the W5500 fine (the library auto -detects the chip over SPI).
If you want a hostname instead of a static IP later, also grab the EthernetBonjour library, but do that after the first success.
The code
This is a complete server: it answers on port 80, shows the state of two inputs and one output, and lets you toggle an LED from the browser.
#include <SPI.h>
#include <Ethernet.h>

byte mac[] = { 0xDE, 0xAD, 0xBE, 0xEF, 0xFE, 0xED };
// Pick an address inside your LAN range but outside the DHCP pool.
// (e.g. router is 192.168.1.1 with a pool of .100-.200, so .10 is safe)
IPAddress ip(192, 168, 1, 10);

EthernetServer server(80);
const int LED_PIN = 6;
const int SENSOR_PIN = A0;

void setup() {
  Serial.begin(115200);
  pinMode(LED_PIN, OUTPUT);
  digitalWrite(LED_PIN, LOW);

  // Ethernet.init(10) selects the CS pin; default is 10 anyway
  Ethernet.init(10);
  if (Ethernet.begin(mac) == 0) {
    // DHCP failed: fall back to the fixed address
    Ethernet.begin(mac, ip);
  }
  server.begin();
  Serial.print("Server at: ");
  Serial.println(Ethernet.localIP());
}

void loop() {
  EthernetClient client = server.available();
  if (!client) return;

  boolean currentLineIsBlank = true;
  boolean gotQuestion = false;
  char lastSix[7] = "";
  int idx = 0;

  while (client.connected()) {
    if (!client.available()) continue;
    char c = client.read();

    // keep the tail of the request line to catch GET /?led=1
    if (idx < 6) { lastSix[idx++] = c; lastSix[idx] = 0; }
    else { for (int i = 0; i < 5; i++) lastSix[i] = lastSix[i + 1]; lastSix[5] = c; lastSix[6] = 0; }

    if (strstr(lastSix, "led=1") != NULL) { digitalWrite(LED_PIN, HIGH); gotQuestion = true; }
    if (strstr(lastSix, "led=0") != NULL) { digitalWrite(LED_PIN, LOW);  gotQuestion = true; }

    if (c == '\n' && currentLineIsBlank) {
      // end of headers: send the page
      client.println("HTTP/1.1 200 OK");
      client.println("Content-Type: text/html");
      client.println("Connection: close");
      client.println();
      client.println("<!DOCTYPE HTML><html><head><meta http-equiv=\"refresh\" content=\"5\"></head><body>");
      client.print("<h1>Garage node</h1>");
      client.print("<p>Analog A0: ");
      client.print(analogRead(SENSOR_PIN));
      client.print("</p><p>LED is ");
      client.print(digitalRead(LED_PIN) ? "ON" : "OFF");
      client.print("</p><p><a href=\"/?led=1\">LED on</a> | <a href=\"/?led=0\">LED off</a></p>");
      client.println("</body></html>");
      break;
    }
    if (c == '\n') currentLineIsBlank = true;
    else if (c != '\r') currentLineIsBlank = false;
  }
  delay(1);
  client.stop();
}
Upload it, open the Serial Monitor, and read the IP it prints. Put that IP in a browser on any machine on the same network. You get a page with the sensor value and two links that toggle the LED. The meta refresh reloads it every 5 seconds.
The pattern in one sentence: read the request until the blank line, write a fixed response, close. Everything fancier (JSON, POST forms, WebSockets) is the same three steps with more content in the middle.
When you actually need static IP
DHCP is fine at a desk. For something bolted to a wall, fix the
address: routers can renumber a DHCP lease after a power cut and your
bookmark breaks. Set it with Ethernet.begin(mac, ip) before
server.begin(), and pick the address the way the comment in the code
says (outside the DHCP pool). (e.g. 192.168.1.10 through .19 is the
usual free strip on home routers.)
What you learned
- The W5500 module puts an Uno on a real network with four SPI pins and no radio.
- The Ethernet library ships with the IDE and handles DHCP, link negotiation, and sockets.
- A web server is: read request, send response, close. Every feature after that is content.
When something breaks
Ethernet.begin(mac)returns 0 and the serial monitor prints nothing useful: the CS/SCS wire is on the wrong pin, or the module never got 3.3V. Check the silkscreen for a voltage jumper, some modules ship set to 5V-only.- Page loads from the laptop but not from the phone on Wi-Fi: the router has AP/client isolation on. It is usually under Wireless >> Advanced >> AP Isolation. Turn it off, or accept that the page is LAN-only.
- Server works for a few hours, then stops answering: the library
can run out of sockets if a client never gets
stop()called. The code above always calls it after the blank-line break; if you added an earlyreturn, you leaked the socket. - The board reboots when the cable plugs in: power. The W5500’s startup current surge drops the rail. Give the module its own 3.3V regulator or power the whole thing from USB.
- Works at the desk, dead in the rack: you used a crossover-era habit and a 20-year-old cable. Any modern patch cable is fine; the real cause is usually a port that is PoE-only or disabled. Try the port your laptop used last.
What to build next
- Wire the relay module tutorial to a socket and you have a web -switched lamp on wired Ethernet (no cloud, no account).
- The ESP32 MQTT tutorial and this one are the two halves of a sensor network: MQTT for the data, this page for the “is it alive” check from any browser.
- ntfy notifications from an Ethernet Arduino need one more library (EthernetClient instead of WiFiClient with the same POST), which is the natural v2 of this sketch.
The book Home Automation with Arduino bundles this tutorial with the relay and sensor ones into a full wired smart home chapter.