Pico: read a DHT22 with MicroPython
Wire a DHT22 temperature and humidity sensor to a Pico and read it from MicroPython. The smallest useful Pico sensor project.
The Pico + a DHT22 is the cheapest weather station you can build. About $10 in parts, and you get temperature and humidity readings on the REPL.
This tutorial covers the wiring, the MicroPython driver, and the part where the DHT22 occasionally fails to read (and how to handle that).
What you need
- Raspberry Pi Pico (any version)
- DHT22 breakout (the 3-pin version with onboard pull-up)
- Three jumper wires
Wiring
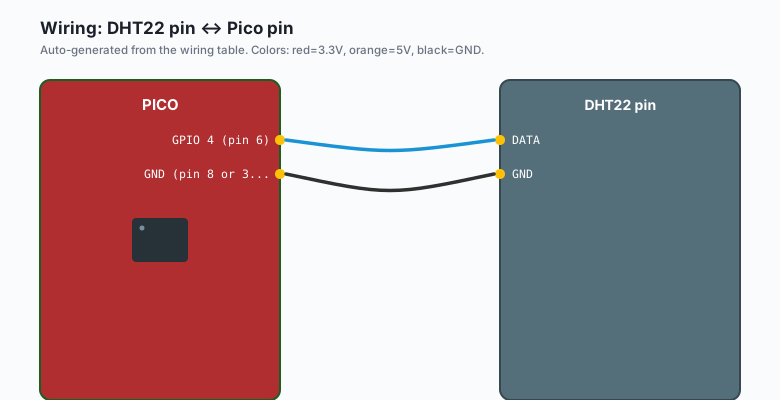
| DHT22 pin | Pico pin |
|---|---|
VCC | VBUS (5V, pin 40) or 3V3 (pin 36) |
DATA | GPIO 4 (pin 6) |
GND | GND (pin 8 or 38) |
Power the DHT22 from VBUS (5V) for longer cable runs. For short runs (under 30 cm), 3V3 works fine. The data line is the same either way.
Get the DHT driver
The MicroPython firmware for the Pico does not include the DHT driver by default. Two options:
Option 1: install via mip (MicroPython’s package manager):
import mip
mip.install("dht")
Option 2: copy dht.py from the MicroPython repository into your
project. The file is at
https://github.com/micropython/micropython/blob/master/drivers/dht/dht.py.
Save it to the Pico as /lib/dht.py.
The code
MicroPython (Pico)
import dht
import machine
import time

sensor = dht.DHT22(machine.Pin(4))

while True:
    try:
        sensor.measure()
        temp = sensor.temperature()
        hum = sensor.humidity()
        print(f"Temperature: {temp:.1f} C  Humidity: {hum:.1f} %")
    except OSError as e:
        print("Read failed:", e)
    time.sleep(2)
Run it. You should see temperature and humidity printing every 2 seconds.
Arduino (Pico)
Install the DHT sensor library by Adafruit through the Arduino IDE
(Sketch >> Include Library >> Manage Libraries). This is the same
library the ESP32 and Uno versions use. Board package: Raspberry Pi
Pico/RP2040 by Earle Philhower (this gives you the Pico’s Arduino
core).
#include "DHT.h"

#define DHT_PIN 4
#define DHT_TYPE DHT22

DHT dht(DHT_PIN, DHT_TYPE);

void setup() {
  Serial.begin(115200);
  dht.begin();
}

void loop() {
  float t = dht.readTemperature();
  float h = dht.readHumidity();

  if (isnan(t) || isnan(h)) {
    Serial.println("Failed to read from DHT22");
  } else {
    Serial.print("Temperature: ");
    Serial.print(t);
    Serial.print(" C  Humidity: ");
    Serial.print(h);
    Serial.println(" %");
  }
  delay(2000);
}
Same wiring as the MicroPython version. Pin(4) maps to GPIO 4 on the
Pico, which is what DHT_PIN 4 uses. The Pico’s Arduino core treats
plain pin numbers as the GPIO number (not the physical pin), so this
matches the MicroPython example exactly.
Why the DHT22 fails sometimes
The DHT22 uses a custom one-wire protocol with tight timing requirements.
The Pico is more reliable than the Raspberry Pi (no operating system
getting in the way), but you will still get occasional OSError: [Errno 110] ETIMEDOUT errors. Just ignore them.
If every read fails, the wiring is wrong. The most common mistake:
- Pull-up resistor missing. Some DHT22 breakouts have it built in; others do not. If yours does not, add a 10k resistor between DATA and VCC.
- Wrong GPIO. Make sure
Pin(4)matches the actual physical pin you used.
Logging to a file
To save readings for later analysis:
import dht
import machine
import time

sensor = dht.DHT22(machine.Pin(4))

def log_line(line):
    try:
        with open("readings.log", "a") as f:
            f.write(line + "\n")
    except OSError:
        print("Could not write to log")

while True:
    try:
        sensor.measure()
        temp = sensor.temperature()
        hum = sensor.humidity()
        line = f"{time.time():.0f},{temp:.1f},{hum:.1f}"
        print(line)
        log_line(line)
    except OSError as e:
        print("Read failed:", e)
    time.sleep(60)
Each line is unix_timestamp,temperature,humidity. You can graph it later
with gnuplot or pandas.
The Pico’s flash has limited write cycles (about 10,000 to 100,000 depending on the chip). Logging every 60 seconds means about 525,000 writes per year, which is over the limit. For long-term logging, use an SD card or send the data over Wi-Fi to a Raspberry Pi.
Why use a DHT22 vs. other sensors
- DHT22: temperature and humidity, cheap, slow, finicky. Good for hobbyist indoor projects.
- BME280: temperature, humidity, pressure. I2C, accurate. Good for weather stations.
- SHT31: temperature and humidity, I2C, very accurate. More expensive than DHT22 but more reliable.
- DS18B20: temperature only, one-wire, multiple sensors on one pin. Best for multi-zone temperature monitoring.
For “indoor temperature and humidity,” the DHT22 is fine. For “outdoor weather station with barometric pressure,” use a BME280. For “long-term deployment where I do not want to debug it,” use an SHT31.
Reading the DHT22 with interrupts
The default DHT driver busy-waits during the read, which blocks other code
from running. For a Pico doing multiple things, you can use the
rp2 module’s PIO (Programmable I/O) to read the DHT22 in the background:
from rp2 import PIO, asm_pio
from machine import Pin
import time

@asm_pio()
def dht22_read():
    pass   # PIO program here

# (full implementation in the book *Pico Sensors*)
The PIO version is more advanced and lets the Pico do other work during the read. Most projects do not need this; the basic version is fine.
What to build next
- A weather station that logs to a Raspberry Pi over MQTT.
- An OLED display showing the current readings.
- A battery-powered version with deep sleep between readings.
The deep sleep version is in the book Pico Low Power. The OLED version is one of the next tutorials on this site.