Arduino: control a servo motor
Drive a hobby servo (SG90, MG996R) from an Arduino. The shortest path from Arduino to 'something moved.'
A hobby servo is the motor I default to for “I need to move something to a specific angle.” The little SG90 blue servos are about $1.50 and they will turn to any angle from 0 to 180 degrees on command.
This tutorial gets you from a fresh Arduino to a knob-controlled servo in about 20 minutes.
What you need
- Arduino (Uno, Nano, etc.)
- SG90 (small, weak) or MG996R (bigger, stronger) servo
- Jumper wires
- Optional: a potentiometer for the knob-control version
Wiring
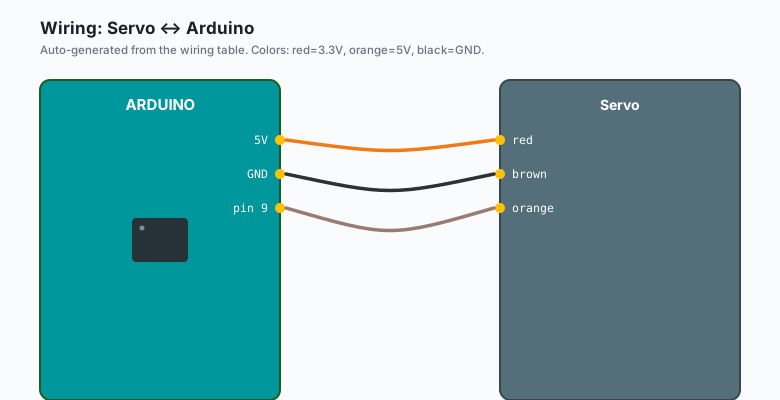
Servos have three wires:
- Red: power (5V on the Arduino)
- Brown or black: ground
- Orange or yellow: signal
The signal wire goes to a digital pin. Pin 9 is the most common pick.
Servo red    -- Arduino 5V
Servo brown  -- Arduino GND
Servo orange -- Arduino pin 9
The SG90 is small enough to power from the Arduino’s 5V pin. The MG996R is not. If your servo stalls or jitters, it is drawing too much current from the Arduino. Use an external 5V supply, and connect the grounds together.
Install
No library needed for basic servo control. The Arduino IDE has Servo.h
built in:
File >> Examples >> Servo >> SweepThat opens the canonical sweep sketch.
The basic code
Arduino (Uno, Nano, Mega)
#include <Servo.h>

Servo myServo;

void setup() {
  myServo.attach(9);
}

void loop() {
  for (int angle = 0; angle <= 180; angle++) {
    myServo.write(angle);
    delay(15);
  }
  for (int angle = 180; angle >= 0; angle--) {
    myServo.write(angle);
    delay(15);
  }
}
Upload it. The servo should sweep back and forth between 0 and 180 degrees.
delay(15) gives the servo time to physically reach the position. Servos
are slow. 15 ms per degree is enough; less than that and the servo will
stutter.
ESP32 (Arduino)
The ESP32 Arduino core does not bundle Servo.h. Use the ESP32Servo
library (Sketch >> Include Library >> Manage Libraries >>
search ESP32Servo). The API is the same:
#include <ESP32Servo.h>

Servo myServo;

void setup() {
  myServo.attach(9);
}

void loop() {
  for (int angle = 0; angle <= 180; angle++) {
    myServo.write(angle);
    delay(15);
  }
  for (int angle = 180; angle >= 0; angle--) {
    myServo.write(angle);
    delay(15);
  }
}
On the ESP32, the LEDC peripheral drives the servo, which means the PWM is more accurate than the Uno’s software-timed version. For most hobby servos the difference does not matter.
MicroPython (ESP32 or Pico)
from machine import Pin, PWM
import time

# ESP32: GPIO 9. Pico: GP9.
pwm = PWM(Pin(9), freq=50)

def write_angle(angle):
    duty = int(65535 * (0.05 + (angle / 180.0) * 0.05))
    pwm.duty_u16(duty)

while True:
    for angle in range(0, 181):
        write_angle(angle)
        time.sleep_ms(15)
    for angle in range(180, -1, -1):
        write_angle(angle)
        time.sleep_ms(15)
This is the MicroPython equivalent of Servo.write(). The Pico tutorial
on servos has the full library wrapper that hides this math.
Raspberry Pi Python
The Raspberry Pi does not have hardware PWM on every GPIO (only GPIO 12,
13, 18, 19 have a hardware PWM peripheral). For hobby servos, use the
gpiozero library, which uses software PWM:
from gpiozero import Servo
from time import sleep

servo = Servo(17)

while True:
    for angle in [-1, -0.5, 0, 0.5, 1]:
        servo.value = angle
        sleep(0.5)
pip3 install gpiozero. Servo.value takes a float from -1 (0
degrees) to 1 (180 degrees), with 0 being the center. The library
handles the 50 Hz PWM internally. If you need precise angle control
in degrees, write a wrapper:
def set_angle(angle):
    servo.value = (angle / 180.0) * 2 - 1
Why the servo jitters
The three usual causes:
- Insufficient power. The Arduino’s 5V pin can deliver about 400 mA total (on USB power). A servo under load can draw that much. Use an external supply.
- Shared ground missing. If you are using an external supply, the Arduino’s GND must be connected to the supply’s GND, or the signal reference is floating.
- Noisy signal. Long wires or wires near motors pick up noise. Add a 100uF capacitor across the servo’s power pins.
The knob-controlled version
Wire a potentiometer (10k) to A0 as in the previous tutorial. Then:
#include <Servo.h>

Servo myServo;

void setup() {
  myServo.attach(9);
  Serial.begin(9600);
}

void loop() {
  int raw = analogRead(A0);
  int angle = map(raw, 0, 1023, 0, 180);
  myServo.write(angle);
  delay(15);
}
Turn the knob, the servo follows. This is the foundation for “pan/tilt camera,” “robotic arm,” and “steering for a small robot.”
Controlling multiple servos
Servo.h supports up to 12 servos on most boards (6 on the Nano, 48 on the
Mega):
#include <Servo.h>

Servo servoA;
Servo servoB;
Servo servoC;

void setup() {
  servoA.attach(9);
  servoB.attach(10);
  servoC.attach(11);
}

void loop() {
  servoA.write(0);
  servoB.write(90);
  servoC.write(180);
  delay(1000);

  servoA.write(180);
  servoB.write(90);
  servoC.write(0);
  delay(1000);
}
For more than 12 servos, you need an external PWM driver (e.g. PCA9685 over I2C). The PCA9685 version is in the book Arduino Robotics.
Continuous rotation servos
There is a variant called a “continuous rotation servo.” Same wiring, but
write(angle) controls speed and direction instead of position:
write(90): stopwrite(180): full speed one directionwrite(0): full speed the other directionwrite(45): half speed one direction
These are great for small wheeled robots. The trade-off is that you cannot control position with them; they are speed-control only.
When the servo just makes a clicking sound
The signal pin is on the wrong pin, or attach() got the wrong number.
Re-check servo.attach(9) against the actual wiring.
If the signal is right and you still get clicking, the servo is being asked to move to a position it cannot reach (e.g. beyond 180 degrees, or against a physical stop). Lower the angle range.
What to build next
- A pan/tilt bracket for a camera or sensor.
- A 4-DOF robotic arm (uses 4 servos).
- A walking robot with 8-12 servos.
The pan/tilt version is one of the next tutorials on this site. The robotic arm is in the book Arduino Robotics.