ESP32: draw graphics and text on a color TFT (ST7735/ST7789)
Wire an ST7735 or ST7789 color TFT to an ESP32, draw text and shapes, update a live readout without flicker, and fix the classic black-screen and wrong-color problems.
I printed sensor readings to the serial monitor for a year before I put a screen on one. The serial monitor wins on effort. A color TFT wins on everything else: numbers you can read across the room, color coding, graphs, and a device that feels finished instead of half-built. The ST7735 (128x160 pixels) and its bigger cousin the ST7789 (240x240 or 240x320) cost about $6, speak SPI, and run on the same Adafruit library. This tutorial wires one to an ESP32, draws text and shapes, and builds a live readout that updates once a second without flicker.
The trap I hit: I bought two “1.8 inch TFT” modules that looked identical in the listing and got different results from the same code. One showed correct colors. The other showed red where blue should be. The colored tab on the screen’s protective film (red, green, black) is the giveaway: the ST7735 ships in several panel variants and each needs its own init flag (e.g. INITR_BLACKTAB vs INITR_GREENTAB). If your colors look wrong, that one line is the first thing to change, not your wiring.
What you need
Needed
- ESP32 dev board (e.g. a DOIT or ESP32-WROOM-32 devkit): the board driving the display over hardware SPI
- ST7735 1.8 inch TFT module, 128x160 (about $5-7): the display; buy one with the header pins already soldered, the bare-pin modules cost you an extra session with the iron
- 8x jumper wires (female-to-male if your module has a pin header): the signal and power connections
- Solderless breadboard: holds the module steady while you test
Nice to have
- A second TFT module (one ST7735, one ST7789): the variant problem becomes obvious and cheap when you can compare two panels
- Multimeter: confirm VCC is really 3.3V before the first power-up
- Soldering iron + solder: only if your module shipped with an unsoldered header
- Helping hands: holds the header straight while you solder it
Wiring
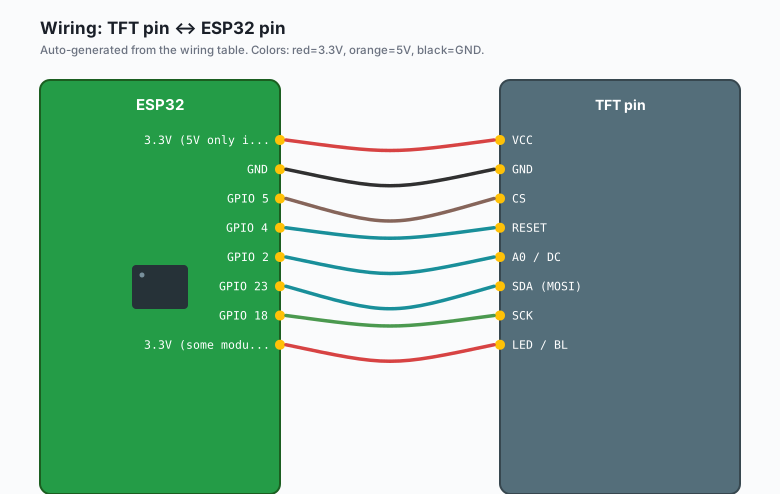
Hardware SPI pins are fixed on the ESP32: MOSI is GPIO 23 and SCK is GPIO 18. The rest can move, but these values match the code below.
| TFT pin | ESP32 pin |
|---|---|
VCC | 3.3V (5V only if the module has a regulator on the back) |
GND | GND |
CS | GPIO 5 |
RESET | GPIO 4 |
A0 / DC | GPIO 2 |
SDA (MOSI) | GPIO 23 |
SCK | GPIO 18 |
| LED / BL | 3.3V (some modules omit this pin) |
The ST7735 is a 3.3V part. Modules with an onboard regulator accept 5V on VCC, but the logic pins are 3.3V either way, which is exactly what the ESP32 outputs, so no level shifter is needed. (The same module on a 5V Arduino Uno is a different story; there you would want a level shifter on the signal lines.)
Install
Arduino IDE >> Sketch >> Include Library >> Manage Libraries, search “Adafruit ST7735 and ST7789 Library” (by Adafruit), install it, and install the Adafruit GFX Library when prompted (it is a dependency). No board package changes needed; any ESP32 core you already have works.
The code
Two things drive the whole design: the panel is a framebuffer you redraw
(top to bottom, left to right, like text), and display()-style
libraries push your drawing to the panel in one burst. The Adafruit
library draws directly, so the flicker trick is different: draw over old
text using a background color instead of clearing the screen.
#include <SPI.h>
#include <Adafruit_GFX.h>
#include <Adafruit_ST7735.h>

#define TFT_CS   5
#define TFT_DC   2
#define TFT_RST  4

// ST7735 (128x160):
Adafruit_ST7735 tft = Adafruit_ST7735(TFT_CS, TFT_DC, TFT_RST);
// For an ST7789 240x240 panel, replace the two lines above with:
//   Adafruit_ST7789 tft = Adafruit_ST7789(TFT_CS, TFT_DC, TFT_RST);
//   tft.init(240, 240);

void setup() {
  Serial.begin(115200);

  // The init flag is the #1 cause of wrong colors:
  //   red PCB 1.8":      INITR_BLACKTAB
  //   green PCB 1.8":    INITR_GREENTAB (some clones: INITR_REDTAB)
  //   1.44" green PCB:   INITR_144GREENTAB
  tft.initR(INITR_BLACKTAB);
  tft.setRotation(1);              // 0..3; 1 = landscape, wide side down
  tft.fillScreen(ST77XX_BLACK);

  tft.setTextColor(ST77XX_CYAN);
  tft.setTextSize(2);              // characters scaled 2x (12x16 px)
  tft.setCursor(8, 8);
  tft.print("TFT online");

  tft.drawFastHLine(8, 32, 144, ST77XX_BLUE);
  tft.drawRect(8, 42, 60, 30, ST77XX_RED);
  tft.fillCircle(120, 57, 14, tft.color565(255, 140, 0)); // custom RGB565

  // (fg, bg): text prints with its own background, erasing what was there
  tft.setTextColor(ST77XX_WHITE, ST77XX_BLACK);
}

uint32_t lastTick = 0;
uint32_t seconds = 0;

void loop() {
  if (millis() - lastTick < 1000) return;  // update once per second
  lastTick += 1000;

  seconds++;
  tft.setTextSize(2);
  tft.setCursor(8, 90);
  tft.print("Up: ");
  tft.print(seconds);
  tft.print("s   ");   // trailing spaces erase leftover digits

  // A live bar that grows and resets: erase-with-background in action
  int barW = 8 + (seconds % 12) * 10;
  tft.fillRect(8, 120, barW, 12, ST77XX_GREEN);
  tft.fillRect(8 + barW, 120, 110 - barW, 12, ST77XX_BLACK);
}
Details worth noticing:
color565()converts 8-bit RGB to the panel’s 16-bit format (5 red, 6 green, 5 blue bits). The named constants likeST77XX_ORANGEare just precomputed values of the same thing.- The
(fg, bg)form ofsetTextColor()is the anti-flicker trick. The “Up: Ns ” trailing spaces matter: without them, going from “Up: 100s” back down or over shorter numbers leaves ghost digits behind. - Text size 2 on a 160-wide landscape screen fits about 13 characters. Plan your labels around that (e.g. “Up:” instead of “Uptime:”).
- On an ST7789 240x240 panel in rotation 0, the coordinate space is 240 by 240, so scale the bar and cursor positions up if you switch panels.
What you learned
- The ST7735/ST7789 family runs on hardware SPI (3 fixed pins plus CS, DC, and RESET you choose) and one library covers both chips.
- The init variant flag (BLACKTAB, GREENTAB, 144GREENTAB) must match the panel revision, or colors come out swapped.
- Fast, flicker-free updates come from drawing over old content with a background color, not from clearing the screen every frame.
color565(r, g, b)gives you any RGB565 color, not just the named constants.
When something breaks
- Screen stays completely white or black. Wiring is the usual suspect: check VCC against the regulator note above, then confirm CS, DC, and RESET are not swapped (DC and RST get crossed constantly because both are single header pins next to each other). If the backlight pin exists, it needs 3.3V or the panel is just dark.
- Text and shapes render but colors are wrong. The init flag does
not match the panel. Try INITR_BLACKTAB, then INITR_GREENTAB, then
INITR_REDTAB with the same sketch; one of them will be right. If only
dark/light are inverted (black looks like white), call
tft.invertDisplay(true)(or flip it to false). - Image shifted by a few pixels or wrapped. You are using an init variant that does not match the panel size (e.g. a 1.44” panel driven with 1.8” settings). The offset lives inside the library’s init code, so fixing the variant flag fixes the offset.
- Random garbage pixels or flicker under motion. Long DuPont wires
on SCK pick up noise. Keep SPI leads short (under 20 cm), and if the
panel is far away anyway, drop the SPI speed by editing
tft.setSPIFrequency(10000000);into setup after init. - Works until you touch the breadboard. These modules are light and the headers are their only mechanical anchor. Tape the module down or move it to a project enclosure before declaring victory.
What to build next
- The LVGL touch display tutorial takes the same SPI wiring up to a full UI framework with buttons, sliders, and touch input.
- The e-paper display tutorial is the low-power counterpart: slow updates, but it holds an image with zero power (e.g. a battery-powered shelf label).
- The SSD1306 OLED tutorial is the small monochrome sibling; if your project only needs a few lines of text, the OLED is cheaper and easier to fit.
- The weather station tutorial pairs sensor readings with this exact display pattern for a desk dashboard, and the ntfy notifications tutorial lets the same device ping your phone when a reading leaves the range you drew on that screen.