ESP32: build a 2WD robot base with motor control
Two DC motors, an L298N motor driver, an ESP32, and ultrasonic distance sensors. The base you build a robot on top of.
A 2WD (two-wheel drive) robot base. Two DC motors, an L298N motor driver, an ESP32 controller, ultrasonic distance sensors for obstacle avoidance. The base is the foundation; you can add a sensor, an arm, or a camera on top.
This is the project that ties the HC-SR04, LEDC PWM, and BME280 (well, not BME280, but other sensors) tutorials together.
What you need
- ESP32 dev board
- 2WD robot chassis (the kit with motors, wheels, and a platform; about $10-20)
- L298N motor driver module (the standard H-bridge; about $2)
- 2 HC-SR04 ultrasonic distance sensors (front and back; about $2 each)
- 18650 battery pack (7.4V, 2 cells in series; about $10)
- Wires, screws, hot glue
Wiring
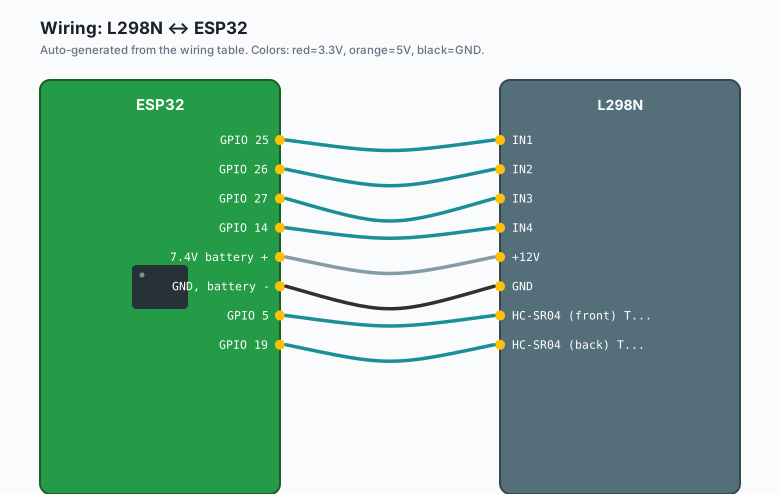
L298N IN1 -- ESP32 GPIO 25
L298N IN2 -- ESP32 GPIO 26
L298N IN3 -- ESP32 GPIO 27
L298N IN4 -- ESP32 GPIO 14
L298N ENA -- ESP32 GPIO 32 (PWM channel for left motor)
L298N ENB -- ESP32 GPIO 33 (PWM channel for right motor)

L298N +12V -- 7.4V battery +
L298N GND  -- ESP32 GND, battery -

HC-SR04 (front) TRIG -- ESP32 GPIO 5
HC-SR04 (front) ECHO -- ESP32 GPIO 18 (use voltage divider: 1k + 2k ohm)
HC-SR04 (back)  TRIG -- ESP32 GPIO 19
HC-SR04 (back)  ECHO -- ESP32 GPIO 23 (use voltage divider)
The L298N’s 5V logic output can power the ESP32’s 5V pin (with a diode or voltage regulator for safety). Or power the ESP32 from a separate 5V regulator.
The code
const int IN1 = 25;
const int IN2 = 26;
const int IN3 = 27;
const int IN4 = 14;
const int ENA = 32;
const int ENB = 33;

const int FRONT_TRIG = 5;
const int FRONT_ECHO = 18;
const int BACK_TRIG = 19;
const int BACK_ECHO = 23;

const int FRONT_OBSTACLE_DISTANCE = 25;   // cm
const int BACK_OBSTACLE_DISTANCE = 15;
const unsigned long OBSTACLE_CHECK_INTERVAL = 100;
const int MOTOR_SPEED = 200;   // 0-255

unsigned long lastObstacleCheck = 0;

void setup() {
  Serial.begin(115200);
  delay(1000);

  pinMode(IN1, OUTPUT);
  pinMode(IN2, OUTPUT);
  pinMode(IN3, OUTPUT);
  pinMode(IN4, OUTPUT);
  pinMode(ENA, OUTPUT);
  pinMode(ENB, OUTPUT);

  pinMode(FRONT_TRIG, OUTPUT);
  pinMode(FRONT_ECHO, INPUT);
  pinMode(BACK_TRIG, OUTPUT);
  pinMode(BACK_ECHO, INPUT);

  // Setup LEDC PWM at 25 kHz for the motors (above audible)
  ledcSetup(0, 25000, 8);   // ENA on channel 0
  ledcSetup(1, 25000, 8);   // ENB on channel 1
  ledcAttachPin(ENA, 0);
  ledcAttachPin(ENB, 1);
}

void loop() {
  if (millis() - lastObstacleCheck > OBSTACLE_CHECK_INTERVAL) {
    lastObstacleCheck = millis();
    int frontDist = readDistance(FRONT_TRIG, FRONT_ECHO);
    int backDist = readDistance(BACK_TRIG, BACK_ECHO);

    if (frontDist < FRONT_OBSTACLE_DISTANCE) {
      stopMotors();
      reverse();
      delay(500);
      turnRight();
      delay(400);
    } else if (backDist < BACK_OBSTACLE_DISTANCE) {
      stopMotors();
      forward();
      delay(500);
      turnLeft();
      delay(400);
    } else {
      forward();
    }
  }
}

int readDistance(int trigPin, int echoPin) {
  digitalWrite(trigPin, LOW);
  delayMicroseconds(2);
  digitalWrite(trigPin, HIGH);
  delayMicroseconds(10);
  digitalWrite(trigPin, LOW);
  long duration = pulseIn(echoPin, HIGH, 30000);
  if (duration == 0) return 999;   // out of range
  return duration * 0.0343 / 2;
}

void forward() {
  digitalWrite(IN1, HIGH);
  digitalWrite(IN2, LOW);
  digitalWrite(IN3, HIGH);
  digitalWrite(IN4, LOW);
  ledcWrite(0, MOTOR_SPEED);
  ledcWrite(1, MOTOR_SPEED);
}

void reverse() {
  digitalWrite(IN1, LOW);
  digitalWrite(IN2, HIGH);
  digitalWrite(IN3, LOW);
  digitalWrite(IN4, HIGH);
  ledcWrite(0, MOTOR_SPEED);
  ledcWrite(1, MOTOR_SPEED);
}

void turnRight() {
  digitalWrite(IN1, HIGH);
  digitalWrite(IN2, LOW);
  digitalWrite(IN3, LOW);
  digitalWrite(IN4, HIGH);
  ledcWrite(0, MOTOR_SPEED);
  ledcWrite(1, MOTOR_SPEED);
}

void turnLeft() {
  digitalWrite(IN1, LOW);
  digitalWrite(IN2, HIGH);
  digitalWrite(IN3, HIGH);
  digitalWrite(IN4, LOW);
  ledcWrite(0, MOTOR_SPEED);
  ledcWrite(1, MOTOR_SPEED);
}

void stopMotors() {
  ledcWrite(0, 0);
  ledcWrite(1, 0);
}
Upload. Place the robot on the floor. It should drive forward, stop when it sees an obstacle, reverse, turn right, and continue.
The “where am I going” problem
The obstacle-avoidance pattern above is a random walk: the robot bounces off things. It will eventually reach most areas but takes a long time.
For real navigation:
- Wall following: use one sensor to track a wall on the left or right.
- Mapping: record where obstacles are and build a map.
- GPS / outdoor navigation: use a GPS module for outdoor waypoints.
The book ESP32 Robotics Projects covers SLAM (Simultaneous Localization and Mapping) on the ESP32.
The “stuck in a corner” problem
If the robot gets stuck in a corner, it can keep reversing and turning without escaping. Add an escape pattern: if the robot has been reversing for more than 3 times in a row, do a 180-degree turn.
int reverseCount = 0;

void loop() {
  // ...
  if (frontDist < FRONT_OBSTACLE_DISTANCE) {
    stopMotors();
    reverse();
    delay(500);
    reverseCount++;
    if (reverseCount > 3) {
      turnRight();
      delay(800);   // turn 180
      reverseCount = 0;
    } else {
      turnRight();
      delay(400);
    }
  } else {
    reverseCount = 0;
    forward();
  }
}
The battery
A 7.4V LiPo or 2x 18650 pack is the right choice. The L298N’s motor supply takes 5-35V, so 7.4V is in range. The motors typically draw 200-500 mA each, so the pack needs to supply at least 1A.
Battery life: about 1-2 hours of continuous driving. For longer runs, use a larger battery or sleep the motors between movements.
What you learned
- A 2WD robot base with obstacle avoidance.
- The L298N motor driver for bidirectional motor control.
- LEDC PWM at 25 kHz for silent motor operation.
- The “stuck in a corner” escape pattern.
What to build next
- The HC-SR04 tutorial covers the distance sensor.
- The LEDC PWM tutorial covers the motor speed control.
- The book ESP32 Robotics Projects covers the full robotics stack (sensors, motors, mapping, navigation).