ESP32: count LED pulses on your utility meter to track kWh
Read your utility meter's blinking LED with an ESP32 photoresistor and count real kWh: interrupt pulse counting, kWh math, and MQTT for a live whole-house power figure.
Every digital utility meter in North America blinks a small red LED as energy flows past. The marking next to it says something like “1000 imp/kWh” (pulses per kilowatt-hour) or “1 Wh/imp”, and that marking is the entire API of your electric bill: count the blinks, do one division, and you know what the house is burning, exactly as the utility counts it, with no CT clamps and nothing inside the panel. This tutorial builds the counter side with an ESP32, a couple of dollars of parts, and the one piece of math (kWh per pulse) that makes the numbers real.
The trap is counting by polling. My first sketch looped,
digitalRead() the sensor, looked for a rising edge, and counted. It
worked on the desk with a test LED. On the real meter it undercounted
by 10 to 20%, because the loop was busy printing serial and doing math
at exactly the moments pulses arrived. Pulse counting is the textbook
use case for a hardware interrupt: the GPIO peripheral latches the edge
in silicon, even during a delay(), even during Wi-Fi traffic, and a
counter variable increments between everything else. Same board, same
wire, and suddenly the count matched the meter’s own display.
What you need
Needed
| Item | Qty | Purpose | Est. cost |
|---|---|---|---|
| ESP32 dev board (ESP32-DevKitC or clone) | 1 | the brain | $8-$15 |
| Photoresistor module (LDR, e.g. LM393 comparator board) | 1 | sees the meter’s blink LED | $2 |
| LDR (GL5528) bare, if not using a module | 1 | the light sensor itself | $1 |
| 10K resistor | 1 | LDR voltage divider (bare LDR builds) | $0.10 |
| Tape or an opaque cover (e.g. a film canister) | 1 | blocks room light so only the LED shows | $0 |
| USB cable + phone charger | 1 | power near the meter | on hand |
| Jumper wires | 3 | sensor to ESP32 | $1 |
Check your meter first. You want the blinking LED marked imp/kWh (or pulses/kWh, or Wh/imp). Typical figures: 1000 imp/kWh on many residential meters, 800, 2000, or 10000 on others. The number goes straight into the code; there is no calibrating around it.
Nice to have
- Soldering iron and solder to attach long leads to the LDR
- Soldering iron stand, helping hands, and a soldering mat for that lead job
- Anti-static wristband when handling the bare board
- Magnifying goggles to read the fine imp/kWh marking on the meter face
- Wire stripper for the sensor leads
- Multimeter to check the sensor module’s output swings when the LED blinks
How the meter talks
The LED pulses at a rate proportional to power. At 1000 imp/kWh:
- 1000 W of load = 1000 pulses per hour = a blink every 3.6 seconds
- 3000 W (e.g. dryer + water heater) = a blink every 1.2 seconds
- 100 W (house idling) = a blink every 36 seconds
Two readings fall out of this, and you want both. Pulse rate is instantaneous power: pulses per second times 3600, divided by imp/kWh, gives watts. Total pulses is energy: pulses divided by imp/kWh gives kWh, which is what the bill actually charges you.
The sensor question is which end of the divider sees the blink. Most LM393 modules output LOW when they detect light, so a blink is a falling edge. Watch the serial monitor against the physical blink once before trusting the count.
Wiring
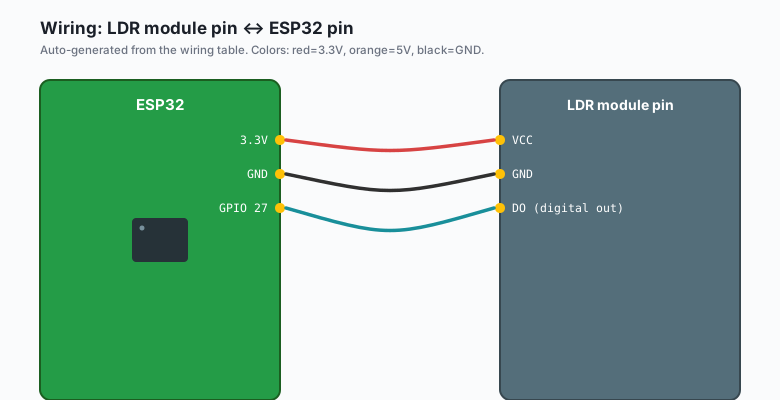
| LDR module pin | ESP32 pin |
|---|---|
VCC | 3.3V |
GND | GND |
| DO (digital out) | GPIO 27 |
Power the module from 3.3V, not 5V, so its output never exceeds the ESP32’s logic level. GPIO 27 is an ADC1-side pin and a plain interrupt input, and it stays far away from the boot-strapping pins (0, 2, 12, 15) that misbehave when something pulls them at reset.
Mount the sensor against the meter face over the LED with tape, then cover the whole assembly with something opaque (a film canister, a folded sticky note). Room light through the LDR’s response band is dimmer than the LED but not that much dimmer; without the cover you get “pulses” every time a cloud moves.
The code
#include <WiFi.h>

const char* WIFI_SSID = "your-network";
const char* WIFI_PASS = "your-password";

const int    SENSOR_PIN   = 27;
const uint32_t IMP_PER_KWH = 1000;   // from YOUR meter's face marking
const char*   TZ_RULE      = "MST7MDT,M3.2.0,M11.1.0";

// Pulse bookkeeping (touched by the ISR, so volatile)
volatile uint32_t pulseCount = 0;
volatile uint32_t lastEdgeUs = 0;
volatile uint32_t minGapUs   = 30000;  // ignore edges closer than 30 ms

void IRAM_ATTR onPulse() {
  uint32_t now = micros();
  if (now - lastEdgeUs > minGapUs) {   // debounce against LED shimmer
    pulseCount++;
    lastEdgeUs = now;
  }
}

void setup() {
  Serial.begin(115200);
  pinMode(SENSOR_PIN, INPUT);
  attachInterrupt(digitalPinToInterrupt(SENSOR_PIN), onPulse, FALLING);

  WiFi.begin(WIFI_SSID, WIFI_PASS);
  while (WiFi.status() != WL_CONNECTED) delay(500);

  configTime(0, 0, "192.168.1.1", "pool.ntp.org");  // router first
  setenv("TZ", TZ_RULE, 1);
  tzset();
}

void loop() {
  static uint32_t last = 0;
  delay(10000);                       // reporting window
  uint32_t windowMs = millis() - last;

  noInterrupts();
  uint32_t pulses = pulseCount;
  pulseCount = 0;
  interrupts();

  if (pulses == 0) {
    Serial.println("no pulses in window (idle or sensor aimed wrong)");
    last = millis();
    return;
  }

  float kwh_window = (float)pulses / IMP_PER_KWH;
  float watts = (pulses * 3600000.0) / (IMP_PER_KWH * windowMs);
  last = millis();

  Serial.printf("pulses %lu  this window %.4f kWh  power %.0f W\n",
                (unsigned long)pulses, kwh_window, watts);
}
The ISR does almost nothing on purpose: latch the edge, bump a counter,
get out. Anything slower (serial prints, Wi-Fi) stays in loop(), and
the noInterrupts() window around the counter read is a few
microseconds. The 30 ms minimum gap is debounce, not because LED pulses
bounce like buttons do, but because a marginal sensor aim can produce
double edges on one blink.
Watts math in plain terms: each pulse is 3600000 / IMP_PER_KWH
joules (1000 imp/kWh means 3600 J per pulse), so power in watts is
pulses times 3600, divided by the window in seconds. If your meter
prints “1 Wh/imp” instead, that is the same as 1000 imp/kWh.
What you learned
- Hardware interrupts count pulses without polling, and the count stays exact even while Wi-Fi and serial work runs.
- Your utility meter has had an open API all along: one LED, one imp/kWh number printed on the face, and one division.
- Pulse rate gives live watts and the running total gives kWh; same counter, two questions.
- ISR discipline: volatile counters, microseconds of work inside the interrupt, everything else in the loop.
When something breaks
- Counts nothing: aim is off. Watch the serial monitor while
watching the LED; if the module’s onboard LED mirrors the meter’s
blink but the count stays zero, the sensor output is the opposite
polarity and you want
RISINGinstead ofFALLING. - Counts roughly double: the opaque cover is missing or leaky and room light is triggering edges, or the 30 ms debounce is too long for a high-rate meter. Cover first, then check your meter’s real imp/kWh figure.
- Counts stop after days with Wi-Fi errors: a brownout or watchdog reset cleared nothing you kept in RAM. Persist the total in NVS every 100 pulses (the NVS storage tutorial on this site covers it).
- Power figure jumps around wildly on short windows: a 10 s window with 1 or 2 pulses gives coarse watts. Report on 60 s windows for stable numbers; the math is the same.
- Meter has no LED at all: older induction-disc meters spin a wheel instead. You are looking at the SCT-013 current transformer tutorial on this site, which measures current directly.
What to build next
- Publish watts and kWh over MQTT (the MQTT tutorial on this site) and Home Assistant or Grafana draws your whole-house graph in an afternoon.
- The SCT-013 current transformer tutorial measures per-circuit current to pair with this whole-house total (e.g. the meter says the house draws 900 W, the SCT-013 on the kitchen circuit says where).
- The InfluxDB timeseries tutorial stores the kWh counters properly, and rate counters are exactly what its functions are built for.
- Send a daily kWh summary with the SMTP email tutorial; the NTP work above is what makes “yesterday” a real window.
The book IoT with ESP32 bundles the project tutorials including this one.