ESP32: connect to Home Assistant two ways (ESPHome and MQTT)
Wire an ESP32 sensor into a self-hosted Home Assistant: flash it with ESPHome from the HA UI, or run native firmware and publish MQTT discovery. Both paths, one tutorial.
You have a Raspberry Pi running Home Assistant (the HA install tutorial covers that part), and you have an ESP32 with a BME280 on it. The question is how the two of them talk. There are two good answers and they both work: flash the ESP32 with ESPHome, which turns the whole firmware into a YAML config file that Home Assistant manages for you, or keep your own Arduino code and publish MQTT discovery messages that make the sensor show up in HA on its own.
I run both in my house. ESPHome for the boring sensors (temperature, door contacts, the mailbox), native MQTT for anything where I want full control of the loop (e.g. the projects where the ESP32 is also driving neopixels or reading a weird sensor that needs custom timing).
The trap: people try to do both at once on one device, or they flash ESPHome and then wonder why their Arduino sketch is gone. Flashing ESPHome replaces the firmware completely. Pick one path per device. You can reflash to the other path any time over USB.
What you need
- ESP32 dev board (the 38-pin ESP32-WROOM-32 devkit is the default)
- A BME280 sensor module for the example (or any I2C sensor you have; the wiring is the same for the ESPHome version either way)
- A Raspberry Pi (or any machine) running Home Assistant, reachable from your network
- A Mosquitto MQTT broker if you take the MQTT path (the MQTT broker on Pi tutorial covers the install)
- 4 jumper wires and a breadboard
- Micro-USB cable for flashing
Needed
| Part | Why this one |
|---|---|
| ESP32-WROOM-32 devkit | The board every other tutorial here assumes |
| BME280 breakout | I2C, 3.3 V safe, HA has a native sensor entity for it |
| 4 jumper wires | SDA, SCL, VCC, GND |
Nice to have
- Soldering iron and solder (if the BME280 header came loose)
- Multimeter (check 3.3 V actually reaches the sensor before blaming the config)
- Helping hands (holding a header while soldering)
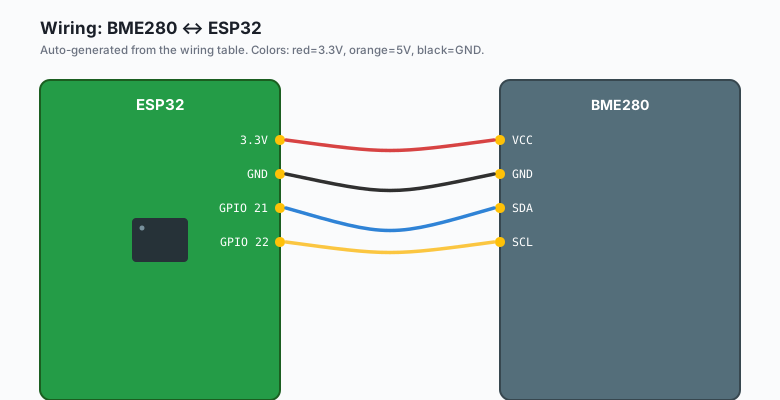
Wiring
| BME280 | ESP32 |
|---|---|
VCC | 3.3V |
GND | GND |
SDA | GPIO 21 |
SCL | GPIO 22 |
Same wiring for both paths. The ESP32 default I2C pins (SDA 21, SCL 22) work in ESPHome and in Arduino code alike.
The BME280 is 3.3 V only. Do not feed it 5 V. And check the module: some GY-BME280 boards want VCC on 3.3 V and some silk says 3.3 V but the board has a regulator. Either way, 3.3 V is the safe answer.
Path 1: ESPHome
Install
ESPHome lives inside Home Assistant. Open your HA UI and go to
Settings >> Add-ons >> Add-on Store >> search ESPHome Device
Builder >> Install >> Start. That is the whole install. If you run
HA Container (not HAOS), you instead run the ESPHome standalone tool
in Docker; the config format is identical.
The config
In the ESPHome builder: + NEW DEVICE >> name it desk-sensor >>
pick ESP32 >> skip the Wi-Fi step (paste your own). You get a YAML
file. Replace the sensor section with this:
esphome:
  name: desk-sensor

esp32:
  board: esp32dev

wifi:
  ssid: !secret wifi_ssid
  password: !secret wifi_password

api:
  encryption:
    key: "paste-the-key-esphome-generated"

ota:
  - platform: esphome

i2c:
  sda: 21
  scl: 22
  scan: true

sensor:
  - platform: bme280
    address: 0x76
    temperature:
      name: "Desk temperature"
    pressure:
      name: "Desk pressure"
    humidity:
      name: "Desk humidity"
  - platform: wifi_signal
    name: "Desk WiFi"
    update_interval: 60s
Click Install, pick “Plug into this computer” the first time (the flash happens from the browser over USB, no Arduino IDE involved), and after about two minutes the device appears in Home Assistant’s device list with three sensor entities. No discovery config, no MQTT broker, no code. That is the ESPHome pitch and it is real.
Path 2: native firmware with MQTT discovery
Install
If you want your own loop instead, install the libraries in the
Arduino IDE: Sketch >> Include Library >> Manage Libraries >>
search PubSubClient by Nick O’Leary and Adafruit BME280
Library. Install both.
The code
The trick is the discovery message. Home Assistant listens for
retain-flagged JSON on homeassistant/sensor/<node_id>/<object_id>/config
describing the entity. Publish that once at boot and HA builds the
entity for you. Then publish state on the topic the config points to.
#include <WiFi.h>
#include <PubSubClient.h>
#include <Wire.h>
#include <Adafruit_BME280.h>

const char* WIFI_SSID = "your-wifi-ssid";
const char* WIFI_PASS = "your-wifi-password";
const char* MQTT_HOST = "192.168.1.50";   // the Pi running Mosquitto

WiFiClient net;
PubSubClient mqtt(net);
Adafruit_BME280 bme;

char stateTopic[] = "home/desk-sensor/state";
char cfgTemplate[] =
  "{\"device_class\":\"temperature\",\"unit_of_measurement\":\"°C\","
  "\"value_template\":\"{{ value_json.temperature }}\","
  "\"state_topic\":\"home/desk-sensor/state\","
  "\"unique_id\":\"desk_sensor_temp\","
  "\"device\":{\"name\":\"Desk sensor\",\"identifiers\":[\"desk-sensor\"]}}";

void publishDiscovery() {
  String topic = "homeassistant/sensor/desk-sensor/temperature/config";
  mqtt.publish(topic.c_str(), cfgTemplate, true);   // retain = true, HA remembers it
}

void setup() {
  Serial.begin(115200);
  Wire.begin(21, 22);
  if (!bme.begin(0x76)) {
    Serial.println("BME280 not found. Check wiring/address.");
    while (true) delay(100);
  }
  WiFi.begin(WIFI_SSID, WIFI_PASS);
  while (WiFi.status() != WL_CONNECTED) { delay(300); }
  mqtt.setServer(MQTT_HOST, 1883);
  while (!mqtt.connect("desk-sensor")) { delay(300); }
  publishDiscovery();
}

void loop() {
  mqtt.loop();
  static uint32_t last = 0;
  if (millis() - last < 30000) return;   // every 30 s
  last = millis();
  float t = bme.readTemperature();
  float h = bme.readHumidity();
  float p = bme.readPressure() / 100.0F;
  char payload[96];
  snprintf(payload, sizeof(payload),
           "{\"temperature\":%.2f,\"humidity\":%.2f,\"pressure\":%.2f}",
           t, h, p);
  mqtt.publish(stateTopic, payload);
  Serial.println(payload);
}
Upload, then in Home Assistant: Settings >> Devices & services >>
the MQTT integration shows “Desk sensor” with a temperature entity.
If HA was already running while you published, the entity appears
within seconds because the message was retained.
Keep the discovery message small and retain it. A lost retained discovery message after a broker restart is the number-one “my sensor vanished from HA” cause. Republishing at boot (this sketch does) fixes it.
Which path when
- ESPHome when the device is sensors and switches, when you want OTA updates from the HA UI, and when you would rather edit YAML than C++.
- Native MQTT when you need timing-sensitive code, custom protocols, or you already have a working sketch and just want it in HA.
What you learned
- ESPHome turns the firmware into YAML and flashes it from the browser; HA picks up every entity automatically.
- Native MQTT needs one retained discovery JSON per entity, then HA builds the sensor itself.
- Same wiring, same I2C pins for both. The paths differ only in the firmware.
- Pick one path per device; flashing one replaces the other.
When something breaks
- ESPHome flash fails at “Connecting…” Hold the BOOT button on the devkit while the flash starts, release when it connects. The classic CP2102 driver issue on Windows shows up as the COM port never appearing at all.
- The MQTT sensor never appears in HA. The discovery message
needs
retain=trueand HA’s MQTT integration needs to be enabled (Settings>>Devices & services>> MQTT). Watch the topic withmosquitto_sub -t 'homeassistant/#' -vto see whether your JSON actually went out. - The sensor appears but values show “unknown”. The
value_templatein the config JSON does not match your state payload’s keys. If you publish{"temperature":22.1}the template must say{{ value_json.temperature }}exactly. - ESPHome device shows “offline” in HA. Wrong API encryption key after regenerating, or the YAML still has a placeholder Wi-Fi secret. The device logs (in the ESPHome builder) say which.
- Both paths on one device fight each other. They cannot coexist; the flash overwrote whatever was there. Reflash with the path you want and move on.
What to build next
- Pair this with the MQTT publish-subscribe tutorial if you want to understand the topic structure the discovery messages ride on.
- The raspberry-pi-home-assistant tutorial covers the HA server side, including the backup you should take before you flash anything.
- Once sensors are in HA, the ntfy notifications tutorial shows the self-hosted way to get your phone to buzz when a threshold trips.
- The book IoT with ESP32 bundles the sensor, MQTT, and automation chapters into one project arc.