ESP32-CAM: face detection with the onboard model
Run the ESP32's built-in face detection model on the ESP32-CAM with ESP-WHO: detect faces in real time, no cloud, no external server, with human detection as a fallback.
The ESP32-CAM’s OV2640 sensor is the boring half of the story. The interesting half is that Espressif ships a small neural model (ESP-WHO, built on their ESP-DL library) that runs on the ESP32 itself and draws boxes around human faces in the camera stream. No cloud, no round trip, no API key. The $10 board does it at a few frames per second, which is enough to know “a person is looking at the camera” vs “the cat walked by”.
The trap I hit: the first sketch I tried ran detection on UXGA frames and the board rebooted every few seconds. Detection needs RAM, the frame buffer needs RAM, and the ESP32 has 520 KB total. Detection wants small frames (e.g. 240x240) and PSRAM for the model working area. Get the frame size wrong and the failure mode is a reboot loop that looks like a power problem.
What you need
Needed
- ESP32-CAM board (AI-Thinker, about $10; it has 4 MB PSRAM, which the
- FTDI USB-serial adapter for programming (GPIO 0 dance, as always)
- 5V supply rated 500 mA or better (the camera plus the radio plus
- The ESP32 Arduino core 2.x installed (Tools >> Board >> ESP32
Nice to have
- A soldering iron and solder (only if you solder the header pins yourself)
- Helping hands or a vise to hold the board while you work
- An anti-static wristband (cheap insurance for the ESP32’s pins)
Wiring
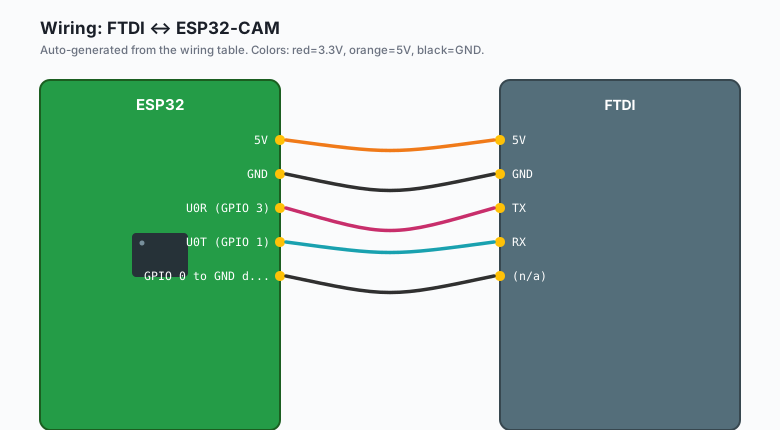
No sensor wiring this time: the only hardware is the FTDI for programming.
| FTDI | ESP32-CAM |
|---|---|
5V | 5V |
GND | GND |
TX | U0R (GPIO 3) |
RX | U0T (GPIO 1) |
| (n/a) | GPIO 0 to GND during power-up (download mode) |
Ground GPIO 0, power the board, upload, remove the jumper, press reset. If uploads fail with “Failed to connect”, the board was not in download mode when it powered up.
Install
Arduino IDE >> Sketch >> Include Library >> Manage Libraries, search
“ESP32”, and install “ESP32” by Espressif Systems (the board support
package; the detection model ships inside it, no separate download).
The library name is esp32-camera plus the bundled esp32-camera
detection headers, and the human face detection model is compiled in
when you include the right headers.
If your core is older than 2.x, upgrade first (Arduino IDE >> Tools >> Board >> Boards Manager, search “esp32”): the 1.0.x core predates the detection API used here.
The code
#include "esp_camera.h"
#include <WiFi.h>
#include "img_converters.h"
#include "fb_gfx.h"
#include "human_face_detect_msr01.hpp"
#include "human_face_detect_mnp01.hpp"

// AI-Thinker pin map
#define PWDN_GPIO_NUM  32
#define RESET_GPIO_NUM -1
#define XCLK_GPIO_NUM   0
#define SIOD_GPIO_NUM  26
#define SIOC_GPIO_NUM  27
#define Y2_GPIO_NUM     5
#define Y3_GPIO_NUM    18
#define Y4_GPIO_NUM    19
#define Y5_GPIO_NUM    21
#define Y6_GPIO_NUM    36
#define Y7_GPIO_NUM    39
#define Y8_GPIO_NUM    34
#define Y9_GPIO_NUM    35
#define VSYNC_GPIO_NUM 25
#define HREF_GPIO_NUM  23
#define PCLK_GPIO_NUM  22

WebServer server(80);
bool cameraReady = false;
int lastFaceCount = 0;

void setup() {
  Serial.begin(115200);

  camera_config_t config = {};
  config.ledc_channel = LEDC_CHANNEL_0;
  config.ledc_timer = LEDC_TIMER_0;
  config.pin_d0 = Y2_GPIO_NUM;  config.pin_d1 = Y3_GPIO_NUM;
  config.pin_d2 = Y4_GPIO_NUM;  config.pin_d3 = Y5_GPIO_NUM;
  config.pin_d4 = Y6_GPIO_NUM;  config.pin_d5 = Y7_GPIO_NUM;
  config.pin_d6 = Y8_GPIO_NUM;  config.pin_d7 = Y9_GPIO_NUM;
  config.pin_xclk = XCLK_GPIO_NUM;
  config.pin_pclk = PCLK_GPIO_NUM;
  config.pin_vsync = VSYNC_GPIO_NUM;
  config.pin_href = HREF_GPIO_NUM;
  config.pin_sccb_sda = SIOD_GPIO_NUM;
  config.pin_sccb_scl = SIOC_GPIO_NUM;
  config.pin_pwdn = PWDN_GPIO_NUM;
  config.pin_reset = RESET_GPIO_NUM;
  config.xclk_freq_hz = 20000000;
  config.pixel_format = PIXFORMAT_RGB565;   // detection needs RGB565
  config.frame_size = FRAMESIZE_240X240;    // the detection sweet spot
  config.fb_count = 2;
  config.grab_mode = CAMERA_GRAB_LATEST;

  cameraReady = (esp_camera_init(&config) == ESP_OK);
  Serial.println(cameraReady ? "camera ok" : "camera FAILED (check power)");

  WiFi.mode(WIFI_STA);
  WiFi.begin("your-wifi", "your-password");
  while (WiFi.status() != WL_CONNECTED) { delay(500); Serial.print("."); }

  server.on("/", handleStatus);
  server.begin();
}

void handleStatus() {
  String json = "{\"faces\":" + String(lastFaceCount) + "}";
  server.send(200, "application/json", json);
}

void loop() {
  camera_fb_t *fb = esp_camera_fb_get();
  if (!fb) { delay(100); return; }

  // The model: MSR (light) finds faces, MNP filters false positives
  HumanFaceDetectMSR01 detector;
  detector.set_threshold(0.7f, 0.3f);   // score gate, then NVR threshold
  std::list<HumanFaceDetectMSR01::result_t> results =
      detector.infer((uint16_t *)fb->buf, {(int)fb->width, (int)fb->height});
  lastFaceCount = results.size();

  // Optional: draw boxes into the frame before returning the buffer
  if (lastFaceCount > 0) {
    for (auto &r : results) {
      fb_gfx_drawFastHLine(fb, r.box.x, r.box.y, r.box.w, 0xFFFFFF);
      fb_gfx_drawFastHLine(fb, r.box.x, r.box.y + r.box.h, r.box.w, 0xFFFFFF);
      fb_gfx_drawFastVLine(fb, r.box.x, r.box.y, r.box.h, 0xFFFFFF);
      fb_gfx_drawFastVLine(fb, r.box.x + r.box.w, r.box.y, r.box.h, 0xFFFFFF);
    }
  }

  esp_camera_fb_return(fb);
  server.handleClient();
  delay(50);   // a few fps is the honest ceiling on this chip
}
Open http://<the-ip>/ in a browser and you get a JSON count of faces
in the last frame (e.g. {"faces":1} when you sit down in front of
it). The serial log prints the same number; the drawn-box version
feeds the streaming tutorial’s MJPEG path if you want to see it live.
Detection vs recognition: what this is and is not
Detection finds faces and counts them. Recognition names them (“that is Brian”), and the recognition model is heavier: it runs, but slowly, and this post is about the detection path that stays real-time. Do not build a door lock on face recognition from a $10 board and call it security; treat detection as a presence signal (e.g. “someone is at the door” vs “nothing is there”), and let your automation decide what that means.
The PSRAM and frame size story
The model’s working buffers want PSRAM, and the ESP32-CAM’s 4 MB is enough at 240x240. What breaks:
FRAMESIZE_240X240withPIXFORMAT_RGB565: the supported path.- QVGA (320x240) works but detection slows to 1-2 fps.
- UXGA with detection: reboot loop. The frame buffer plus the model working area do not fit.
The grab_mode = CAMERA_GRAB_LATEST line matters too: with two frame
buffers you want the newest frame, not a queue of stale ones (e.g. a
detection result on a 2-second-old frame is the wrong answer for a
doorbell).
What you learned
- The face detection model ships inside the ESP32 Arduino core; the hardware part is frame size and pixel format, not wiring.
- RGB565 at 240x240 is the supported configuration; bigger frames trade into reboots.
- Detection counts faces; recognition names them, and they are different budgets on this chip.
When something breaks
- “Camera init failed”: power supply first (the camera’s 300 mA
bursts brownout weak USB). If power is good, check that
PIXFORMAT_RGB565is set; JPEG frames cannot be fed to the model. - Reboot loop after a few seconds of detection: frame size too
big for the model’s RAM budget. Drop to 240x240 and make sure
fb_countis 2, not more. - Faces detected but count flickers 0/1/0: the score threshold is
too loose. Raise the first
set_threshold()value toward 0.8 (e.g. 0.7 catches profile faces at the cost of a few false hits on posters and pets’ faces). - 0.5 fps and getting worse: PSRAM is not being detected. Run the
board-support example
ESP32 >> Camera >> CameraWebServeronce; its boot log prints “PSRAM: OK” or “PSRAM: FAILED”. A failed PSRAM module is a returned-board situation. - Upload fails: GPIO 0 was not grounded at power-up. Same dance as every ESP32-CAM post.
What to build next
- The streaming tutorial is the live-view base; add this detection loop to it and the boxes appear in the browser.
- The photo-on-motion ntfy tutorial pairs with this: gate the photo on a detected face and the cat stops filing reports.
- The edge AI image classification tutorial is the broader what-can-this-chip-run follow-up.
- The book IoT with ESP32 bundles the camera tutorials.