ESP32: build an indoor air quality monitor
BME280 + MQ-2 + MQ-135 + ESP32 + OLED = a complete indoor air quality monitor. Temperature, humidity, CO2 equivalent, and combustible gas.
An indoor air quality monitor that displays CO2 equivalent, combustible gas level, temperature, and humidity on an OLED. BME280 for the climate data, MQ-2 for the combustible gas sensor, MQ-135 for CO2 equivalent, OLED for the display.
This project combines the BME280, MQ-2, and OLED tutorials into a finished device.
What you need
- ESP32 dev board
- BME280 breakout (I2C)
- MQ-2 gas sensor module (with breakout)
- MQ-135 air quality sensor module
- SSD1306 OLED display (128x64, I2C)
- 4 jumper wires for each sensor (12 total)
Wiring
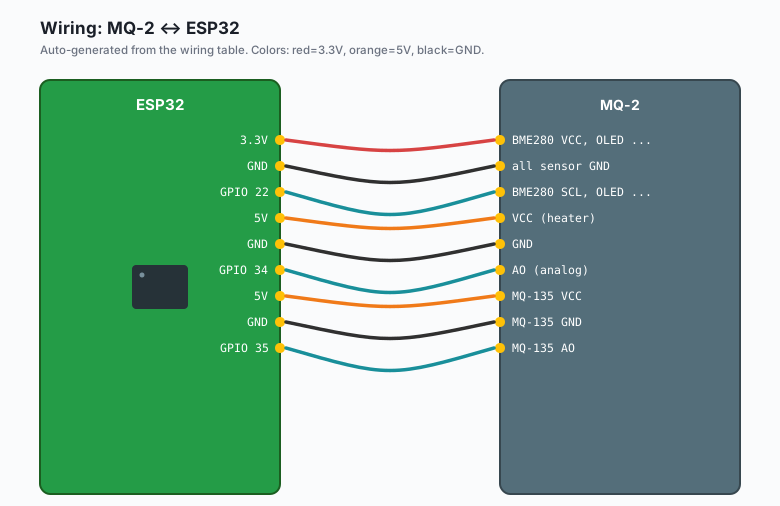
ESP32 3.3V -- BME280 VCC, OLED VCC
ESP32 GND  -- all sensor GND
ESP32 GPIO 21 -- BME280 SDA, OLED SDA (shared I2C bus)
ESP32 GPIO 22 -- BME280 SCL, OLED SCL

ESP32 5V -- MQ-2 VCC (heater)
ESP32 GND -- MQ-2 GND
ESP32 GPIO 34 -- MQ-2 AO (analog)
(MQ-2 DO not connected)

ESP32 5V -- MQ-135 VCC
ESP32 GND -- MQ-135 GND
ESP32 GPIO 35 -- MQ-135 AO
(MQ-135 DO not connected)
The BME280 and OLED share the I2C bus. The MQ sensors use separate analog inputs.
The MQ sensors need 5V for the heater to reach operating temperature. The analog output is in the 0-5V range. The ESP32’s ADC can only read 0-3.3V; readings above 3.3V will saturate. Add a voltage divider (1k + 2k ohm) to scale down the MQ output to 0-3.3V.
The code
#include <Wire.h>
#include <Adafruit_Sensor.h>
#include <Adafruit_BME280.h>
#include <Adafruit_GFX.h>
#include <Adafruit_SSD1306.h>

#define SCREEN_WIDTH 128
#define SCREEN_HEIGHT 64
Adafruit_SSD1306 display(SCREEN_WIDTH, SCREEN_HEIGHT, &Wire, -1);

Adafruit_BME280 bme;

const int MQ2_PIN = 34;
const int MQ135_PIN = 35;

void setup() {
  Serial.begin(115200);
  delay(1000);

  Wire.begin(21, 22);
  if (!bme.begin(0x76)) {
    Serial.println("Could not find BME280");
    while (1);
  }

  if (!display.begin(SSD1306_SWITCHCAPVCC, 0x3C)) {
    Serial.println("Could not find OLED");
    while (1);
  }

  display.clearDisplay();
  display.setTextSize(1);
  display.setTextColor(SSD1306_WHITE);
  Serial.println("Air quality monitor ready");
}

unsigned long lastRead = 0;

void loop() {
  if (millis() - lastRead > 2000) {
    lastRead = millis();
    updateDisplay();
  }
}

void updateDisplay() {
  float temp = bme.readTemperature();
  float hum = bme.readHumidity();
  int mq2Raw = analogRead(MQ2_PIN);
  int mq135Raw = analogRead(MQ135_PIN);

  // Invert MQ readings (lower = more gas)
  int mq2Air = 4095 - mq2Raw;     // 0 = clean, 4095 = max gas
  int mq135Air = 4095 - mq135Raw; // same

  display.clearDisplay();

  // Line 1: temperature
  display.setCursor(0, 0);
  display.print("T:");
  display.print(temp, 1);
  display.print("C H:");
  display.print(hum, 0);
  display.println("%");

  // Line 2: CO2 equivalent (rough)
  display.setCursor(0, 16);
  display.print("CO2:");
  display.print(map(mq135Air, 0, 4095, 400, 2000));
  display.println("ppm");

  // Line 3: gas level
  display.setCursor(0, 32);
  display.print("Gas:");
  int gasPct = map(mq2Air, 0, 4095, 0, 100);
  display.print(gasPct);
  display.println("%");

  // Bar graph for gas
  display.drawRect(0, 48, 128, 12, SSD1306_WHITE);
  display.fillRect(2, 50, map(gasPct, 0, 100, 0, 124), 8, SSD1306_WHITE);

  display.display();
}
Upload. The OLED shows temperature, humidity, CO2 estimate, and gas level. The bar graph at the bottom visualizes the gas reading.
The MQ sensor warm-up
MQ sensors need 24 hours of continuous power before they give stable readings. The first day, the readings will drift as the heater warms up. After that, they are stable.
For projects where this matters (e.g. production deployment), add a “calibration mode” message that displays the warm-up status.
The CO2 estimate
The MQ-135 is sensitive to multiple gases including CO2, NH3, and alcohol. The “CO2 equivalent” value is an estimate that assumes the sensor is in a typical indoor environment.
For accurate CO2 readings, use a dedicated CO2 sensor like the MH-Z19 or SCD30. Those cost more ($20-30) but give true CO2 values.
The “alarm when gas is detected” addition
Add a buzzer that activates when gas exceeds a threshold:
const int BUZZER_PIN = 4;

void loop() {
  // ... after updateDisplay() ...

  if (mq2Air > 3000) {   // very high gas
    digitalWrite(BUZZER_PIN, HIGH);
  } else {
    digitalWrite(BUZZER_PIN, LOW);
  }
}
The buzzer tone (from the buzzer tutorial) makes an alarm sound. For real safety, do not rely on this for gas leak detection; use a commercial detector.
The data logging addition
For a permanent record of air quality, log to MQTT:
#include <PubSubClient.h>

void publishReading() {
  char payload[200];
  snprintf(payload, sizeof(payload),
    "{\"temp\":%.1f,\"hum\":%.1f,\"co2\":%d,\"gas\":%d}",
    bme.readTemperature(), bme.readHumidity(),
    map(mq135Air, 0, 4095, 400, 2000), map(mq2Air, 0, 4095, 0, 100));
  mqtt.publish("home/air/sensor", payload);
}
A Raspberry Pi running Node-RED can graph these over time.
What you learned
- A complete indoor air quality monitor with 4 sensors and an OLED.
- All sensors share the I2C bus for the BME280 and OLED.
- MQ sensors need 24 hours of warm-up for stable readings.
- The CO2 value from MQ-135 is approximate; use a dedicated CO2 sensor for accurate readings.
What to build next
- The BME280 tutorial covers the climate sensor.
- The MQ-2 tutorial covers the gas sensor (and its caveats).
- The OLED tutorial covers the display.
- The book ESP32 Smart Home has more air quality patterns (ventilation control, multi-room monitoring).