Arduino: read an HC-SR04 ultrasonic distance sensor
Wire an HC-SR04 to an Arduino and read distance in centimeters. The 40 kHz chirp, the trigger pulse, the echo timing, and the math that turns a microsecond count into a number you can use.
The HC-SR04 is the distance sensor I hand to anyone building their first robot. It is cheap (about $2), it works on a 5V Arduino, the wiring is four jumpers, and the math is one formula. It also has the most predictable failure modes of any sensor I have used, which is rare in this hobby.
The sensor works by sending out a 40 kHz chirp (above human hearing) and timing how long the echo takes to come back. The math is distance = (echo_time * speed_of_sound) / 2, and the 2 is because the sound has to go out and come back.
What you need
- HC-SR04 ultrasonic distance sensor
- Arduino (Uno, Nano, Mega)
- 4 jumper wires
- USB cable
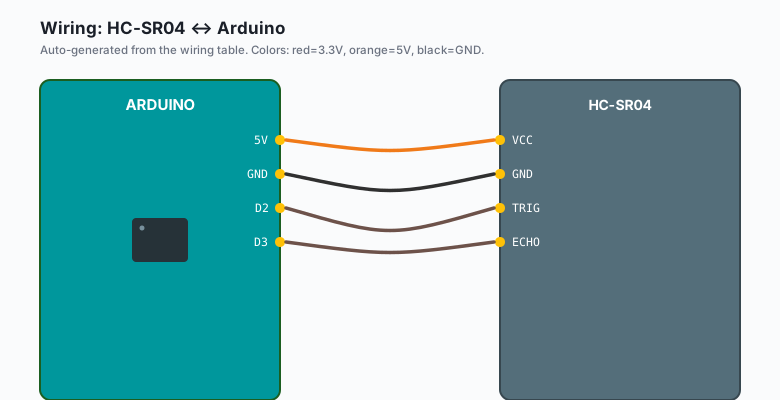
The HC-SR04 has four pins: VCC, GND, TRIG, ECHO. The TRIG pin is the input (you send a pulse to start a measurement). The ECHO pin is the output (the sensor drives it HIGH for the duration of the echo).
The 5V logic level on the HC-SR04 works on a 5V Arduino. On a 3.3V board (ESP32, Pico, RP2040), the ECHO pin outputs 5V and you need a level shifter or a voltage divider. Otherwise you can fry the GPIO. I have done this. Do not do this.
Wiring
HC-SR04 VCC  -- Arduino 5V
HC-SR04 GND  -- Arduino GND
HC-SR04 TRIG -- Arduino D2
HC-SR04 ECHO -- Arduino D3
If you are on a 3.3V board, add a voltage divider on the ECHO pin. Two resistors, 1k and 2k, bring the 5V echo down to about 3.3V.
HC-SR04 ECHO --[ 1k ]--+-- Arduino D3
                        |
                     [ 2k ]
                        |
                       GND
The code (raw pulseIn, no library)
const int TRIG_PIN = 2;
const int ECHO_PIN = 3;

void setup() {
  Serial.begin(9600);
  pinMode(TRIG_PIN, OUTPUT);
  pinMode(ECHO_PIN, INPUT);
}

void loop() {
  // Send a 10-microsecond trigger pulse
  digitalWrite(TRIG_PIN, LOW);
  delayMicroseconds(2);
  digitalWrite(TRIG_PIN, HIGH);
  delayMicroseconds(10);
  digitalWrite(TRIG_PIN, LOW);

  // Read the echo pin; pulseIn returns the duration in microseconds
  long duration = pulseIn(ECHO_PIN, HIGH, 30000);
  // 30000 us timeout = 5.1 m max range (anything farther reads 0)

  if (duration == 0) {
    Serial.println("No echo (out of range)");
  } else {
    long cm = duration / 29 / 2;   // speed of sound is ~29 us/cm
    Serial.print("Distance: ");
    Serial.print(cm);
    Serial.println(" cm");
  }

  delay(100);
}
The trigger pulse is 10 microseconds of HIGH after a 2-microsecond
LOW. The sensor sees that, fires the chirp, then drives the ECHO
pin HIGH for the round-trip time. pulseIn() waits for the pin to
go HIGH, times how long it stays HIGH, and returns the duration in
microseconds. The timeout argument (30000) prevents pulseIn from
hanging forever if the sensor does not see an echo.
The distance math: sound travels about 343 meters per second, which
is 29.1 microseconds per centimeter. Round trip is twice that, so
cm = duration / 29 / 2. The divide by 2 and divide by 29 (in
either order) is the same as divide by 58.
The NewPing library vs raw pulseIn
The NewPing library wraps the same logic into a single function call and adds a few features: median filtering (drops outlier readings), built-in timing for multiple sensors on one Arduino, and a “ping_temperature” mode that compensates for the speed of sound at different temperatures (it is about 0.6 m/s slower per degree Celsius, which matters for precise measurements).
#include <NewPing.h>

#define TRIG_PIN 2
#define ECHO_PIN 3
#define MAX_DISTANCE 200   // cm

NewPing sonar(TRIG_PIN, ECHO_PIN, MAX_DISTANCE);

void setup() {
  Serial.begin(9600);
}

void loop() {
  int cm = sonar.ping_cm();
  if (cm == 0) {
    Serial.println("Out of range");
  } else {
    Serial.print(cm);
    Serial.println(" cm");
  }
  delay(100);
}
For a beginner project, raw pulseIn is fine. For a robot with
multiple sensors, NewPing is worth the install.
The 3-meter range limit
The HC-SR04 is rated for 2 cm to 400 cm, but in practice the useful range is about 2 cm to 300 cm. Beyond 3 meters, the echo gets weak and you start getting phantom readings (the sensor returns a number that has no real-world meaning).
The reasons are physics: the 40 kHz chirp spreads out, the energy density drops, and the return is below the noise floor of the sensor’s receiver. There is no code fix for this. If you need longer range, you need a different sensor (an outdoor-rated ultrasonic, or a LiDAR).
The “soft surfaces absorb sound” gotcha
A common confusion: the sensor reads 200 cm when pointed at a pillow, but reads the same 200 cm when pointed at nothing. The pillow absorbed the sound. Ultrasonic bounces off hard surfaces (wood, plastic, walls) and is absorbed by soft ones (cloth, carpet, fur, foam).
This matters for robots. If your robot needs to detect a person walking in front of it, and the person is wearing a thick winter coat, the HC-SR04 will not see them.
For a robot that needs to detect soft things, you need a different sensor. Time-of-flight LiDAR (VL53L0X, VL53L1X) works on most surfaces because it uses light, not sound.
Multi-sensor arrays
The HC-SR04 has a single TRIG and a single ECHO pin. To use multiple sensors on one Arduino, you give each one its own TRIG pin (outputs) but they all share the same ECHO pin, with a diode on each one to prevent the sensors from shorting into each other.
A simpler approach: trigger them one at a time. Connect all TRIG
pins to separate Arduino outputs, share the ECHO pin through
diodes, and call pulseIn() on the shared ECHO line. Trigger
sensor 1, wait for the echo, then trigger sensor 2, wait, etc.
This is slow but reliable.
For a fast multi-sensor setup, the I2C-controlled ultrasonic sensors (e.g. the SRF02) are easier.
When to use ultrasonic vs LiDAR vs IR
The three options for distance sensing on a hobby robot, and when to pick each:
- HC-SR04 (ultrasonic): cheap, works in the dark, does not work on soft surfaces. Range about 3 m. Use for: simple obstacle detection at short range.
- VL53L0X / VL53L1X (time-of-flight LiDAR): more expensive ($3-$5), measures actual distance to a point, works on most surfaces. Range 2 m. Use for: precise distance, detecting thin obstacles, anything that needs to work on cloth or skin.
- Sharp IR (GP2Y0A21): cheap, analog output, short range (10 cm to 80 cm), works on most surfaces but is sensitive to ambient light. Use for: short-range sensing, line following, anything where you do not need precision.
For a first robot, start with the HC-SR04. For a second sensor on the same robot, add a VL53L0X. For a small line follower, use the Sharp IR.
When something breaks
- Reads 0 every time. The wiring is wrong, or the sensor has no power. Check VCC and GND first.
- Reads a constant 5 cm no matter what. The sensor is reading its own chirp before the trigger pulse ends. Increase the delay after the trigger from 10 us to 100 us, or use a slower trigger pattern.
- Reads random values. Power supply issue. The HC-SR04 pulls 15 mA when chirping, which can cause brownouts if you are powering the Arduino from a weak USB port. Add a 100 uF capacitor on the sensor’s VCC and GND.
- Reads the right value but with high jitter. Soft surface, or the sensor is at the edge of its range. Add a median filter (take 5 readings, return the middle one).
- Works on the Uno but not on the ESP32. Level shifter. The ESP32’s GPIO is 3.3V and the HC-SR04’s ECHO is 5V.
The temperature compensation
Speed of sound is 343 m/s at 20 degrees C. It varies by about 0.6 m/s per degree. For most projects, this does not matter. For a precision distance sensor (e.g. a tape measure replacement), it does.
float temperatureC = 20.0;   // read from a temp sensor if you have one
float speedOfSound = 331.0 + 0.6 * temperatureC;   // m/s
float usPerCm = 10000.0 / speedOfSound;            // us/cm round trip
float cm = duration / usPerCm / 2.0;
The correction is small (about 2% across a 30-degree temperature range), but for sub-centimeter accuracy it matters.
What to build next
- A “wall follower” that drives a robot parallel to a wall at a constant distance.
- A reversing “parking sensor” with a buzzer that beeps faster as you get closer.
- A multi-sensor array on a robot for 360-degree obstacle detection.
The wall follower is in the book Arduino Robotics. The 360-degree obstacle array is a chapter in the Robot Drive Train book, with the wiring diagrams for four sensors on a single Arduino.