Raspberry Pi: internet anywhere with a 4G/LTE HAT
Get a Raspberry Pi online over cellular with a SIM7600 4G/LTE HAT, check signal honestly, and run your own WireGuard bridge over the link instead of port forwarding.
I have a Pi at a property with no broadband. The utility closet gets Wi-Fi like the moon gets weather. A 4G LTE HAT plus a data SIM is the fix: the Pi dials the cellular network and it has internet anywhere with a signal. The hardware is a board that plugs onto the Pi’s GPIO header, a modem (SIM7600, A7670, or similar) with antennas, and a data SIM plan (e.g. a prepaid IoT plan, or a hotspot plan from your phone carrier).
The trap I hit: the HAT came up, dmesg showed the modem, and I could
even query signal strength, but no data flowed. The main issue was APN.
The modem had the carrier’s default APN, and my data plan needed the
other string (the IoT plan’s APN, which was in the plan’s welcome email
and nowhere else). Cellular modems do not guess. Set the APN first, not
last.
Also, the honest part up front: most cellular connections are behind CGNAT, carrier-grade NAT. You will not get inbound connections to this Pi from the internet the way you would with home broadband. This tutorial builds the self-hosted answer to that: the Pi dials OUT and holds a WireGuard tunnel to a small server you control, so you reach the Pi from anywhere through your own bridge. No Telegram, no Firebase, no third-party cloud in the middle.
What you need
Needed
- Raspberry Pi (4 or 5; Zero 2 W works too, watch the power budget)
- Waveshare SIM7600E-H 4G HAT (or SIM7600G for Australia/Asia; the board includes the modem, GPIO header, USB, and antenna connectors)
- Data SIM with an active data plan (a real data plan, not voice-only; check the plan’s APN before you start)
- Two LTE antennas or one antenna plus a TS-9 pigtail (the Waveshare board ships with two small ones)
- Power: the official Pi supply (5V/3A minimum). The modem pulls 2A bursts during transmission and an underpowered Pi drops the link.
Nice to have
- External magnetic-mount LTE antenna with a long cable (puts the antenna near a window, the Pi in the closet)
- USB SSD for logs (see the microSD datalogger habit: cellular links drop, local logs keep the record)
- Multimeter (to confirm the Pi’s 5V rail does not sag below 4.8V while the modem transmits)
- Helping hands and soldering iron (only if your HAT ships headers unsoldered; the Waveshare comes pre-soldered)
Wiring
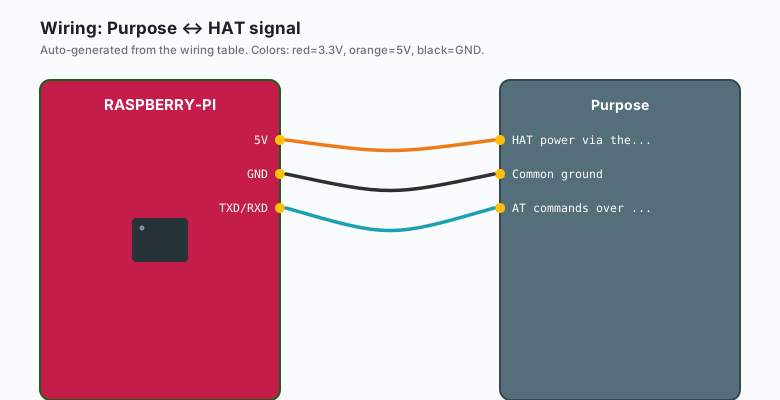
The HAT sits on all 40 GPIO pins. Only a few pins actually matter:
| HAT signal | Pi pin | Purpose |
|---|---|---|
5V | 5V rail (pins 2/4) | HAT power via the header |
GND | GND | Common ground |
TXD/RXD | GPIO 14/15 (UART0) | AT commands over serial |
Most boards also expose the modem over USB. Use USB if you have it: the
serial port then stays free for a console, and ls /dev/ttyUSB* shows
the modem’s data ports.
Do not power this stack from a phone charger through the Pi’s micro-USB/USB-C port and expect stability. The SIM7600 pulls short 2A bursts at transmit. The official Pi supply handles it; a laptop USB port does not, and the failure looks like random reboots.
Setup
Flash Raspberry Pi OS as usual (see the headless setup tutorial), then enable the serial interface:
sudo raspi-configRaspberry Pi Software Configuration Tool >> Interface Options >> Serial Port: login shell over serial NO, serial port hardware enabled YES.
Reboot. The modem should appear:
ls /dev/ttyUSB* /dev/ttyAMA0
dmesg | grep -i -E "sim7600|usb|gsmtk"
Install
On Raspberry Pi OS Bookworm and later, the kernel handles the modem as a network device through the qmi_wwan driver. Install the tools:
sudo apt update
sudo apt install -y modemmanager network-manager usbutils picocom
Check that the modem enumerates:
lsusbYou should see a SIM7600 (Qualcomm/AirSpeed style vendor ID) or the
Waveshare string. If lsusb shows nothing, it is power or USB: swap the
cable before you suspect the board.
Bring the link up
NetworkManager (already on Bookworm) can manage the modem like any other
connection. First find the modem’s data port (e.g. /dev/ttyUSB2 on
Waveshare boards; the AT port is usually the third):
nmcli deviceThe modem shows as gsm. Create the connection:
sudo nmcli connection add type gsm ifname '*' con-name lte apn "your.apn.here"
sudo nmcli connection up lte
ip a show ppp0
ping -c 3 1.1.1.1
Replace your.apn.here with the APN from the SIM plan (e.g.
internet for many consumer plans, iot.mid-style strings for IoT
plans). That is the whole dial-in: NetworkManager talks to the modem,
the ppp0 interface appears, and the Pi routes over cellular.
Set the connection to come up automatically:
sudo nmcli connection modify lte connection.autoconnect yesCheck the signal like an engineer
Talk to the modem over AT commands (the Waveshare SIM7600 AT port on the
default jumper setting is /dev/ttyUSB2 at 115200):
sudo picocom -b 115200 /dev/ttyUSB2AT+CSQ
+CSQ: 15,99The first number is signal. Multiply by 2 and subtract 113 for dBm: 15 means -83 dBm, which is a usable medium signal. Below 10 (-93 dBm or worse) expect drops; above 20 (-73 dBm) is good. If you are under 10, move the antenna or add the external one before blaming the carrier.
Useful extras while you are in the AT session: AT+CGDCONT? shows the
configured APN (this is where the wrong-APN trap shows itself), and
AT+CREG? should report registered on the home network (0,1 or 0,5).
Exit picocom with Ctrl-A then Ctrl-X.
The code
A health probe you can run from cron. It reports status, checks data, and restarts the connection when the link goes stale (cellular drops are a fact of life; the fix is automatic recovery, not hope):
#!/usr/bin/env python3
"""lte_health.py: check the cellular link and restart it if dead."""
import subprocess
import time

CHECK_IP = "1.1.1.1"
CONNECTION = "lte"
MODEM_PORT = "/dev/ttyUSB2"   # Waveshare SIM7600 AT port by default

def sh(cmd, timeout=20):
    return subprocess.run(cmd, shell=True, capture_output=True,
                          text=True, timeout=timeout)

def signal_info():
    """Read +CSQ via the AT port; returns (csq, dBm) or None."""
    try:
        # a fresh microcom-free trick: use mmcli if ModemManager owns the port
        r = sh("mmcli -m any --signal-get 2>/dev/null | grep -i 'power.*rsrp'")
        if r.returncode == 0 and "rsrp" in r.stdout.lower():
            return r.stdout.strip()
    except Exception:
        pass
    return None

def link_ok():
    r = sh(f"ping -c 1 -W 3 {CHECK_IP}", timeout=10)
    return r.returncode == 0

def main():
    if link_ok():
        print(f"OK {time.strftime('%Y-%m-%d %H:%M:%S')} link up")
        return 0
    print(f"DEAD {time.strftime('%Y-%m-%d %H:%M:%S')}, restarting {CONNECTION}")
    sh(f"sudo nmcli connection down {CONNECTION}")
    time.sleep(5)
    sh(f"sudo nmcli connection up {CONNECTION}", timeout=90)
    # give the tunnel time to re-establish before the next cron pass
    return 0 if link_ok() else 1

if __name__ == "__main__":
    raise SystemExit(main())
Cron it every five minutes:
*/5 * * * * /usr/bin/python3 /home/pi/lte_health.py >> /home/pi/lte_health.log 2>&1The restart logic is the whole value. Cellular links fail several times a week in the field. The health probe turns “the remote site is offline again” into “the log shows three restarts last week, all recovered.”
The CGNAT problem and the VPN bridge answer
Here is the honest part. On home broadband, your router gets a public IP
and you forward a port. On cellular, the carrier puts you behind
carrier-grade NAT: hundreds of modems share a handful of public
addresses. Inbound connections to your Pi do not arrive. whatsmyip
will show an address, and port forwarding to it will not work.
You have three real options, in order of how much I like them:
- Your own WireGuard bridge (self-hosted, covered below). The Pi dials out and holds a persistent tunnel to a small server with a public IP (a $5 VPS). You connect to the VPS, and the VPS forwards you down the tunnel to the Pi. You control the keys. This is the pattern the rest of this tutorial builds.
- Tailscale or a similar NAT-traversal mesh. Works well, zero config, but the coordination server is a third party. Fine for convenience, and it can run against your own relay if you want.
- Ask the carrier for a public/static IP. Some IoT and M2M plans sell one for a few dollars a month. If they say yes, the port-forward world works again (with all the exposure risks that come with it).
Option 1 is the self-hosted answer, so here is the setup. You need:
- The Pi with the LTE link (this tutorial)
- A small VPS with a public IP running WireGuard (install with
apt install wireguardandwg genkey, or use the PiVPN script on the VPS the same way the WireGuard tutorial describes) - A peer config on the Pi with
PersistentKeepalive = 25
The Pi’s /etc/wireguard/wg0.conf peer entry that makes CGNAT work:
[Peer]
PublicKey = <vps-public-key>
Endpoint = <vps-public-ip>:51820
AllowedIPs = 10.10.0.0/24
PersistentKeepalive = 25
PersistentKeepalive = 25 is the line that defeats CGNAT: the Pi sends
a packet every 25 seconds, which keeps a NAT mapping open on the
carrier’s side, and the VPS can always reply down that established path.
The Pi is unreachable from the internet directly, but it is reachable
through the tunnel, always, because it built the tunnel itself.
On the VPS side you allow forwarding for the Pi’s tunnel address, and
from your laptop you connect to the VPS as a second peer. Then
ssh 10.10.0.2 reaches the Pi at the shed. The tunnel config lives in
three files you own, and the only public endpoint is your VPS.
Data budget reality check: WireGuard overhead is tiny, but the
cellular plan is not free. A maintenance link (SSH, monitoring, small
sync jobs) is tens of MB a day. Video streaming through the bridge will
eat a monthly plan in an afternoon. Meter it (vnstat is one install
and done) before you promise anyone remote access.
Power and antenna notes from the field
- The Waveshare SIM7600 HAT idles around 50-90 mA and peaks over 2A at transmit. Size the power supply for the peak, not the idle.
- If the link drops every few minutes at good signal, suspect the power
before the antenna. Log
dmesg | grep -i usband look for USB disconnects: those are brownouts. - Antenna placement matters more than antenna price. A window-facing cheap antenna beats a cabinet-shielded expensive one every time.
What you learned
- A 4G HAT plus NetworkManager turns a Pi into a cellular client with
one
nmcliconnection and an APN. - Signal is a number you can read:
AT+CSQ, dBm = 2x - 113. - CGNAT is the rule on cellular, not the exception. Plan around it.
- A WireGuard bridge with keepalive gives you self-hosted remote access through CGNAT, with no third-party cloud holding your keys.
When something breaks
- Modem enumerates, signal reads fine, but no data. Wrong or missing
APN. Check with
AT+CGDCONT?over the AT port, and set the right APN in the nmcli connection (nmcli connection modify lte gsm.apn "..."). Restart the connection after changing it. pingworks but DNS fails. The cellular interface came up without DNS. NetworkManager usually writes/etc/resolv.confautomatically; if your Pi has a manualresolv.conf, add the carrier DNS or 1.1.1.1.- The link dies every few minutes with USB errors in dmesg. Power sag. Use the official supply, shorten the USB cable, and move the modem to its own powered USB hub if the Pi is a Zero.
- The WireGuard tunnel never handshakes. The Pi’s keepalive is
missing, or the VPS firewall drops UDP 51820. Check
sudo wg showon both ends: no handshake means keys, endpoint, or firewall; handshake but no traffic means AllowedIPs. - Throughput is terrible at strong signal. Check what band you are
on (
AT+BAND?or the modem’s own commands) and lock to a band with better local capacity. Also check your plan’s speed cap: some IoT plans cap at 1-2 Mbit/s no matter the signal.
What to build next
- The WireGuard tutorial on this site sets up the server end of the bridge on a home Pi; the same config works on the VPS.
- Pair the cellular link with the SQLite logging tutorial: sensor batches sync to the bridge when the link is up.
- The Samba NAS tutorial plus this one is the “offsite NAS that phones home” build: the Pi holds files locally and you reach it only through your own tunnel.