ESP32: drive WS2812B addressable LEDs (NeoPixels)
Wire a strip of WS2812B LEDs to an ESP32 and drive colors, brightness, and animations from Arduino code. The classic ESP32 eye-candy project.
WS2812B strips are the reason a lot of people bought an ESP32 in the first place. They are cheap, they are bright, and they let you control 60 RGB LEDs from a single GPIO pin.
This tutorial gets you from a fresh strip to a working animation in under half an hour.
What you need
- ESP32 dev board
- WS2812B strip (the 5V, 30 or 60 LEDs per meter ones are the common pick)
- 5V power supply rated for the strip (e.g. a 5V 3A brick for a 1m strip of 60)
- Level shifter (3.3V to 5V) on the data line, or a strip that accepts 3.3V
- Capacitor (470uF to 1000uF, 6.3V or higher) across the strip power pads
- Resistor (330 to 470 ohm) on the data line, between the ESP32 and the strip
If you are using a small strip (under 30 LEDs), you can power it from the ESP32’s 5V pin for testing. For anything longer, use a separate supply.
Wiring
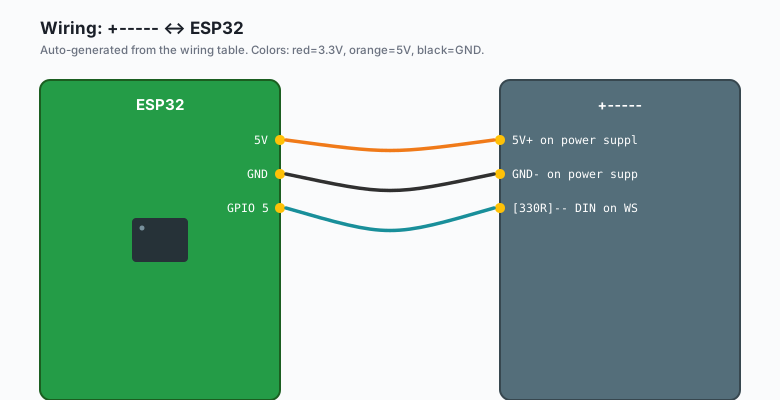
ESP32 5V  ----+----- 5V+ on power supply
              |
              +----- 5V on WS2812B strip
ESP32 GND ----+----- GND- on power supply
              |
              +----- GND on WS2812B strip
ESP32 GPIO 5 --[330R]-- DIN on WS2812B strip
The resistor is not optional. The WS2812B datasheet asks for it, and without it you can get flickering or, on a bad day, fried LEDs at the start of the strip.
The capacitor across the strip’s power pads is also not optional. WS2812Bs draw current in spikes, and without bulk capacitance nearby you get brown resets when you turn on white at full brightness.
Install the library
Sketch >> Include Library >> Manage Library >> search Adafruit NeoPixel >> install.
The code
#include <Adafruit_NeoPixel.h>

#define PIN       5
#define NUM_LEDS  60
#define BRIGHT    60   // 0-255, 60 is sane for indoor eye-candy

Adafruit_NeoPixel strip(NUM_LEDS, PIN, NEO_GRB + NEO_KHZ800);

void setup() {
  strip.begin();
  strip.setBrightness(BRIGHT);
  strip.clear();
  strip.show();
}

void loop() {
  rainbowCycle(10);
}

void rainbowCycle(uint8_t wait) {
  uint16_t i, j;
  for (j = 0; j < 256 * 5; j++) {
    for (i = 0; i < strip.numPixels(); i++) {
      strip.setPixelColor(i, wheel(((i * 256 / strip.numPixels()) + j) & 255));
    }
    strip.show();
    delay(wait);
  }
}

uint32_t wheel(byte wheelPos) {
  wheelPos = 255 - wheelPos;
  if (wheelPos < 85) {
    return strip.Color(255 - wheelPos * 3, 0, wheelPos * 3);
  }
  if (wheelPos < 170) {
    wheelPos -= 85;
    return strip.Color(0, wheelPos * 3, 255 - wheelPos * 3);
  }
  wheelPos -= 170;
  return strip.Color(wheelPos * 3, 255 - wheelPos * 3, 0);
}
Upload it. If you see a rainbow chasing down the strip, you are good.
The 3.3V vs 5V data line problem
The WS2812B expects a logic-high of about 0.7 * VCC, which is 3.5V at 5V power. The ESP32 outputs 3.3V on its GPIO. That is close enough to work in most cases, especially with short data lines and the resistor. If you get flickering on the first LED of the strip, the data signal is borderline.
Solutions, in order of how much I like them:
- Sn74hct125 or similar 3.3V-to-5V level shifter on the data line.
- A “3.3V compatible” WS2812B strip (some breakouts are explicitly rated for it).
- A short data wire (under 30 cm), with the resistor right at the strip end.
Brightness and current
At full white (255, 255, 255) each LED draws about 60 mA. A 60-LED strip at full white is 3.6A. The ESP32’s 5V pin is fused at maybe 500 mA. Use a real supply for anything longer than a short test strip.
strip.setBrightness(60) keeps the current to about 14 mA per LED and still
looks great indoors.
What to build next
- A “fire” effect with red/orange flickering.
- A music-reactive strip with a MAX4466 or INMP441 microphone.
- A small panel matrix (e.g. 8x8 or 16x16) and run text across it.
The microphone version is a separate tutorial on this site. The matrix version is in the ESP32 LED Projects book.