ESP32: build a weather station that logs to Wi-Fi
A complete weather station: BME280 over I2C, ESP32 web server, deep sleep between readings. Battery-powered, weatherproof case, web dashboard.
This is the project tutorial that ties together everything from the foundations through the power cluster. A working weather station: ESP32 reads a BME280, serves the readings on a Wi-Fi web page, sleeps between readings to save power, and runs from a 18650 battery.
It is built from the parts in the tutorials in this book. If you have read the BME280, Wi-Fi, deep sleep, and 18650 tutorials, you have seen all the pieces. This is where they come together.
What you need
- ESP32 dev board
- BME280 breakout (the I2C variant)
- 18650 + TP4056 + LDO regulator (from the 18650 tutorial)
- 4 jumper wires
- A USB cable for programming
- A weatherproof enclosure (a clear plastic food container works for prototyping)
Wiring
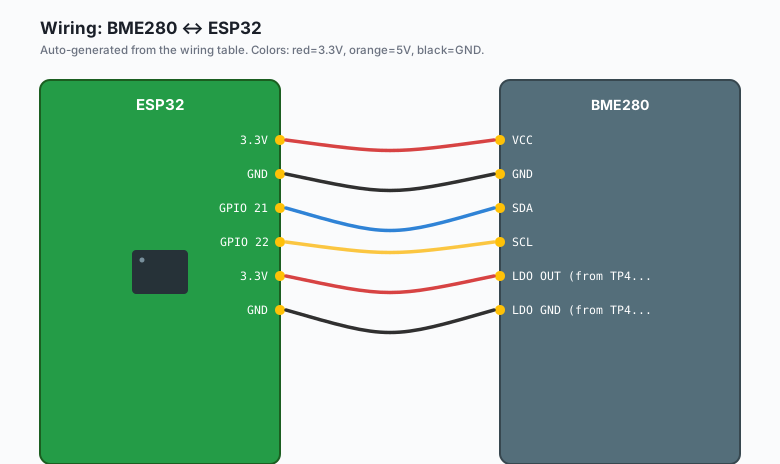
ESP32 3.3V -- BME280 VCC
ESP32 GND  -- BME280 GND
ESP32 GPIO 21 -- BME280 SDA
ESP32 GPIO 22 -- BME280 SCL
ESP32 3.3V -- LDO OUT (from TP4056)
ESP32 GND  -- LDO GND (from TP4056)
The BME280 is on the default I2C pins. The LDO provides 3.3V from the 18650 battery. Add a 100uF capacitor across the LDO output for noise filtering.
The code
#include <WiFi.h>
#include <WebServer.h>
#include <Wire.h>
#include <Adafruit_BME280.h>
#include <esp_sleep.h>
const char* ssid = "your-wifi";
const char* password = "your-password";
#define I2C_SDA 21
#define I2C_SCL 22
WebServer server(80);
Adafruit_BME280 bme;
float lastTemp = 0;
float lastHum = 0;
float lastPress = 0;
unsigned long lastRead = 0;
void setup() {
Serial.begin(115200);
delay(1000);
Wire.begin(I2C_SDA, I2C_SCL);
if (!bme.begin(0x76)) {
Serial.println("Could not find BME280");
ESP.restart();
}
WiFi.mode(WIFI_STA);
WiFi.begin(ssid, password);
while (WiFi.status() != WL_CONNECTED) {
delay(500);
Serial.print(".");
}
Serial.println();
Serial.print("Connected. IP: ");
Serial.println(WiFi.localIP());
server.on("/", handleRoot);
server.begin();
// Take a reading now
takeReading();
// Sleep for 60 seconds
esp_sleep_enable_timer_wakeup(60 * 1000000ULL);
Serial.println("Going to sleep for 60 seconds");
esp_deep_sleep_start();
}
void loop() {
// Not reached; the ESP32 wakes from sleep and starts at setup()
server.handleClient();
}
void takeReading() {
lastTemp = bme.readTemperature();
lastHum = bme.readHumidity();
lastPress = bme.readPressure() / 100.0;
lastRead = millis();
Serial.printf("Temp: %.2f, Hum: %.2f, Press: %.2f\n",
lastTemp, lastHum, lastPress);
}
void handleRoot() {
String html = "<!DOCTYPE html><html><head>";
html += "<meta charset='utf-8'>";
html += "<meta http-equiv='refresh' content='5'>";
html += "<title>Weather Station</title></head>";
html += "<body style='font-family:sans-serif;max-width:480px;margin:2rem auto;'>";
html += "<h1>Weather Station</h1>";
html += "<p><strong>Temperature:</strong> " + String(lastTemp, 1) + " °C</p>";
html += "<p><strong>Humidity:</strong> " + String(lastHum, 1) + " %</p>";
html += "<p><strong>Pressure:</strong> " + String(lastPress, 1) + " hPa</p>";
html += "<p><small>Last update: " + String(lastRead / 1000) + " seconds after boot</small></p>";
html += "</body></html>";
server.send(200, "text/html", html);
}Upload. Open Serial Monitor. After Wi-Fi connects, note the IP address. Open it in a browser. You should see the current temperature, humidity, and pressure.
The ESP32 then sleeps for 60 seconds. After 60 seconds, it wakes, takes a new reading, serves the web page again, and sleeps again. The web page refreshes every 5 seconds, but the readings only update every 60 seconds (when the ESP32 wakes).
The 60-second deep sleep
The 60-second sleep interval is a tradeoff:
- Longer sleep: less Wi-Fi time, lower battery drain, less current data freshness.
- Shorter sleep: more Wi-Fi time, higher battery drain, fresher data.
For a weather station, 60 seconds is the right pick. Atmospheric pressure changes on the order of minutes, not seconds.
For projects that need faster updates (e.g. a burglar alarm), shorten the sleep to 1-5 seconds and accept the battery drain.
The battery math
Average current draw:
- Wake period (5 seconds): Wi-Fi active, ~100 mA. = 0.14 mAh per wake.
- Sleep period (55 seconds): Wi-Fi off, ~10 mA. = 0.15 mAh per sleep.
Total: 0.29 mAh per minute = 17 mAh per hour = 410 mAh per day.
A 2500 mAh 18650 lasts about 6 days. For longer runtime, use a larger battery (e.g. 18650 + parallel) or a solar panel.
Adding a solar panel
For perpetual operation, wire a solar panel through the TP4056:
Solar panel -- TP4056 IN+ -- TP4056 OUT+ -- LDO -- ESP32A 1W solar panel in 4 sun-hours per day provides about 200 mAh, which is half the daily consumption. Use a 2W panel for 100% replenishment.
The weatherproof enclosure
The ESP32 and battery need to be protected from rain. Options:
- Clear plastic food container: cheap, easy to modify, works for prototyping. Drill holes for ventilation, seal with silicone.
- Outdoor electrical junction box: the standard for permanent installations. Available at any hardware store.
- 3D-printed enclosure: custom fit. Use ABS or PETG (PLA melts in summer sun).
The BME280 needs to be exposed to outside air but protected from direct rain. Mount it under a small overhang or with a Gore-Tex membrane over the sensor.
Logging to a database
For historical data, post to an MQTT broker or HTTP API. Combine with the MQTT tutorial:
#include <PubSubClient.h>

WiFiClient wifiClient;
PubSubClient mqtt(wifiClient);

void setup() {
  // ... after Wi-Fi setup ...
  mqtt.setServer("192.168.1.50", 1883);
  mqtt.connect("esp32-weather");
}

void takeReading() {
  lastTemp = bme.readTemperature();
  lastHum = bme.readHumidity();
  lastPress = bme.readPressure() / 100.0;

  char payload[100];
  snprintf(payload, sizeof(payload),
    "{\"temp\":%.2f,\"hum\":%.2f,\"press\":%.2f}",
    lastTemp, lastHum, lastPress);
  mqtt.publish("weather/sensor", payload);
}
The Node-RED tutorial on the Pi shows how to consume these readings into InfluxDB or another time-series database.
What you learned
- A working weather station can be built from the tutorials in this book.
- The ESP32 wakes every 60 seconds, takes a reading, serves it on Wi-Fi, sleeps again.
- Battery runtime is about 6 days with a single 18650.
- Adding solar makes the project perpetual.
What to build next
- The MQTT tutorial publishes these readings to a broker.
- The Raspberry Pi Node-RED tutorial consumes the readings and graphs them.
- The book IoT with ESP32 has more weather station patterns (wind speed, rain gauge, UV sensor).