ESP32: build a plant monitor with soil moisture and auto-watering
Soil moisture sensor + 12V water pump + ESP32 = a plant monitor that waters your plant when the soil gets dry. Solar-powered for outdoor use.
A plant monitor with automatic watering. Soil moisture sensor reads the soil, ESP32 turns on a 12V water pump when the soil is dry, pump runs for 5 seconds, ESP32 sleeps for 5 minutes before checking again. Solar-powered for outdoor planters.
This is the project that ties the soil moisture, transistor, and solar+battery tutorials together.
What you need
- ESP32 dev board
- Capacitive soil moisture sensor
- 12V DC peristaltic pump (the kind for hydroponics; about $10)
- 2N2222 NPN transistor
- 1k ohm resistor (base resistor)
- 1N4007 flyback diode (for the pump’s inductive kick)
- 12V power supply (or a 3S 18650 pack for solar)
- 18650 + TP4056 + LDO (for the ESP32 side)
- Wires, weatherproof enclosure
Wiring
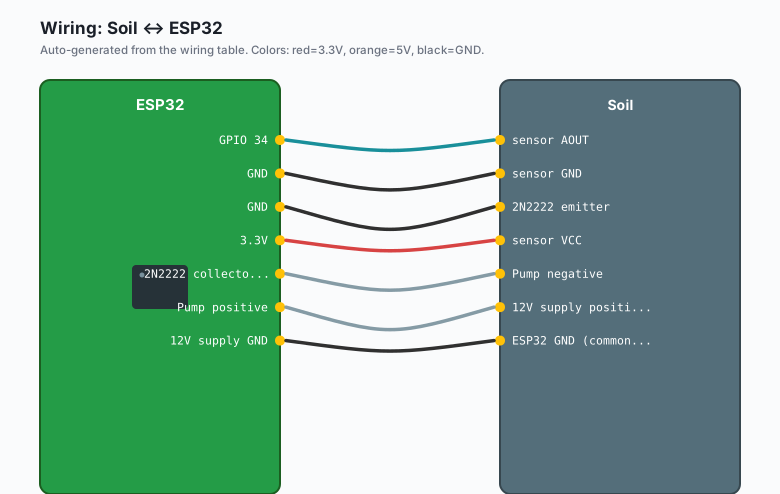
ESP32 GPIO 4 --[ 1k resistor ]-- 2N2222 base
ESP32 GPIO 34 -- Soil sensor AOUT
ESP32 GND -- Soil sensor GND
ESP32 GND -- 2N2222 emitter
ESP32 3.3V -- Soil sensor VCC
2N2222 collector -- Pump negative
Pump positive -- 12V supply positive
12V supply GND -- ESP32 GND (common ground)
1N4007 diode cathode (stripe) -- Pump positive
1N4007 diode anode (no stripe) -- 2N2222 collector
The 2N2222 switches the pump’s negative wire. The flyback diode absorbs the inductive kickback when the pump turns off (from the motor’s windings). Without the diode, the 2N2222 will eventually die.
The code
const int PUMP_PIN = 4;
const int SOIL_PIN = 34;

const int DRY_VALUE = 2800;
const int WET_VALUE = 400;
const float THRESHOLD = 30.0;

const unsigned long PUMP_DURATION = 5000;
const unsigned long CHECK_INTERVAL = 300000;   // 5 minutes

float readMoisturePercent() {
  int raw = analogRead(SOIL_PIN);
  float pct = (float)(DRY_VALUE - raw) / (DRY_VALUE - WET_VALUE) * 100.0;
  return constrain(pct, 0.0, 100.0);
}

void setup() {
  Serial.begin(115200);
  delay(1000);
  pinMode(PUMP_PIN, OUTPUT);
  digitalWrite(PUMP_PIN, LOW);
  Serial.println("Plant monitor active");
}

void loop() {
  float moisture = readMoisturePercent();
  Serial.print("Moisture: ");
  Serial.print(moisture, 1);
  Serial.print("% (threshold: ");
  Serial.print(THRESHOLD, 1);
  Serial.println("%)");

  if (moisture < THRESHOLD) {
    Serial.println("Soil dry, watering for 5 seconds");
    digitalWrite(PUMP_PIN, HIGH);
    delay(PUMP_DURATION);
    digitalWrite(PUMP_PIN, LOW);
    Serial.println("Watering complete");
    delay(60000);   // wait a minute for water to absorb
  }

  delay(CHECK_INTERVAL);
}
Upload. Insert the soil sensor into the plant. The pump will turn on when the soil is dry.
The threshold
The 30% threshold is a starting point. Adjust based on your plant:
- Succulents (low water): 20% threshold.
- Herbs (moderate water): 40% threshold.
- Vegetables (high water): 50% threshold.
- Tropical plants: 60% threshold.
Calibrate by watching your plant for a week and noting the moisture reading when it starts to wilt.
The pump runtime
5 seconds delivers about 50 mL of water. That is enough for a small planter. For larger planters, increase to 10-15 seconds. Too much water and the plant’s roots will rot; too little and the plant will not get enough.
The “water once per cycle” pattern
A common bug: the soil is dry, the pump runs, the soil is still dry (water has not absorbed yet), the pump runs again. To prevent this, the code above waits 60 seconds after watering before re-reading.
For projects with multiple plants, water each one in sequence with a multi-channel relay:
const int PUMP1_PIN = 4;
const int PUMP2_PIN = 5;
const int PUMP3_PIN = 6;
const int NUM_PUMPS = 3;
const int PUMP_PINS[] = {4, 5, 6};

void waterAll() {
  for (int i = 0; i < NUM_PUMPS; i++) {
    float moisture = readMoisturePercent(i);
    if (moisture < THRESHOLD) {
      digitalWrite(PUMP_PINS[i], HIGH);
      delay(PUMP_DURATION);
      digitalWrite(PUMP_PINS[i], LOW);
      delay(60000);
    }
  }
}
Solar + battery
For outdoor use without a power outlet, run the ESP32 from the solar
- battery setup from the previous tutorial. The pump draws 12V from the solar panel directly; the ESP32 draws 3.3V from the LDO.
Solar panel + -- TP4056 IN+ -- TP4056 OUT+ -- LDO -- ESP32 3.3V
Solar panel - -- TP4056 IN- -- 12V supply + -- Pump +
                  TP4056 OUT- -- ESP32 GND = Pump - (common GND)
The solar panel must be rated for both the ESP32 (5V charging the 18650) and the pump (12V). A 12V solar panel works for both with a 12V-to-5V step-down for the TP4056.
The weatherproof enclosure
The pump and electronics need weather protection:
- Pump: fully waterproof submersible pumps can be submerged; other pumps need a dry enclosure.
- Electronics: outdoor junction box or 3D-printed enclosure with IP65 rating.
- Soil sensor: the exposed probe end is waterproof; the electronics end needs protection.
Mount the electronics in the enclosure, run the soil sensor wire down into the soil, run the pump’s intake and output tubing into the planter.
What to learn
- The transistor + flyback diode pattern for switching inductive loads.
- The threshold-based auto-watering logic.
- The 5-minute check interval (long enough to not overwater, short enough to not let the plant wilt).
What to build next
- The soil moisture tutorial covers the sensor in detail.
- The transistor tutorial covers the switch circuit.
- The MQTT tutorial publishes the watering events to a dashboard.