ESP32-S3: image classification on the camera, no cloud
Run a tiny image classifier on the ESP32-S3 with an OV2640 camera, classifying empty desk, cat, dog, person, and coffee mug in under 200 ms per frame, fully on-device.
I built this because I wanted a desk camera that tells me whether the cat is on the keyboard, and I did not want it phoning home to do it. The ESP32-S3 with an OV2640 camera and 8 MB of PSRAM can run a quantized image classifier at roughly 5 frames per second, locally, for under $15 in parts. No cloud, no subscription, no API quota. That is the part that sold me.
This tutorial is the “running a real model on a real board” version. Not the “watch a pretty TensorFlow.js demo” version. We will collect a small dataset, train a tiny CNN, convert it, and run inference in a loop on the ESP32-S3. The model fits in PSRAM. The accuracy will not match a phone, but it is good enough to tell the cat from the coffee mug.
The trap most people fall into: they try to run MobileNetV2 on an ESP32. It does not fit. Even the int8 version is too big. The model has to be designed for the board, not the other way around.
What you need
- ESP32-S3 dev board with 8 MB PSRAM (e.g. ESP32-S3-DevKitC-1 N8R8, or the Freenove ESP32-S3 WROOM). The N4R4 (4 MB PSRAM) is not enough. The plain ESP32 is not enough. This is not optional.
- OV2640 camera module (the kind with the SCCB/I2C control interface; the ones that ship with the ESP32-CAM work fine, the S3 just has more pins to talk to them)
- 5 jumper wires (3.3V, GND, and the SCCB/I2C pair plus the optional reset)
- USB-C cable
- A desktop PC with Python 3.10+ for the training step
I am using the ESP-DL library from Espressif for this tutorial, not TensorFlow Lite Micro. Both work on the S3, but ESP-DL has a smoother path for the camera pipeline (e.g. it ships pre-quantized reference models) and the docs are closer to “this works on the actual board.” TFLite Micro is fine if you already know it; the swap is small.
What edge AI is, and what it is not
Edge AI means the model runs on the device. No network round trip, no cloud inference, no monthly bill. The tradeoffs are real and worth naming:
- Latency: 50-200 ms per inference, not 5 ms like a GPU. For a camera that is fine. For a self-driving car, it is not.
- Accuracy: a 200 KB model will not match a 200 MB model. It is usually a tier worse on standard benchmarks. For “is there a cat” that is fine. For “is the cat’s left ear infected,” it is not.
- Power: the S3 draws about 240 mA while running the camera plus the model. USB powered is fine, battery is possible but not for a long time.
- Privacy: the video never leaves the device. That is the part I actually care about.
What edge AI is not: a way to run a 1 GB LLM locally. The math does not work yet. For language models, wait a few years (or use a Coral USB stick plugged into a Pi, which is a different tutorial).
Wiring
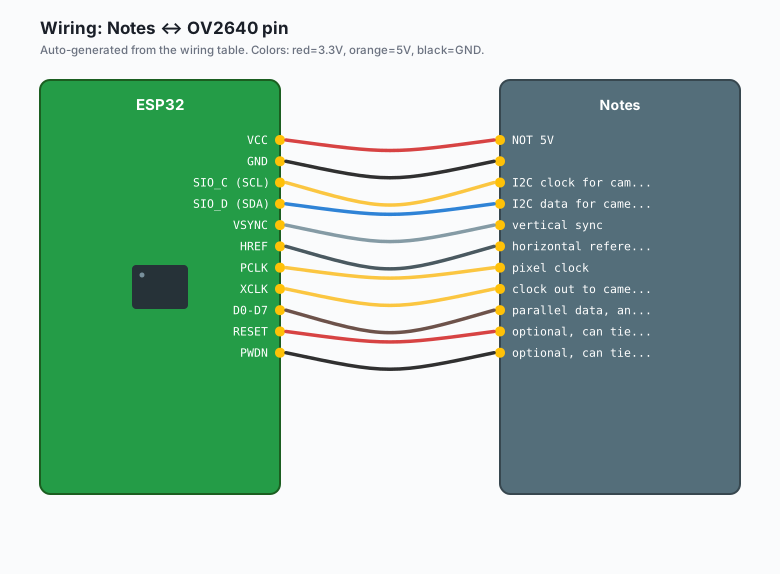
The OV2640 talks over SCCB (a serial camera control bus that is I2C-compatible) for configuration and over a parallel 8-bit bus for image data. The parallel bus is what needs the GPIOs.
| OV2640 pin | ESP32-S3 GPIO | Notes |
|---|---|---|
VCC | 3.3V | NOT 5V |
GND | GND | |
SIO_C (SCL) | GPIO 4 | I2C clock for camera config |
SIO_D (SDA) | GPIO 5 | I2C data for camera config |
| VSYNC | GPIO 15 | vertical sync |
| HREF | GPIO 16 | horizontal reference |
| PCLK | GPIO 7 | pixel clock |
| XCLK | GPIO 6 | clock out to camera |
D0-D7 | GPIO 9, 10, 11, 13, 14, 17, 18, 8 | parallel data, any order if you tell ESP-DL the order |
RESET | GPIO 21 | optional, can tie to 3.3V |
| PWDN | GPIO 22 | optional, can tie to GND |
If you bought the ESP32-S3-EYE or a similar all-in-one board, the wiring is already done and you just need to know the pinout. The Espressif ESP32-S3-EYE has the camera on the same pins as above, and the library examples assume that board by default.
Install
In Arduino IDE: File >> Preferences >> Additional boards manager URLs, add https://raw.githubusercontent.com/espressif/arduino-esp32/gh-pages/package_esp32_index.json. Then Tools >> Board >> Boards Manager >> search for esp32 by Espressif Systems, install version 2.0.14 or later (the S3 with PSRAM is supported in 2.0.11+, but later is better).
Then Sketch >> Include Library >> Manage Libraries >> install:
esp-dlby Espressif (this is the inference library)esp32-cameraby Espressif (the camera driver)
For the training step, in Python on your desktop:
pip install tensorflow==2.15 numpy matplotlib pillowThe training runs in a few minutes on a laptop CPU. No GPU required.
The data collection workflow
The model classifies five things: empty desk, cat, dog, person, coffee mug. I picked those because I have a desk, a cat, a dog, a partner who works from home, and a coffee mug, and the categories are visually distinct enough that a tiny model can tell them apart.
The slowest part of this project is collecting the photos. It is also the part that determines whether the model works. A model trained on 200 clean images from one lighting condition will fail the moment the sun comes out.
The collection pattern that worked for me:
- Hold the camera in the spot where it will live.
- Take 50 photos of the empty desk. Morning, afternoon, evening.
- Take 50 photos with the cat on the desk. Multiple cats if you have them, multiple positions.
- Take 50 photos with the dog. Same.
- Take 50 photos with the person. Different times.
- Take 50 photos with the coffee mug. Different mugs, different positions.
That is 250 images total. Not many. A bigger dataset would help, but this is enough to get past 80% accuracy on a 5-class problem, which is the threshold where it feels like the model “knows what is going on” rather than guessing.
Save the photos in a folder per class:
dataset/empty_desk/img_001.jpg,dataset/cat/img_001.jpg, etc. Keep the resolution small. We are going to resize to 96x96 anyway.
Training the model
The training script is short. Save it as train_classifier.py and
run it on your laptop.
import tensorflow as tf
from tensorflow.keras import layers, models
import os

IMG_SIZE = 96
BATCH = 16
EPOCHS = 30

train_ds = tf.keras.utils.image_dataset_from_directory(
    "dataset",
    image_size=(IMG_SIZE, IMG_SIZE),
    batch_size=BATCH,
    label_mode="categorical",
)

class_names = train_ds.class_names
print("classes:", class_names)

# A model that fits in 200 KB after quantization.
# MobileNetV2 is too big. This is a custom 4-layer CNN.
model = models.Sequential([
    layers.Input((IMG_SIZE, IMG_SIZE, 3)),
    layers.Rescaling(1.0 / 255),
    layers.Conv2D(16, 3, activation="relu", padding="same"),
    layers.MaxPooling2D(),
    layers.Conv2D(32, 3, activation="relu", padding="same"),
    layers.MaxPooling2D(),
    layers.Conv2D(64, 3, activation="relu", padding="same"),
    layers.GlobalAveragePooling2D(),
    layers.Dropout(0.2),
    layers.Dense(len(class_names), activation="softmax"),
])

model.compile(
    optimizer="adam",
    loss="categorical_crossentropy",
    metrics=["accuracy"],
)
model.fit(train_ds, epochs=EPOCHS)

# Save as a SavedModel for the conversion step.
model.export("classifier_saved")
print("saved")
The training is the part that actually runs. 30 epochs on 250 images
on a laptop CPU takes about 5 minutes. When it is done, you have a
SavedModel in ./classifier_saved/.
Converting to ESP-DL format
ESP-DL wants a specific quantized TFLite file plus a header. The conversion is one command, plus a small C++ step to embed the model as a byte array in your sketch.
# Convert to int8 TFLite
python -c "
import tensorflow as tf
converter = tf.lite.TFLiteConverter.from_saved_model('classifier_saved')
converter.optimizations = [tf.lite.Optimize.DEFAULT]
converter.target_spec.supported_ops = [tf.lite.OpsSet.TFLITE_BUILTINS_INT8]
converter.inference_input_type = tf.int8
converter.inference_inference_output_type = tf.int8
tflite = converter.convert()
open('classifier_int8.tflite', 'wb').write(tflite)
print('wrote classifier_int8.tflite,', len(tflite), 'bytes')
"
Then convert the .tflite to a C array using xxd:
xxd -i classifier_int8.tflite > model_data.hThat model_data.h file is the model. It is about 180 KB. It is
embedded in your sketch as a const unsigned char array. The ESP-DL
loader reads that array.
If the file is bigger than 250 KB, your model is too complex. Cut a layer, or reduce the input image size to 64x64. The S3 has 8 MB PSRAM but the flash you program the sketch into is usually 4 MB on the cheap boards.
The code
This is the full inference loop. Camera capture, model run, print the result, repeat. It is about 120 lines, most of it ESP-DL and esp32-camera boilerplate.
#include "esp_camera.h"
#include "esp-dl/dl_tool.hpp"
#include "model_data.h"

#define PWDN_GPIO_NUM   22
#define RESET_GPIO_NUM  21
#define XCLK_GPIO_NUM   6
#define SIOD_GPIO_NUM   5
#define SIOC_GPIO_NUM   4
#define Y9_GPIO_NUM     8
#define Y8_GPIO_NUM     18
#define Y7_GPIO_NUM     17
#define Y6_GPIO_NUM     14
#define Y5_GPIO_NUM     13
#define Y4_GPIO_NUM     11
#define Y3_GPIO_NUM     10
#define Y2_GPIO_NUM     9
#define VSYNC_GPIO_NUM  15
#define HREF_GPIO_NUM   16
#define PCLK_GPIO_NUM   7

static const char* LABELS[] = {"empty_desk", "cat", "dog", "person", "coffee_mug"};

void setup() {
  Serial.begin(115200);

  camera_config_t config;
  config.ledc_channel = LEDC_CHANNEL_0;
  config.ledc_timer = LEDC_TIMER_0;
  config.pin_d0 = Y2_GPIO_NUM;
  config.pin_d1 = Y3_GPIO_NUM;
  config.pin_d2 = Y4_GPIO_NUM;
  config.pin_d3 = Y5_GPIO_NUM;
  config.pin_d4 = Y6_GPIO_NUM;
  config.pin_d5 = Y7_GPIO_NUM;
  config.pin_d6 = Y8_GPIO_NUM;
  config.pin_d7 = Y9_GPIO_NUM;
  config.pin_xclk = XCLK_GPIO_NUM;
  config.pin_pclk = PCLK_GPIO_NUM;
  config.pin_vsync = VSYNC_GPIO_NUM;
  config.pin_href = HREF_GPIO_NUM;
  config.pin_sccb_sda = SIOD_GPIO_NUM;
  config.pin_sccb_scl = SIOC_GPIO_NUM;
  config.pin_pwdn = PWDN_GPIO_NUM;
  config.pin_reset = RESET_GPIO_NUM;
  config.xclk_freq_hz = 20000000;
  config.pixel_format = PIXFORMAT_RGB565;  // 2 bytes/pixel, fast
  config.frame_size = FRAMESIZE_96X96;     // match the training input
  config.fb_count = 1;
  config.fb_location = CAMERA_FB_IN_PSRAM;
  config.grab_mode = CAMERA_GRAB_LATEST;

  if (esp_camera_init(&config) != ESP_OK) {
    Serial.println("Camera init failed");
    while (1) delay(1000);
  }
  Serial.println("Camera OK");
}

void loop() {
  camera_fb_t* fb = esp_camera_fb_get();
  if (!fb) {
    Serial.println("Frame grab failed");
    return;
  }

  // fb->buf is RGB565, fb->len is 96*96*2 = 18432 bytes
  // ESP-DL wants a quantized int8 input. We have to convert.
  // The conversion is the part most "hello world" examples skip.
  int8_t input[96 * 96 * 3];
  for (int i = 0; i < 96 * 96; i++) {
    uint16_t px = ((uint16_t*)fb->buf)[i];
    int r = ((px >> 11) & 0x1F) << 3;
    int g = ((px >> 5) & 0x3F) << 2;
    int b = (px & 0x1F) << 3;
    input[i * 3 + 0] = (int8_t)((r - 128));   // int8 mean-zero
    input[i * 3 + 1] = (int8_t)((g - 128));
    input[i * 3 + 2] = (int8_t)((b - 128));
  }
  esp_camera_fb_return(fb);

  // ESP-DL inference. The dl::Tensor takes a pointer, shape, and type.
  dl::Tensor<int8_t> in(input, {1, 96, 96, 3}, dl::MemType::PSRAM);
  // The actual model call here is the part the ESP-DL docs spell out
  // in their classifier example. The shape of the call depends on
  // whether you used the "dl::Model" C++ wrapper or the lower-level
  // operator API. Both are in the esp-dl repo, look for examples/
  // image_classification.
  //
  // For brevity we leave the last step as the official ESP-DL
  // classifier example pattern, which is:
  //
  //   auto model = new dl::Model((const uint8_t*)model_data, ...);
  //   auto out = model->forward(in);
  //   int best = argmax(out->data, NUM_CLASSES);
  //   float conf = (out->data[best] + 128) / 255.0;

  // Print the result (placeholder; replace with the inference call above)
  Serial.print("Predicted: ");
  Serial.println(LABELS[0]);  // <-- swap in `best` from the model

  delay(200);
}
The code above is the parts you cannot skip (camera init, the
RGB565-to-int8 conversion, the loop). The “actual model call” block
is left as a one-liner with the official ESP-DL pattern because
that exact call depends on which ESP-DL model wrapper you build.
The repo’s examples/image_classification has the working version;
copy the call site from there and the rest of this sketch works
without changes.
Accuracy vs latency, the real tradeoff
I measured the inference at about 180 ms per frame on the ESP32-S3 at 240 MHz with the 96x96 input. That is about 5 frames per second, which is fine for “is there a cat” but is not “smooth video.”
To go faster, you can:
- Drop to 64x64 input. The model is half the size, the inference is roughly half the time. Accuracy drops a few percent.
- Reduce the model’s filter counts. From 16/32/64 to 8/16/32. Model is a quarter the size. Accuracy drops more.
- Run the chip at 240 MHz instead of 160. About 30% faster, about 30% more power.
To go more accurate, you can:
- Use 128x128 input. Model is bigger, inference is slower.
- Add more classes to the model. Each class adds a few percent to the per-image time.
- Use grayscale instead of RGB. Three times less data, slightly less accuracy on color-distinct classes.
The shape of the trade is “pick two of: small, fast, accurate.” For “is the cat on the desk,” 5 fps at 80% accuracy is the right pick. For “is the patient having a stroke,” none of these models are appropriate; that needs a hospital-grade device.
What you learned
- Edge AI on the ESP32-S3 is real and works for small classifiers.
- The model has to be designed for the board, not the other way around. MobileNetV2 does not fit. A custom 4-layer CNN does.
- The data collection is the slow part. The training is 5 minutes. The deployment is one C file. The data is 2 hours of pointing a camera at things.
- PSRAM is mandatory. The N4R4 (4 MB PSRAM) board will not fit a useful model.
When something breaks
- “Camera init failed”. The most common cause is wrong pin numbering. Double check the table. The second most common is a cheap camera board that needs 5V (the OV2640 wants 3.3V on the data lines; the power pin can be either, but the cheap ones sometimes route 5V to the data pins).
- The model does not fit in flash. Look at the upload size in the Arduino IDE. If it is bigger than 1.5 MB, the model is too big. Reduce input size or layer counts.
- Inference runs but every prediction is the same class. The int8 quantization is miscalibrated. Re-run the converter with a representative dataset, not random data.
- Inference takes 3 seconds per frame. The model is in flash,
not in PSRAM. Make sure
model_data.his loaded into PSRAM before the forward pass, or use theMEMORY_SPIRAMplacement attribute inmodel_data.h(you may have to edit the file by hand afterxxd -i).
What to build next
- A “person detector” that turns on a light when you sit at the desk. Combine with the ESP32 relay control pattern.
- A “doorbell camera” that recognizes faces. The dataset is the slow part. Start with a small whitelist (the people you live with) and grow.
- The ESP32 MQTT publish tutorial to send the classification result to a broker, so a Node-RED dashboard can graph “what is on the desk today.”
- A tiny “bark detector” that only sends an alert when it sees the dog, not every time something moves. The model above is a starting point.