ESP32: read a DHT22 temperature and humidity sensor
Wire a DHT22 to an ESP32, install the library, and stream readings over Serial every 2 seconds. The shortest useful ESP32 project.
The DHT22 is the sensor I reach for when I want temperature and humidity without thinking too hard. It is cheap, it is accurate enough, and the wiring is three wires. This tutorial gets you from a fresh ESP32 to reading values in the Serial Monitor in about 20 minutes.
What you need
- ESP32 dev board (any variant with a USB port and the usual GPIO header)
- DHT22 sensor (the blue one, not the DHT11)
- 10k ohm resistor (only if your DHT22 breakout does not have one built in)
- Three jumper wires
- USB cable
If your DHT22 is on a small breakout board (e.g. the ones with three pins and a tiny PCB), the pull-up resistor is usually already on the board. If it is the bare sensor with four pins, you need to add a 10k between the data pin and VCC. The wiring section assumes the breakout.
Wiring
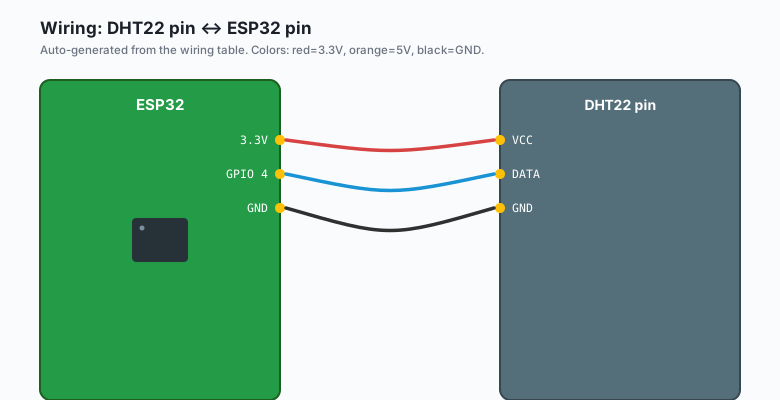
The DHT22 has three pins: VCC, data, and GND. On most breakouts they are labeled.
| DHT22 pin | ESP32 pin |
|---|---|
VCC | 3.3V |
DATA | GPIO 4 |
GND | GND |
Some tutorials use GPIO 15 or GPIO 2. Those work too. GPIO 4 is fine and avoids the boot-strapping pins (e.g. GPIO 0, GPIO 2, GPIO 15) that do weird things during reset.
Install the Arduino IDE
If you do not have it yet: https://www.arduino.cc/en/software. The regular IDE, not the Web Editor. You will want it offline.
Then add the ESP32 board package. In the IDE:
File>>Preferences>>Additional boards manager URLs- Paste:
https://raw.githubusercontent.com/espressif/arduino-esp32/gh-pages/package_esp32_index.json Tools>>Board>>Boards Manager>> searchesp32>> install
Restart the IDE after this step. It always needs a restart.
Install the DHT library
Sketch >> Include Library >> Manage Libraries >> search DHT sensor library by Adafruit. Install it. It will ask if you also want to install
the Adafruit Unified Sensor dependency. Say yes.
The code
ESP32 (Arduino)
#include "DHT.h"

#define DHT_PIN 4
#define DHT_TYPE DHT22

DHT dht(DHT_PIN, DHT_TYPE);

void setup() {
  Serial.begin(115200);
  dht.begin();
  Serial.println("DHT22 reading on ESP32");
}

void loop() {
  float humidity = dht.readHumidity();
  float temperature = dht.readTemperature();

  if (isnan(humidity) || isnan(temperature)) {
    Serial.println("Failed to read from DHT22. Check wiring.");
  } else {
    Serial.print("Humidity: ");
    Serial.print(humidity);
    Serial.print("%  Temperature: ");
    Serial.print(temperature);
    Serial.println("C");
  }
  delay(2000);
}
Arduino (Uno, Nano, Mega)
#include "DHT.h"

#define DHT_PIN 2   // any digital pin; pin 2 is convenient on Uno
#define DHT_TYPE DHT22

DHT dht(DHT_PIN, DHT_TYPE);

void setup() {
  Serial.begin(9600);   // 9600 is more reliable than 115200 on the Uno's USB bridge
  dht.begin();
  Serial.println("DHT22 reading on Arduino");
}

void loop() {
  float humidity = dht.readHumidity();
  float temperature = dht.readTemperature();

  if (isnan(humidity) || isnan(temperature)) {
    Serial.println("Failed to read from DHT22");
  } else {
    Serial.print("Humidity: ");
    Serial.print(humidity);
    Serial.print("%  Temperature: ");
    Serial.print(temperature);
    Serial.println("C");
  }
  delay(2000);
}
MicroPython (ESP32 or Pico)
from machine import Pin
import dht
import time

sensor = dht.DHT22(Pin(4))

while True:
    try:
        sensor.measure()
        t = sensor.temperature()
        h = sensor.humidity()
        print(f'Temp: {t} C  Humidity: {h} %')
    except OSError:
        print('Failed to read DHT22')
    time.sleep(2)
Raspberry Pi Python
pip3 install Adafruit-DHTimport Adafruit_DHT
import time
DHT_SENSOR = Adafruit_DHT.DHT22
DHT_PIN = 4 # BCM pin 4 (physical pin 7)
while True:
humidity, temperature = Adafruit_DHT.read(DHT_SENSOR, DHT_PIN)
if humidity is not None:
print(f'Temp: {temperature:.1f} C Humidity: {humidity:.1f} %')
else:
print('Failed to read DHT22')
time.sleep(2)The Adafruit library requires sudo on some Pi images, because the GPIO timing driver needs root. If you get a “no permissions” error, run with
sudo python3 your_script.py.
What you should see
Upload it: Sketch >> Upload. Then Tools >> Serial Monitor (or
Ctrl+Shift+M). Set the baud rate to 115200 (top right dropdown). The
common mistake is leaving it at 9600 and seeing nothing. If you see nothing,
check that dropdown first.
What you should see
DHT22 reading on ESP32
Humidity: 42.30%  Temperature: 23.10C
Humidity: 42.40%  Temperature: 23.10C
Humidity: 42.40%  Temperature: 23.20C
If you see Failed to read from DHT22 over and over, the usual suspects are:
- Wiring is on the wrong GPIO. Double-check the pin number, not the silkscreen.
- The pull-up resistor is missing (bare sensor, no breakout).
- The data pin is one of the boot-strapping pins (e.g. GPIO 0, GPIO 2).
- The Serial Monitor baud rate is wrong.
Where to go from here
This is the foundation. Once you have the reading, the next steps are usually one of:
- Push it to MQTT or a Google Sheet.
- Show it on a small OLED display.
- Log it to an SD card and graph it later.
The MQTT version is in the book IoT with ESP32 (linked from the books page). The OLED version is one of the next tutorials on this site.
What to build next
- The BME280 tutorial is the I2C upgrade when accuracy matters.
- The OLED tutorial displays the readings.
- The book IoT with ESP32 bundles the sensor tutorials.