Arduino: drive a 28BYJ-48 stepper motor with a ULN2003 driver
Wire a small stepper motor to an Arduino using the ULN2003 driver board. Precise position control without the expensive hardware.
The 28BYJ-48 is the stepper motor I use when I want precise position control and I do not need a lot of torque. It is cheap (about $2), it comes with a ULN2003 driver board, and it is the right call for “I need to move this thing to a specific angle, slowly.”
This tutorial covers the wiring, the basic stepping code, and the slow-part- of-this-motor-is-X caveat that makes the 28BYJ-48 a learning tool, not a production motor.
What you need
- Arduino (Uno, Nano, etc.)
- 28BYJ-48 stepper motor
- ULN2003 driver board (comes with the motor in most kits)
- 5 jumper wires
- External 5V power supply (recommended)
Wiring
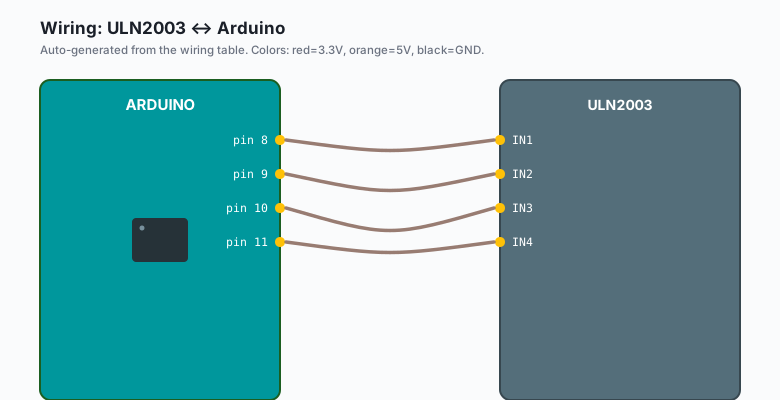
The ULN2003 has 4 input pins (IN1-IN4) and 4 output pins (OUT1-OUT4) plus power:
ULN2003 IN1 -- Arduino pin 8
ULN2003 IN2 -- Arduino pin 9
ULN2003 IN3 -- Arduino pin 10
ULN2003 IN4 -- Arduino pin 11
ULN2003 GND -- Arduino GND (and external supply GND)
ULN2003 VCC -- External 5V+ (recommended) OR Arduino 5V (small motors only)
The motor plugs into the ULN2003’s white connector. There is only one way to plug it in, so you cannot get this wrong.
The 28BYJ-48 draws about 200 mA when stepping. The Arduino’s 5V pin can supply that, but if you are doing anything else on the Arduino at the same time, the voltage can sag and the Arduino can reset. Use an external 5V supply and connect the grounds together.
Install library
Sketch >> Include Library >> Manage Library >> search Stepper (the
built-in Arduino library). No install needed; it ships with the IDE.
The code
Arduino (Uno, Nano, Mega)
#include <Stepper.h>

const int stepsPerRevolution = 2048;   // 28BYJ-48 in half-step mode
Stepper myStepper(stepsPerRevolution, 8, 10, 9, 11);
//                  ^                ^  ^   ^   ^
//                  steps            IN1 IN3 IN2 IN4
//                                   (note the pin order!)

void setup() {
  myStepper.setSpeed(10);   // RPM
}

void loop() {
  myStepper.step(stepsPerRevolution);    // one full turn clockwise
  delay(1000);
  myStepper.step(-stepsPerRevolution);   // one full turn counter-clockwise
  delay(1000);
}
Upload it. The motor should turn one full revolution, pause, then turn the other way.
ESP32 (Arduino)
#include <Stepper.h>

const int stepsPerRevolution = 2048;
Stepper myStepper(stepsPerRevolution, 16, 17, 18, 19);
//                  ^                  ^   ^   ^   ^
//                  steps              IN1 IN3 IN2 IN4

void setup() {
  myStepper.setSpeed(10);
}

void loop() {
  myStepper.step(stepsPerRevolution);
  delay(1000);
  myStepper.step(-stepsPerRevolution);
  delay(1000);
}
Same library, same code. Just pick four GPIO pins on the ESP32 that are not boot-strapping pins (avoid 0, 2, 5, 12, 15). Pins 16, 17, 18, 19 are fine.
MicroPython (ESP32 or Pico)
from machine import Pin
import time

IN1 = Pin(16, Pin.OUT)   # ESP32: GPIO 16. Pico: GP16.
IN2 = Pin(17, Pin.OUT)
IN3 = Pin(18, Pin.OUT)
IN4 = Pin(19, Pin.OUT)

# Full-step sequence (energize one coil at a time)
sequence = [
    (1, 0, 0, 0),
    (0, 1, 0, 0),
    (0, 0, 1, 0),
    (0, 0, 0, 1),
]

coils = [IN1, IN2, IN3, IN4]
STEP_DELAY_MS = 5   # 28BYJ-48 at 10 RPM: 60s / 2048 / 2 ~= 15 ms

def step():
    for pattern in sequence:
        for coil, val in zip(coils, pattern):
            coil.value(val)
        time.sleep_ms(STEP_DELAY_MS)

for i in range(2048):
    step()             # one full turn clockwise
time.sleep(1)
for i in range(2048):
    step()             # and the other way
MicroPython is fast enough to drive the 28BYJ-48 with bit-banged output. The Pico’s PIO can do this in hardware if you need the CPU for something else.
Raspberry Pi Python
The Raspberry Pi runs Linux, which is not a real-time OS. For an occasional stepper move (e.g. rotating a display), software timing is fine. For position-critical work, an external stepper driver that takes STEP/DIR pulses (like the A4988) is the better pick.
pip3 install RPi.GPIOimport RPi.GPIO as GPIO
from time import sleep
IN1, IN2, IN3, IN4 = 17, 18, 27, 22
sequence = [
(1, 0, 0, 0),
(0, 1, 0, 0),
(0, 0, 1, 0),
(0, 0, 0, 1),
]
GPIO.setmode(GPIO.BCM)
for pin in (IN1, IN2, IN3, IN4):
GPIO.setup(pin, GPIO.OUT)
coils = [IN1, IN2, IN3, IN4]
STEP_DELAY = 0.01 # 10 ms between steps
def step():
for pattern in sequence:
for coil, val in zip(coils, pattern):
GPIO.output(coil, val)
sleep(STEP_DELAY)
for _ in range(2048):
step()
sleep(1)
for _ in range(2048):
step()
GPIO.cleanup()Same wiring as the Arduino version: each IN pin to a Pi GPIO. The Pi can drive the 28BYJ-48 fine; if you find steps are getting dropped, slow the step interval down. For anything that needs precise position control under load, an external driver (DRV8825, TMC2209) is the right move.
Note the pin order in the constructor:
8, 10, 9, 11, not8, 9, 10, 11. This is a quirk of theStepper.hlibrary: the second and third pins are swapped to match the 28BYJ-48’s internal coil order.
Half-step mode vs. full-step mode
The 28BYJ-48 has a 1:64 gear reduction inside. Combined with the 32 steps per revolution of the actual motor, you get 2048 steps per revolution at the output shaft.
stepsPerRevolution = 2048 is half-step mode (smoother, more torque, slower).
stepsPerRevolution = 1024 is full-step mode (less smooth, less torque,
faster). Use 2048 unless you have a reason.
Speed
setSpeed(10) sets 10 RPM. The 28BYJ-48’s max usable speed is about 15-20
RPM. Above that, it starts missing steps (you tell it to move 100 steps but
it only moves 90).
For “I want to position something precisely,” slow is fine. For “I want to spin this fast,” you want a different motor (e.g. a NEMA 17 with a A4988 driver).
Position control
Track the current position in a variable and step relative to it:
int currentPos = 0;

void moveTo(int target) {
  int delta = target - currentPos;
  myStepper.step(delta);
  currentPos = target;
}

void loop() {
  moveTo(0);     delay(1000);
  moveTo(512);   delay(1000);   // quarter turn
  moveTo(1024);  delay(1000);   // half turn
  moveTo(2048);  delay(1000);   // full turn
}
This is the foundation for “rotate the dial to 90 degrees” or “open the valve to half.”
When to use a 28BYJ-48 vs. a NEMA 17
- 28BYJ-48: cheap, low torque (~0.3 kg-cm), slow, geared. Best for small projects where the load is light (e.g. a small dial, a camera slider).
- NEMA 17: more expensive, high torque (~4 kg-cm), fast, not geared. Best for 3D printers, CNC machines, anything that needs real power.
If you find yourself saying “the 28BYJ-48 keeps missing steps” or “it’s too slow,” you want a NEMA 17 with an A4988 or TMC2209 driver.
When the motor just hums but does not turn
- The pin order is wrong. Swap the order in the constructor.
- The motor is under-powered. Use an external 5V supply.
- The speed is set too high. Drop
setSpeedto 5 and try again.
What to build next
- A camera slider that pans back and forth.
- A “rotating display stand” for a 3D-printed model.
- A 4-wire stepper-driven valve controller.
The camera slider version is one of the next tutorials on this site. The valve controller is in the book Arduino Home Automation.