Arduino: read temperature with a DS18B20 one-wire sensor
Wire a DS18B20 temperature sensor to an Arduino using the OneWire protocol. Multiple sensors on one pin, accurate to 0.5C.
The DS18B20 is the temperature sensor I reach for when accuracy matters. It is a “one-wire” sensor, which means you can put multiple DS18B20s on the same single Arduino pin and read each one individually.
This tutorial gets you from a fresh DS18B20 to a reading on the Serial Monitor in about 25 minutes, then shows you how to add more sensors on the same wire.
What you need
- Arduino (Uno, Nano, etc.)
- DS18B20 (the bare TO-92 package, or the waterproof stainless steel probe)
- 4.7k resistor (for the pull-up)
- Jumper wires
The waterproof version comes pre-wired with red (VCC), black (GND), and yellow (data). It is about $3 and is great for outdoor projects.
Wiring
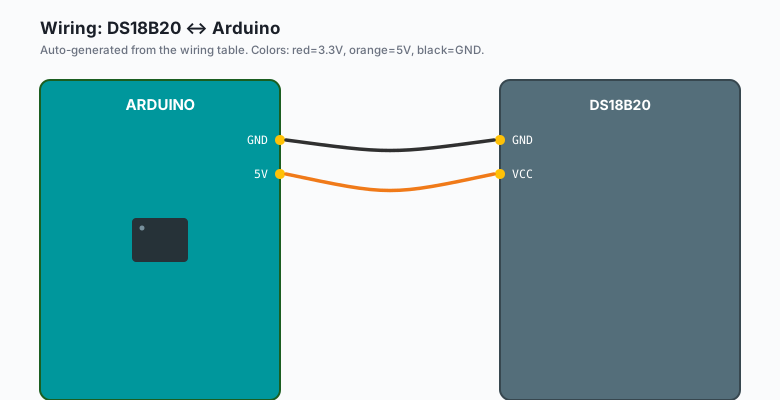
DS18B20 GND -- Arduino GND
DS18B20 DATA -- Arduino pin 2 --[ 4.7k pull-up ]-- Arduino 5V
DS18B20 VCC -- Arduino 5V
That pull-up resistor is mandatory. Without it, the one-wire bus does not work.
For multiple DS18B20s on the same pin, just connect all the data lines to the same Arduino pin. Each DS18B20 has a unique 64-bit address burned into it, so the Arduino can tell them apart.
Install libraries
In the Arduino IDE:
Sketch>>Include Library>>Manage Libraries>> searchOneWireby Paul Stoffregen. Install.- Also install
DallasTemperatureby Miles Burton. Install.
The code
Arduino (Uno, Nano, Mega)
#include <OneWire.h>
#include <DallasTemperature.h>

#define ONE_WIRE_BUS 2

OneWire oneWire(ONE_WIRE_BUS);
DallasTemperature sensors(&oneWire);

void setup() {
  Serial.begin(9600);
  sensors.begin();
}

void loop() {
  sensors.requestTemperatures();
  float tempC = sensors.getTempCByIndex(0);
  Serial.print("Temperature: ");
  Serial.print(tempC);
  Serial.println(" C");
  delay(2000);
}
Upload it. Open Serial Monitor. You should see the temperature.
ESP32 (Arduino)
#include <OneWire.h>
#include <DallasTemperature.h>

#define ONE_WIRE_BUS 4   // any GPIO; pin 4 avoids the boot-strapping pins

OneWire oneWire(ONE_WIRE_BUS);
DallasTemperature sensors(&oneWire);

void setup() {
  Serial.begin(115200);
  sensors.begin();
}

void loop() {
  sensors.requestTemperatures();
  float tempC = sensors.getTempCByIndex(0);
  Serial.print("Temperature: ");
  Serial.print(tempC);
  Serial.println(" C");
  delay(2000);
}
Same libraries, same code. The ESP32 version uses 115200 baud over its USB-serial bridge and a different GPIO pin (the Uno’s pin 2 is not an GPIO on the ESP32; pick any other pin).
MicroPython (ESP32 or Pico)
from machine import Pin
import onewire, ds18x20
import time

# ESP32: GPIO 4. Pico: GP4.
ow = onewire.OneWire(Pin(4))
sensor = ds18x20.DS18X20(ow)

roms = sensor.scan()
print(f'Found {len(roms)} DS18B20 sensor(s)')

while True:
    sensor.convert_temp()
    time.sleep_ms(750)
    for rom in roms:
        t = sensor.read_temp(rom)
        print(f'Temperature: {t:.1f} C')
    time.sleep(2)
The ds18x20 driver is in micropython-lib. Install with
mip install ds18x20 on the Pico, or copy onewire.py and
ds18x20.py from the MicroPython repository into the ESP32’s /lib/.
Raspberry Pi Python
The Raspberry Pi does not have OneWire support in the kernel’s GPIO driver by default. To read a DS18B20 on the Pi:
- Enable 1-Wire on the GPIO: add
dtoverlay=w1-gpioto/boot/config.txt(or/boot/firmware/config.txton Bookworm), then reboot. - The sensor shows up at
/sys/bus/w1/devices/28-*/w1_slave.
import glob
import time

def read_ds18b20(device_path):
    with open(device_path) as f:
        lines = f.readlines()
    if lines[0].strip()[-3:] != 'YES':
        return None
    raw = lines[1].split('=', 1)[1]
    return int(raw) / 1000.0

devices = glob.glob('/sys/bus/w1/devices/28-*/w1_slave')
print(f'Found {len(devices)} DS18B20 sensor(s)')

while True:
    for path in devices:
        t = read_ds18b20(path)
        if t is not None:
            print(f'{path}: {t:.1f} C')
    time.sleep(2)
This works on any Pi with the 1-Wire overlay enabled. The kernel driver handles the timing; the Python code just reads the sysfs file.
If you see
-127.00 C, the sensor is not responding. Check the wiring, especially the 4.7k pull-up.
Reading multiple sensors
Each DS18B20 has a unique address. You can find the address of every sensor on the bus with this:
#include <OneWire.h>
#include <DallasTemperature.h>

#define ONE_WIRE_BUS 2

OneWire oneWire(ONE_WIRE_BUS);
DallasTemperature sensors(&oneWire);

DeviceAddress addresses[10];   // up to 10 sensors
int numSensors;

void setup() {
  Serial.begin(9600);
  sensors.begin();
  numSensors = sensors.getDeviceCount();
  Serial.print("Found ");
  Serial.print(numSensors);
  Serial.println(" sensors");

  for (int i = 0; i < numSensors; i++) {
    sensors.getAddress(addresses[i], i);
    Serial.print("Sensor ");
    Serial.print(i);
    Serial.print(": ");
    for (int j = 0; j < 8; j++) {
      if (addresses[i][j] < 16) Serial.print("0");
      Serial.print(addresses[i][j], HEX);
    }
    Serial.println();
  }
}

void loop() {
  sensors.requestTemperatures();
  for (int i = 0; i < numSensors; i++) {
    float tempC = sensors.getTempC(addresses[i]);
    Serial.print("Sensor ");
    Serial.print(i);
    Serial.print(": ");
    Serial.print(tempC);
    Serial.println(" C");
  }
  delay(2000);
}
Run the address-discovery sketch first. Copy the addresses into a config file. Then read by address instead of index, so the order does not matter when you swap sensors.
DeviceAddress outsideSensor = {0x28, 0xFF, 0x64, 0x1E, 0xC2, 0x00, 0x00, 0x9A};
DeviceAddress insideSensor  = {0x28, 0xFF, 0x57, 0x32, 0xC2, 0x00, 0x00, 0x4D};

void loop() {
  sensors.requestTemperatures();
  float outTemp = sensors.getTempC(outsideSensor);
  float inTemp  = sensors.getTempC(insideSensor);
  Serial.print("Outside: ");
  Serial.print(outTemp);
  Serial.print(" C  Inside: ");
  Serial.print(inTemp);
  Serial.println(" C");
  delay(2000);
}
Parasitic power mode
There is a wiring variant where the DS18B20 draws power from the data line instead of a separate VCC wire. Wire it like this:
DS18B20 GND -- Arduino GND
DS18B20 DATA -- Arduino pin 2 --[ 4.7k pull-up ]-- Arduino 5V
DS18B20 VCC -- Arduino GND   (yes, both GND and VCC to ground)
Then in code:
sensors.setWaitForConversion(false);Parasitic power is finicky for sensors on long wires. I use it for short runs (under 3 m) where saving one wire matters. For anything longer, use the normal wiring with three wires.
Why the DS18B20 is great
- Accuracy: 0.5 C from -10 to 85 C.
- Range: -55 to 125 C (with degraded accuracy outside the calibrated range).
- Resolution: configurable from 9 to 12 bits (0.5 C to 0.0625 C).
- Multiple sensors on one pin: up to about 100 sensors on a single Arduino pin if your wiring is clean.
- Wire length: up to about 100 m on a single twisted pair.
- No calibration: each DS18B20 is factory-calibrated and the calibration data is stored in ROM.
That last one is the killer feature for multi-sensor projects. No per-sensor calibration, no per-sensor offset, no per-sensor lookup table. Plug them in and they report the right number.
When to use DS18B20 vs. DHT22 vs. BME280
- DS18B20: temperature only, accurate, multiple sensors on one wire. Best for “monitor temperature in 5 places” projects.
- DHT22: temperature and humidity, slow (one reading every 2 s), cheap. Best for “one sensor, indoor, hobbyist” projects.
- BME280: temperature, humidity, pressure. I2C, fast, accurate. Best for “weather station” projects.
For outdoor projects with a long wire run, the DS18B20 is the right call every time.
What to build next
- A multi-zone home temperature monitor.
- A sous-vide controller (DS18B20 + relay + PID loop).
- A greenhouse monitor with sensors in different soil beds.
The sous-vide controller is one of the next tutorials on this site. The greenhouse version is in the book Arduino Sensors.